
Related Manuals for Danfoss MPE 70


Summary of Contents for Danfoss MPE 70
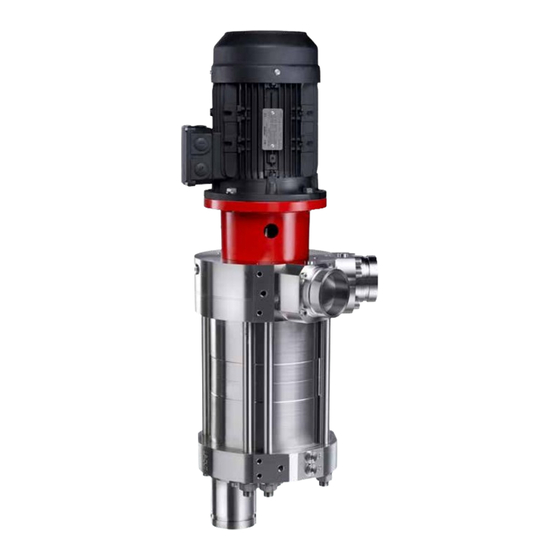
- Page 1 Operating guide Energy Recovery Device MPE 70 Installation, Operation and Maintenance Manual hpp.danfoss.com...
- Page 2 5.7 How does the MPE 70 work?........
- Page 3 7.7.2 Starting torque for the MPE 70 ....... . 18...
- Page 4 The serial number is referring to the Serial no. on the product label. The digits shown (01) indicate the version number of the pump. This document is only valid for MPE version 1 and upwards. 180R9426 | AQ367027814446en-000801 | IOM MPE 70 | 08.2022...
- Page 5 • Transporting of the MPE 70 unit. • Lifting the unit. Safety glasses required • Installing the MPE 70 unit on a frame. • Connecting the MPE 70 unit to the fluid Hearing protection required system. • Connecting the electrical motor and Safety shoes required instrumentation.
- Page 6 Operating guide | MPE 70 2.6 Additional technical documents Below documents are not present in this Operating guide. Please contact Danfoss. Document name Content Service guide: “MPE 70 Disassembling and Description of how to disassemble and as- assembling” semble the MPE 70 Detailed description about the need for Guide line: “P and ID review sheet”...
- Page 7 Operating guide |MPE 70 3. Safety 3.1 General • Improper installation can cause fatal The MPE 70 must not be used for other injuries. purposes than those recommended and • The MPE 70 must not operate outside specified without first consulting your local the application range.
- Page 8 Operating guide | MPE 70 3.2 Intended use If positive displacement pumps are used be aware they can build up The MPE 70 is designed for use as energy recovery device in Sea Water Reverse pressure exceeding the mechanical strength of the membrane vessels, Osmosis (SWRO) or Brackish Water Reverse Osmosis (BWRO) system.
- Page 9 Operating guide |MPE 70 4. Arrival inspection, 4.1 Arrival inspection handling and storage The MPE 70 is packed in a wooden box. The 4.3 Transport and Handling MPE 70 ports connector are protected by plastic caps that protect the MPE 70 against •...
- Page 10 Lifting the MPE 70 with electric motor electric motor and lifted horizontal it must (vertical): be lifted in the lifting eye on the MPE 70. Lift the MPE 70 unit with suitable lifting eyes mounted in the flange as shown on the pic- Some motors have specific lifting eyes - ture.
- Page 11 The structural noise may affect the noise level from the MPE 70 system. The sound level is therefor only given for the MPE 70 in- cluding the MPE 70 motor. The Sound pres- sure level can be found in data sheet MPE 70 Pressurre exchanger in appendix 11.1.Struc-...
- Page 12 Operating guide | MPE 70 5.3 Materials 5.5 Dimensions and weights All critical parts of the MPE 70 are made of For dimensions and weights please refer to super-duplex 1.4410/UN S32750/1.4462/ the MPE 70 data sheet. See appendix 11.1. UN S32205/S31803 or the like.
- Page 13 Operating guide |MPE 70 5.7 How does the MPE 70 work? The MPE 70 rotor is rotated by an electric motor. The rotor spins between two end The figure below shows the princip in the covers. MPE 70. Pressure energy is transferred directly from...
- Page 14 MPE 70. Inadequate how to select the right filter. pre-flushing will strongly affect the life of the MPE 70 and may lead to its eventual breakdown. It is essential that the water used for the final pre-flush is pre-filtered to a level described in chapter 6.8.
- Page 15 Booster pumps have been stabilized and all the air have been removed, the bleed valves can be closed and the MPE 70 will be started through control loop no. 4. During this the the system bleed valves remain open until system have been bled.
- Page 16 A true graded density must be pre-filtered to the level described in melt-blown depth filter cartridge is recom- chapter 6.8. All parts of the MPE 70 must be mended. Poor pre-filtration of the feed flushed, i.e. LP- and HP flow channels.
- Page 17 MPE 70. 7.5 Piping and joints Hard piping to the MPE 70 must be properly aligned to avoid stress on the MPE 70 port con- nections. Don’t use the MPE 70 as a strain for hard piping.
- Page 18 A special attention should label. be taken when dimensioning the Frequency drive for the MPE 70. The drive must be able to provide start current enough for the mo- Type MPE 70 tor to start.
- Page 19 8. Commissioning, 8.1 Safety regulations 8.3 Commissioning start-up and shutdown Before starting up the MPE 70 and the high- The MPE 70 has a transit screw installed that pressure pump, make sure the following must be removed before startup. Instruc-...
- Page 20 9.3 Maintenance schedule Re-check bolts in all pipe con- The schedule of preventive maintenance nections/couplings and tighten below will help ensure that the MPE 70 pro- the bolts to specified torque if vides years of trouble-free performance. necessary. Note and compare the operating One day after commissioning: current at the VFD.
- Page 21 Danfoss service and maintenance, see appendix 11.5. High Pressure Pumps. Se below table. For detailed information see parts list for MPE 70 in appendix 11.4. 180R9426 | AQ367027814446en-000801 | IOM MPE 70 | 08.2022...
- Page 22 Mixing in the MPE 70 is too high Check flow on LP-in (12)adjust it with the flow in pos. (29) Flow out of the MPE 70 is too low and causes a Check the flowmeter pos (29) and adjust recovery rate that is too high...
- Page 23 Appendices Energy Recovery Device MPE 70 Installation, Operation and Maintenance Manual hpp.danfoss.com...
- Page 24 11.3 Design guide Pipe connections (180R9367) ......51 11.4 MPE 70 part list (AX361839752024en-000301)..... . .53 11.5 Operating- and maintenance instruction, electric motor (180R9230) .
- Page 25 Data sheet Energy Recovery Device MPE 70 hpp.danfoss.com...
- Page 26 MPE 70 without electric motor ............36 MPE 70 with IE3 motor 2.2 kW on base frame vertical - front mounted ....37 Accessories .
- Page 27 MPE 70 is designed for use with low All parts included in the MPE 70 are designed to viscosity and corrosive fluid such as sea water. provide long service life with a constant high effi- ciency and minimum service required.
- Page 28 36-104 0-50 0-50 Ambient temperature 32-122 32-122 Filtration requirements (nominal) 5 μm melt blown Salinity increase at membrane at 40% recovery 2 - 3% 2 - 3% rate at balanced flow 180R9426 | AQ367027814446en-000801 | IOM MPE 70 | 08.2022...
- Page 29 Must be able to operate at constant torque over the whole range of speeds. Must be able to deliver start current of 23.5 A. For a Danfoss FC 51 micro drive a 7.5 kW drive is required to deliver this current. If other drives are used make sure it can provide the start current required.
- Page 30 Data sheet | MPE 70 Energy recovery device Performance curves 5.1 MPE flow curves The diagram below shows the minimum speed The MPE 70 is delivered with a 3.1 performance needed for the required flow. certificate according to EN10204. For detailed overview please use the MPE selection tool.
- Page 31 The curve below shows the mixing during operation. Flush rate of 0 is when LP-in flow equals HP-out (Balanced flow). Volumetric mixing versus flushing 14,0 12,0 10,0 Flush ratio (larger than 0 means overflush) [%] 180R9426 | AQ367027814446en-000801 | IOM MPE 70 | 08.2022...
- Page 32 NaCl concentration and temperature. All critical parts of the MPE 70 is made of Super Duplex 1.4410/UNS 32 750 or Duplex 1.4462/UNS 32803. 80 º...
- Page 33 High quality water extends the service life of the hard piping. Danfoss recommends to follow whole system. Water to the MPE 70 must be filtered to 5 μm the Guideline 180R9367 - Pipe connection. nominal, using melt-blown depth filter with a Design Configuration for Manifolds proven efficiency of min.
- Page 34 The max. and min. inlet pressure must be controlled according to specifications in Install a VFD to control the speed of the datasheet for MPE 70. MPE 70. The speed is defined by HP flow given by the flowmeter (29.) C. Piping: H. Membrane cleaning...
- Page 35 In case the Danfoss check valves are not used, the valve must be placed between pump and check valve (See 180R9371, Design Guide Pressure safety valve in seawater RO sytem for more details). 180R9426 | AQ367027814446en-000801 | IOM MPE 70 | 08.2022...
- Page 36 Data sheet | MPE 70 Energy recovery device Dimensions and 8.1 MPE 70 without electric motor connections 180R9426 | AQ367027814446en-000801 | IOM MPE 70 | 08.2022...
- Page 37 Data sheet | MPE 70 Energy recovery device 8.2 MPE 70 with IE3 motor 2.2 kW on base frame vertical - front mounted 180R9426 | AQ367027814446en-000801 | IOM MPE 70 | 08.2022...
- Page 38 Code no. MPE 70 coupling kit 180Z4110 MPE 70 coupling 180Z4106 Bracket for 1 MPE 70 180Z4107 2 m rail without bracket 180Z4108 Electrical motor IEC112M 2.2 kW 6 pole 180Z4109 AI366651348409en-000501 | 38 © Danfoss | DCS (IM) | 2022.06...
- Page 39 Instruction Instruction APP pump instruction Energy recovery device APP 0 6-1 0, APP 1 5-2 5 and MPE 70 Installation instructions APP 3 0-3 5 ro-solutions com hpp.danfoss.com...
- Page 40 Connecting the MPE 70 to the manifolds........
- Page 41 To prevent cold welding, Danfoss recommend to system. use thread lubricant for all screw threads for installing the MPE 70 (here after only referred to as lubricate) and first tighten the screws by hand. 1.5 Additional technical document For below Design guide, please contact Danfoss High Pressure Pumps.
- Page 42 Do not use one sling 3.1 Use of lifting eye The M12 lifting eyes supplied with the MPE 70 are For inclined lift use the lifting eyes from the tool to be used for straight lift only.
- Page 43 Instruction | MPE 70 energy recovery device Horizontal lift Vertical lifting To protect the connectors during lifting place the Keep plastic caps on until MPE 70 is installed to MPE 70 with plastic caps on the connectors on a the base frame. wooden board.
- Page 44 The motor can be installed either before or after The MPE 70 is connected to the electric motor by the MPE unit is placed on the rail. If it is not the bell housing and a flexible coupling. See installed on the rail, the MPE 70 is positioned section 2.
- Page 45 1. Check that the dust cap is placed on the MPE 6. Verify the measurement and secure the coup- 70 shaft. Mount the coupling for the MPE 70 ling with the right torque on the set screw. on the shaft all the way down to the dust cap Mount the elastic gear ring and mount the and press down for tight contact.
- Page 46 The MPE 70 is built for vertical installation. The electric motor must be placed above the MPE 70. The MPE 70 is connected to the electric motor by the bell housing. The motor can be rotated in any direction for...
- Page 47 8 x M10 bolts – in plastic bag 2 x height adjustment screws mounted to the bracket 2 x safety screws – in plastic bag 2 x M10 nuts 10 x washers – in plastic bag 180R9426 | AQ367027814446en-000801 | IOM MPE 70 | 08.2022...
- Page 48 To allow for inaccuracies in the manifolds and to ensure an easy installation we recommend mounting a spool piece with a minimum length of 80 mm on the HP-out connection. 180R9426 | AQ367027814446en-000801 | IOM MPE 70 | 08.2022...
- Page 49 Instruction | MPE 70 energy recovery device Installing and The bracket is attached to the MPE 70 unit by alignment four x M10 bolts each side, positioned in the center of the sleeve, for later adjustments. Tighten the bolts - see section 6.2.
- Page 50 Remove transit screw Install plug (from plastic bag). Tighten with 30Nm. 10. Grounding To limit/prevent galvanic corrosion, MPE 70 skid should be properly grounded. Grounding All parts in the system must be electrical potential equalized to a single reference point (grounding point).
- Page 51 0 mm 2° or 36 51150 4” 0 mm 3° - 12´ or 56 84500 6” 0 mm 2° - 24´ or 36 184000 © Danfoss | DHS (im) | 2022.08 180R9426 | AQ367027814446en-000801 | IOM MPE 70 | 51...
- Page 52 This must be considered when determinate rotational movement at each joint, to accommo- hanger and support bracing. See Reference date expansion, contraction, settling, Victaulic – Design Data 26.01. © Danfoss | DHS (im) | 2020.10 180R9367 | AJ182686502974en-000301 | 52...
- Page 53 Parts list Energy recovery device MPE 70 hpp.danfoss.com...
- Page 54 Exploded view MPE 70 ........
- Page 55 Shaft seal ø18 NBR/hasteloy O-ring 9,25 x 1,78 Key 5 x 5 x 20 AISI 316 Pin ø6x15 AISI 316 Valve plate, refurbished Super Dublex Instruction 180R9426 | AQ367027814446en-000801 | IOM MPE 70 | 55 © Danfoss | DCS (im) | 2022.08...
- Page 56 Parts list | MPE 70 Exploded view MPE 70 56 | © Danfoss | DCS (im) | 2022.08 180R9426 | AQ367027814446en-000801 | IOM MPE 70...
- Page 57 Screw M8x50 Tool for backup ring Tool for valve plate Tool for shaft seal Calibration tool Feet M10 x25 (feet) Washers Ø12.6 for feet 180R9426 | AQ367027814446en-000801 | IOM MPE 70 | 57 © Danfoss | DCS (im) | 2022.08...
- Page 58 © Danfoss | DCS (im) | 2022.08 AX367028596447en-000301 | 58...
- Page 59 Electric Motors Motor Manual hoyermotors.com M a n u a l...
- Page 60 Inspect the motor at regular intervals, keep it clean and doubled supply frequency. ensure free ventilation air flow, check the condition of shaft Only mount or remove drive components (pulley, coupling, seals and replace if necessary. Both electrical and mechanical 180R9426 | AQ367027814446en-000801 | IOM MPE 70 | 08.2022...
- Page 61 At 60Hz the time will be reduced by app. 20%. Maintenance, repairs and replacement on this type must Data for vertically mounted motors are half of the above only be carried out by qualified specialists. values. 180R9426 | AQ367027814446en-000801 | IOM MPE 70 | 08.2022...
- Page 62 Connection diagram Anschlußdiagram Anslutningdiagramm Forbindelsesdiagram Aansluitdiagram Connection Conexión Collegamento Schemat polacsen 180R9426 | AQ367027814446en-000801 | IOM MPE 70 | 08.2022...
- Page 63 180R9426 | AQ367027814446en-000801 | IOM MPE 70 | 08.2022...
- Page 64 180R9426 | AQ367027814446en-000801 | IOM MPE 70 | 64 © Danfoss | DCS (DHS) | 2022.08...
Need help?
Do you have a question about the MPE 70 and is the answer not in the manual?
Questions and answers