
Related Manuals for Deponti Pigato


Summary of Contents for Deponti Pigato
- Page 1 User manual / Assembly instructions Deponti Veranda Type Pigato Version: EN – April 2022 www.deponti.com...
-
Page 2: Table Of Contents
We also refer you to our General Terms and Conditions of Sale and Delivery which are available on request. Deponti B.V. accepts no liability for any damage or injury resulting from a failure to carefully follow the instructions in this manual or exercise due caution during transport, assembly, use and maintenance of the Veranda. -
Page 3: Introduction
Before you can start enjoying your Veranda it must be assembled properly. This manual provides clear instructions for all the steps you must complete for correct assembly of your Deponti Veranda. We recommend that you take the time to read the entire manual before you begin assembly. - Page 4 Dispose of the product in accordance with local laws and regulations. • Deponti B.V. accepts no liability for damage or injury caused by failure to strictly follow the safety regulations and instructions in this manual or exercise due caution during assembly, use and maintenance of the product and any related accessories.
-
Page 5: Product Description
The Deponti Pigato veranda is available as standard in widths of 4060, 5060, 6060 or 7060 as a single section; there is no limit to the number of sections that can be joined end to end. -
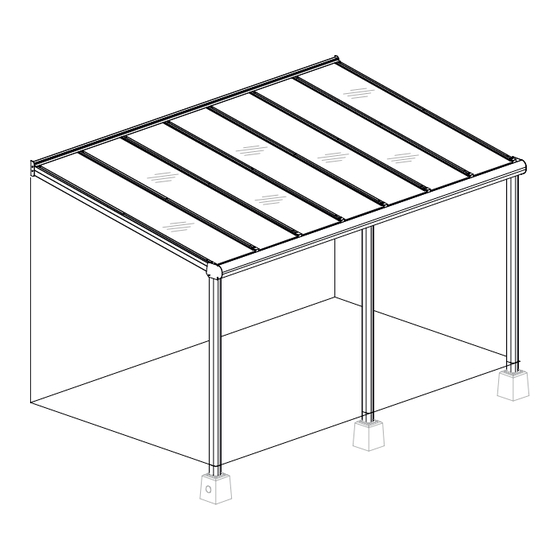
Page 6: Parts Overview
4.1 Exploded view 4.2 Delivery Inspection The veranda shown in this manual is a 5x3 metre Pigato with the posts on concrete bases. This merely serves as an example. The type and number of components supplied depends on your order. -
Page 7: Parts List
18. Sheet stopper 12. End rafter 16. End cover strip 1x sealing rubber 1x sealing rubber 17. Top cover strip 13. Middle rafter 18. Sheet stopper 2x sealing rubber 2x sealing rubber Assembly Manual – Pigato Veranda www.deponti.com page 7... - Page 8 1x hole saw 60 mm 1x coloured 1x sealant gun sealant 08. Foundation block 03. Gutter extension Hex bolt M8x40 Foundation with rainwater (Option) Washer block discharge (Option at foundation (Option) (Option) block) Assembly Manual – Pigato Veranda www.deponti.com page 8...
-
Page 9: Preparation For Assembly
Dimensions & slope • This Deponti roof should be installed with a slope of 15,7 cm per metre. The height of the wall profile and the passage height (distance from bottom of gutter to the ground) are completely dependent on each other and determined by this slope. - Page 10 Warranty is void if the Pigato veranda is not assembled and installed in accordance with the instructions.
-
Page 11: Inspection Of Tools And Accessories
5.2 Inspection of tools and accessories Assembly Manual – Pigato Veranda www.deponti.com page 11... -
Page 12: Measuring & Determining Dimensions
5.3 Measuring & determining dimensions The Deponti veranda is available in a large range of sizes. Moreover, the roof has a modular design and can be quickly and easily made to size. However, please note that our current and future modular options are based on standard sizes. -
Page 13: Height Adjustments
5.3.1 Height adjustments A Deponti veranda is designed for a slope of 12 cm per metre. All the static strength calculations, as well as all sizes and dimensions in this manual, are based on this. The height of the wall profile and the passage height (distance from bottom of gutter to the ground) are completely dependent on each other and determined by this slope. -
Page 14: Joining Verandas
5.4 Joining verandas There is no limit to the width in which the Deponti verandas can be delivered. This is because the verandas can be joined end to end. In this case the gutter profile, wall profile and decorative profile are supplied in multiple lengths of 4060, 5060 or 6060 mm. - Page 15 Apply sealant on the assembly so it is smooth and waterproof! Assembly Manual – Pigato Veranda www.deponti.com page 15...
-
Page 16: Assembly
Place the wall profile on the line and then mark the holes that you pre-drilled in your wall profile. 3. Now use a concrete drill bit with a diameter of 8 mm to drill the holes. Make sure the wall profile is level. Ø8 mm Assembly Manual – Pigato Veranda www.deponti.com page 16... - Page 17 6. Apply sealant on the top edge of the wall profile (between the wall and the wall profile) to make a good seal. Strike off the sealant to make it smooth and waterproof. cleaner Assembly Manual – Pigato Veranda www.deponti.com page 17...
-
Page 18: Pre-Installing The Gutter
4. Place the leaf catcher in the hole in the gutter (with the cut side towards the side of the gutter profile with the open chambers). Apply sealant to form a waterproof seal around the leaf catcher. Assembly Manual – Pigato Veranda www.deponti.com... -
Page 19: Attaching The Decorative Profile To The Gutter
2. Secure the decorative profile with the supplied short 19 mm stainless steel screws. Begin approximately 5 cm from the end and place a screw approximately every 50 cm. The last screw should be placed approximately 5 cm from the end. 50 cm 5 cm Assembly Manual – Pigato Veranda www.deponti.com page 19... -
Page 20: Installing The Steel Strip In The Gutter
The gutter is fitted with a 20x100 mm steel strip to hold the glass. 1. Place the gutter flat and firm on a table or sawhorses. 2. Slide the steel strip into the gutter. Use a lubricant. Assembly Manual – Pigato Veranda www.deponti.com page 20... -
Page 21: Installing Posts, Gutter And End Beams
Make sure that the concrete bases are positioned perfectly square. Connect the drain to the side outlet of the rainwater discharge concrete base. ½B-55 mm ½B-55 mm D+55 mm 100 mm D+55 mm 100 mm Optie Assembly Manual – Pigato Veranda www.deponti.com page 21... - Page 22 M8x40 hex bolts (incl. washers). Make sure the post is level. 3. Place the other posts on the concrete bases and secure them so they are plumb. 1/2 B-55mm 1/2 B-55mm Min. 100 mm Assembly Manual – Pigato Veranda www.deponti.com page 22...
-
Page 23: Installing The Gutter
PVC pipe in one of the posts! 3. Screw 2 screws down from the gutter into the screw channels of the uprights. By doing this the gutter is pulled on the posts. Assembly Manual – Pigato Veranda www.deponti.com page 23... -
Page 24: Installing The End Beams
2. Place the left and right end beams in both the gutter profile and the wall profile, one by one. Make sure that the outer edges of the end beams are flush with the ends of the gutter profile and wall profile. Assembly Manual – Pigato Veranda www.deponti.com page 24... - Page 25 Screw the end beams to both the gutter profile and wall profile from the top with one short screw per end. Make sure the roof is completely square. Secure the end beams with the second screw. Assembly Manual – Pigato Veranda www.deponti.com...
-
Page 26: Installing The Middle Beams
6.4 Installing the middle beams Note: if you install Deponti LED lighting, we recommend performing the installation before placing the middle beams. If you do not shorten the width of your veranda, you can use the trim elements for the gutter as spacers between the beams. - Page 27 NOTE: see table on page 14 for the correct dimensions. 5. Screw the middle beams to both the gutter profile and wall profile with two short screws. 654mm 654mm 654mm 654mm 654mm 654mm Assembly Manual – Pigato Veranda www.deponti.com page 27...
- Page 28 Note: if Deponti LED lighting is installed, make sure all the cabling is properly positioned and connected before the inside trim covers are fitted. We recommend placing the transformer behind a trim click strip so it will be easily accessible for future service.
-
Page 29: Installing The Glass Panels
(use a rubber mallet). 4. Now screw the end cover strip to three points on the end beam with long stainless steel screws (1 top – 1 bottom – 1 middle). Assembly Manual – Pigato Veranda www.deponti.com page 29... - Page 30 Once the strip is positioned correctly, click the trim click strip into the middle beam (use a rubber mallet). 8. Now screw the middle cover strip to three points on the middle beam with long stainless steel screws (1 top – 1 bottom – 1 middle). Assembly Manual – Pigato Veranda www.deponti.com page 30...
- Page 31 9. Repeat steps 1 to 4 on pages 29 & 30 for installation of the other cover strips. 10. Now screw a sheet stopper at the gutter end of each middle beam to ensure secure attachment. Note: securing the end cover strips comes later. Assembly Manual – Pigato Veranda www.deponti.com page 31...
-
Page 32: Finishing
1. Position the rubber strip in the wall profile properly so it covers the sheets and cover strips. 2. Carefully cut the rubber strip to size at both ends. Silicon spray 3. Screw the wall profile side cover onto wall profile with two short screws. Assembly Manual – Pigato Veranda www.deponti.com page 32... - Page 33 5. Carefully screw the decorative profile side cover to the gutter profile and the decorative profile with the short screws in the guides provided for this purpose. 6. Apply sealant the inside of the gutter so it is waterproof. Assembly Manual – Pigato Veranda www.deponti.com page 33...
- Page 34 7. Now attach the sheet stoppers to the cover strips of the end beams with the short screws. 8. Remove the remaining protective film from the aluminium parts. Assembly Manual – Pigato Veranda www.deponti.com page 34...
- Page 35 9. Secure your posts with the second short screw. 10. If there is a small gap between the top of the posts and the gutter you can seal it with sealant. 11. Congratulations! The roof is now finished! Assembly Manual – Pigato Veranda www.deponti.com page 35...
-
Page 36: Maintenance
Warranty in accordance with the warranty conditions and Deponti’s general terms and conditions. These can be found on the website www.deponti.com. 10. Contact IMPORTANT: Your Deponti partner is your first point of contact for questions and comments. Assembly Manual – Pigato Veranda www.deponti.com...
Need help?
Do you have a question about the Pigato and is the answer not in the manual?
Questions and answers