Table of Contents
Advertisement
Quick Links
Advertisement
Table of Contents

Related Manuals for Idex Wright Flow Technologies RTPe Series


Summary of Contents for Idex Wright Flow Technologies RTPe Series
- Page 1 NSTALLATION PERATION AINTENANCE ANUAL ANGE OF UMPS...
-
Page 2: Table Of Contents
INSTALLATION, OPERATION AND MAINTENANCE MANUAL FOR RTPe ROTARY LOBE PUMPS. SAFETY INFORMATION. ISK ASSESSMENT RELATING TO THE USE OF RIGHT ECHNOLOGIES IMITED ROTARY LOBE PUMPS INTRODUCTION. ENERAL RIGHT ECHNOLOGIES IMITED ISTRIBUTORS ECEIPT AND TORAGE LEANING ODEL ESIGNATION 2.5.1 ATEX I NFORMATION GENERAL. - Page 3 SPECIFICATIONS. LEARANCE HART & T ASTENERS ORQUE ETTINGS UBRICANTS – B (1” F 5.5.1 20 F OUNDATION IMENSIONS ASIC ETRIC EMALE RIVE – B (1” F 5.5.2 20 F OUNDATION IMENSIONS ASIC EMALE RIVE (RTP 20 S YPICAL ASIC UILD HOWN ROUBLE HOOTING...
-
Page 4: Safety Information
Safety Information. INCORRECT INSTALLATION, OPERATION, OR MAINTENANCE OF EQUIPMENT MAY CAUSE SEVERE PERSONAL INJURY OR DEATH AND/OR EQUIPMENT DAMAGE THAT MAY INVALIDATE THE WARRANTY. THIS INFORMATION MUST BE READ FULLY BEFORE BEGINNING INSTALLATION, OPERATION, OR MAINTENANCE AND MUST BE KEPT WITH THE PUMP. - Page 5 The mounting of the pump or pump unit should be solid and stable. Pump orientation must be considered in relation to drainage requirements. Once mounted, shaft drive elements must be checked for correct alignment. Rotate pump shaft by at least one full revolution to ensure smoothness of operation. Incorrect alignment will produce excessive loading, create high temperatures and increased noise emissions.
- Page 6 DO NOT attempt any maintenance or disassembly of the pump or pump unit without first ensuring that: The pump is fully isolated from the power source (electric, hydraulic, pneumatic). The pumping chamber, pneumatic relief valve and any shaft seal support system are depressurised and purged. Any temperature control devices (jackets, heat-tracing, etc.) are fully isolated, that they are depressurised and purged, and components are allowed to reach a safe handling temperature.
-
Page 7: Risk Assessment Relating To The Use Of Wright Flow Technologies Limited Rtp Etm
Risk assessment relating to the use of Wright Flow Technologies Limited RTPe rotary lobe pumps. Note:- For a feature to be suitable for an application, The feature must be fit for its designated purpose and also suitable for the environment where it is to be installed. Page | 6... -
Page 8: Introduction
Introduction. General. RTPe rotary lobe pump is manufactured by Wright Flow Technologies Limited a unit of the IDEX Corporation. This manual includes all the necessary information for RTPe pumps and should be read prior to beginning installation, operation and maintenance. -
Page 9: Cleaning
Cleaning. The RTPe pump series is suitable for both manual cleaning and CIP (Cleaning In Place), refer to section 3.3.2. The strategic positioning of the product seals, combined with their ease of access provides an arrangement that can be more effectively cleaned by both manual and CIP procedures. -
Page 10: Atex Information
2.5.1 ATEX Information ATEX Pump Requirements Mechanical seals are a source of heat and must never be allowed to run dry. We would recommend provision be made to ensure that there is always flow or fluid around the pump seals. If there is a risk of the supply being interrupted, then a temperature monitoring system must be applied to ensure the pump does not exceed the Atex rating. - Page 11 The Atex rating is displayed on the pump nameplate see fig 2 Fig 2 Nameplate. Pump Model and Serial Number. Should you require any information regarding your RTPe rotary lobe pump contact Wright Flow Technologies Limited or your Wright Flow Technologies Limited distributor, providing the pump model and serial number as stated on the pump nameplate, see Fig 2, which is fixed to the pump gearbox.
-
Page 12: General
General. RTPe Pumping Principle. The pumping action of the rotary lobe pump principle is generated by the contra-rotation of two pumping elements (rotors) within a chamber (rotorcase), Fig 4. The shaft assemblies comprise of, the shaft support bearings and the timing gears. -
Page 13: Rtp Etm Operating Parameters
RTPe Operating Parameters. Fig 5 Operating Parameters RTPe20 Nominal Connection Max-Diff. Maximum Theoretical Displacement Size Pressure Speed Temp Temp Imp.gal US gal / Litre/ rev inches rev/min /100 rev 100 rev 1.00 21.9 26.4 1000 The maximum pressure and speed operating parameters are given above. In practice, there may be limits due to the nature of the product to be pumped and/or design of the system in which the pump is to be installed. - Page 14 • Ventilation of the drive to prevent overheating. The exterior of the pump unit may exceed 68C (154F), Appropriate measures must be taken to warn or protect operators. The pump must not be used to support piping. All piping to and from the pump unit must be independently supported.
- Page 15 Observing the following general guidelines should ensure the best possible suction condition is created. • Suction piping is at least the same diameter as the pump connections. • The length of suction piping is kept to the absolute minimum. • The minimum number of bends, tees and pipework restrictions are used. •...
-
Page 16: Cleaning In Place
Where motor mounting options are to be installed follow the manufactures recommended guidelines. However, when installing a pump complete with base and drive the following guidelines must be observed: • The preferred drive arrangement for the RTPe pump is close coupled. •... -
Page 17: Start-Up Procedure
Start-Up Procedure. Check that all piping and associated equipment are clean and free from WARNING debris and that all pipe connections are secure and leak free. Refer to section 5.3 for lubricant capacities and grades. WARNING As standard, the pump is shipped with grease lubricant unless otherwise specified. -
Page 18: Shutdown Procedure
Ensure product is available at the inlet before starting the pump. The WARNING Composite seal are dry run capable for a limited time, the risk of seal failure increases with mechanical seal if allowed to run dry. Before beginning operation, it is considered a good practice to momentarily start/stop the pump to check the direction of rotation and ensure that the pump is free of obstructions. -
Page 19: Additional Routine Maintenance - Atex Units
3.6.1 Additional Routine Maintenance – Atex units. Grease Check for any signs of lubricant leakage on startup. Check for any signs of overheating. Low maintenance gearbox, factory filled with EP 00 semi-fluid grease. The grease should not require replacement during the lifetime of the bearings or until 14,000 hours of operation. -
Page 20: Integral Pressure Relief Valve
Integral Pressure Relief Valve. Integral pressure relief valves are normally used to protect the pump from the effects of increases in system pressure caused, for example, by a restricted or closed discharge line. In response to a pressure increase, the valve opens and internally circulates the pumped media within the pump chamber. - Page 21 Fig 8 Pre-Set Relief Valve. UMBER ESCRIPTION RV F RONT OVER DIAPHRAGM SPRING HOUSING SPRING SCREW VALVE HEAD O-RING SPACER DOWEL ANGER Under no circumstances should any attempt be made to dismantle a pressure relief valve which has not had the spring pressure relieved (where applicable) or is mounted on a pump that is operating.
-
Page 22: Rtpe Tm Pump Disassembly And Assembly
RTPe Pump Disassembly and Assembly. Before undertaking any work on the pump the Shutdown Procedure should be followed in section 3.5, and site safety practices must be observed. While dismantling or assembling the pump it is essential to ensure that the pump and/or components are secured to provide adequate stability. -
Page 23: Disassembly
Disassembly. 4.1.1 Front Cover and Rotor Removal See Fig 9. - Follow recommended Shutdown Procedure, referring to section 3.5. - Gradually loosen front cover retaining screws (50). Care should be taken as residual product and pressure may still be present in the pump head. -
Page 24: Gearbox Disassembly
4.1.2 Gearbox Disassembly (After Completing 4.1.1). The following procedures assume that the pump has been removed from the base-plate and that the product seals have been removed (see section 4.3 & Fig 10). Remove drain plug (81). Remove retaining screws (74) and remove the endplate (70) from the gearbox (16) utilising the retaining screws (74) in the jacking points provided, see fig 11. - Page 25 Fig 11 Gearbox and Endplate Jacking Points. Endplate Jacking Point Gearbox Jacking Point Remove the cups of the rear bearing (19, see Fig 12) from the endplate (70). Remove rear Lip-seal (11). Remove shaft assemblies from the gearbox (16, see section 5.6). Shaft assemblies will be complete with gears (14), and bearings (24 and 19) –...
-
Page 26: Shaft Disassembly
4.1.3 Shaft Disassembly. Remove the rear bearing assembly (19). Remove the bearing pre-load shims (72, see section 4.1.3). The shims may be different for each assembly and therefore should be kept in their respective positions. Remove the timing gear screws (23). Remove the timing gear (14) and locating dowel (80), using jacking points. -
Page 27: Assembly
Assembly. 4.2.1 Gearbox & Rotorcase Assembly, See Fig 13. Install front bearing cups (24 not shown). Do not install the front lip seals (17) until the bearing pre-load has been set. The lips may give a false rolling torque reading as well as increasing WARNING the risk of damage during assembly. -
Page 28: Shaft Assembly - Rtp E
4.2.2 Shaft Assembly – RTPe20 Install front bearing (24) to the shaft (9 or 10). Install O-rings (26), to shafts (9 or 10) in the appropriate grooves. Lightly lubricate all O-rings with a compatible lubricant. Install the gear (14) over the O-rings (26) and secure with retaining bolts (23). -
Page 29: Timing
Assemble the endplate by installing O-ring (3) Do not install the rear lip seal (11) until the bearing pre-load has been set. The lips may give a false rolling torque reading as well as increasing the risk of damage WARNING during assembly. - Page 30 Once the correct clearances have been achieved, tighten the gear retaining screw (23) to the correct torque see section 5.2, and mark the teeth at the mesh point, see Fig 16. Recheck all clearances before moving on to the next stage. Fig 16 Aligning the mesh point.
-
Page 31: Setting The Rolling Torque
4.2.4 Setting the rolling torque. It is important that the product seals, both front and rear lip seals are not installed until the bearing pre-load has been set and the clearances WARNING checked. The seals may give a false rolling torque reading as well as increasing the risk of damage during assembly. -
Page 32: Product Seal Fitting And Removal
Install O-ring (39) into the front cover (38). Install front cover (38) to rotorcase (40), securing with screws (50), tightening to correct torque, refer to section 5.2. Product Seal Fitting and Removal. 4.3.1 General Procedures for Installing Seals. Mechanical seals are precision-engineered assemblies incorporating finely lapped seal faces and seats. -
Page 33: Rtpe20 Composite O-Ring Seal Removal And Installation
4.3.2 RTPe20 Composite O-ring Seal Removal and installation. Fig 18 Composite O-ring Seal. Note: Extreme care should be taken when carrying out these procedures WARNING to ensure that the O-ring grooves, sleeve faces and O-ring are not damaged. Remove the front cover screws, front cover, rotor retainer and rotor as per section 4.1.1 The Composite O-ring &... - Page 34 To install the sleeve, make sure the sleeve O-ring is placed in the rotor and the location of the two drive dogs lines up. Install the static pin using Loctite 648, then place seal spacer ensuring the slot and pin are in line. Fit composite O-ring to the liner and use lubricate on the outside O-ring then install Composite seal into seal bore ensuring the seal is pushed against the spacer.
-
Page 35: Rtpe20 Mechanical Seal
4.3.3 RTPe20 Mechanical Seal. Remove the front cover screws, front cover, rotor retainer and rotor as per section 4.1.1 Remove the rotary seal face and inspect or replace the O-rings as required. When installing the seal face ensure correct engagement of the two drive dogs (Fig 20). -
Page 36: Specifications
Specifications. Clearance Chart Page | 35... -
Page 37: Fasteners & Torque Settings
Fasteners & Torque Settings. Notes:1. See product seal section 4.3 where applicable. 2. For position of items see section 5.6, typical basic pump build. Page | 36... -
Page 38: Lubricants
Lubricants. Grease The recommended synthetic gearbox grease for use in the RTPe is one that is intended for ‘sealed’ units. Suitable for operating temperatures between -20°C and 120°C (-4°F to 248°F) and a base viscosity in the region of 150 Cst at 40°C (104°F). Tool List. -
Page 39: Rtpe20 Foundation Dimensions - Basic Pump Metric (1" Female Drive)
5.5.1 RTPe20 Foundation Dimensions – Basic Pump Metric (1” Female Drive) Pump Weight:- 58kg These dimensions are for guidance only – Certified drawings are available on request Page | 38... -
Page 40: Rtpe20 Foundation Dimensions - Basic Pump Inch (1" Female Drive)
5.5.2 RTPe20 Foundation Dimensions – Basic Pump Inch (1” Female Drive) Pump Weight: - 128Ibs These dimensions are for guidance only – Certified drawings are available on request Page | 39... -
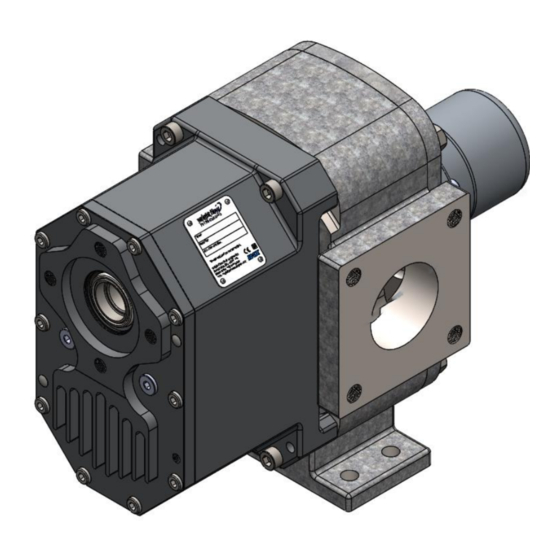
Page 41: Typical Basic Pump Build (Rtpe20 Shown)
Typical Basic Pump Build (RTPe20 Shown) Page | 40... -
Page 42: Trouble Shooting
Trouble Shooting Page | 41... - Page 43 Causes CTION NCORRECT IRECTION OTATION EVERSE OTOR & P RIMED XPEL UCTION HAMBER RIME NPSH A & S NSUFFICIENT VAILABLE NCREASE UCTION TATIC UCTION IAMETER & R IMPLIFY UCTION EDUCE ENGTH EDUCE & P RODUCT APORISING UCTION PEED RODUCT EMPERATURE NTERING UCTION EMAKE...
-
Page 44: Rtp Etm Service History
RTPe Service History. Pump Serial No: Date Comments Page | 43... -
Page 45: Notes
Notes. The information contained in this document is correct at time of print but may be subject to change without prior notice. The latest updated copies are available from our website Page | 44... - Page 46 Wright Flow Technologies Ltd. Edison Road, Eastbourne, East Sussex, BN23 6PT United Kingdom Phone: +44 1323 509211 Fax: +44 1323 507306 E-mail: wright.eu@idexcorp.com Wright Flow Technologies, Inc. 406 State Street Cedar Falls, Iowa 50613 U.S.A. Phone: (319) 268-8013 Fax: (803) 216-7686 E-mail: wright.usa@idexcorp.com www.wrightflowtechnologies.com Issue B –...
Need help?
Do you have a question about the Wright Flow Technologies RTPe Series and is the answer not in the manual?
Questions and answers