Advertisement
Quick Links
NXP Semiconductors
Android™ Quick Start Guide
1 Overview
This document guides you through the processes of
downloading and running this release package. It only
explains how to download and run the default release image
with default configuration. For details on using the release
package, see the Android™ User's Guide (AUG) included in
this release package.
2 Hardware Requirements
The hardware requirements for using this release package are
as follows:
Supported system-on-chips (SoCs):
• i.MX 8M Mini
• i.MX 8M Quad
• i.MX 8QuadXPlus
• i.MX 8M Nano
Supported boards:
• EVK board and Platform
• MEK board and Platform
• AIY board and Platform
Document Number: AQSUG
Rev. P9.0.0_2.3.0, 08/2019
Contents
1
Overview....................................................................1
2
Hardware Requirements............................................ 1
3
Board......................................................................... 2
4
Board......................................................................... 9
5
MEK Board............................................... .............. 14
6
Working with the i.MX 8M Nano Board................ 19
7
Revision History......................... ............................ 26
Advertisement

Related Manuals for NXP Semiconductors Androidi.MX 8M Mini


Summary of Contents for NXP Semiconductors Androidi.MX 8M Mini
-
Page 1: Table Of Contents
NXP Semiconductors Document Number: AQSUG Rev. P9.0.0_2.3.0, 08/2019 Android™ Quick Start Guide Contents 1 Overview Overview..............1 Hardware Requirements..........1 This document guides you through the processes of downloading and running this release package. It only Working with the i.MX 8M Mini EVK explains how to download and run the default release image Board................. -
Page 2: Working With The I.mx 8M Mini Evk Board
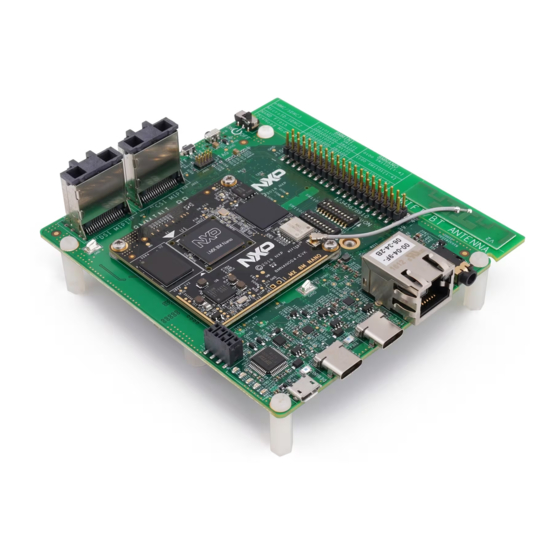
3 Working with the i.MX 8M Mini EVK Board 3.1 Board hardware The figures below show the different components of the i.MX 8M Mini EVK board. Figure 1. i.MX 8M Mini EVK board Android™ Quick Start Guide, Rev. P9.0.0_2.3.0, 08/2019 NXP Semiconductors... - Page 3 Working with the i.MX 8M Mini EVK Board Figure 2. i.MX 8M Mini EVK with audio board Figure 3. i.MX 8M Mini SAS cable with DSI-to-HDMI adapter Android™ Quick Start Guide, Rev. P9.0.0_2.3.0, 08/2019 NXP Semiconductors...
- Page 4 • The QCOM 1PJ Wi-Fi/Bluetooth module is used on the i.MX 8M Mini EVK LPDDR4 Board. • The BCM 1MW Wi-Fi/Bluetooth module is used on the i.MX 8M Mini EVK DDR4 Board. Android™ Quick Start Guide, Rev. P9.0.0_2.3.0, 08/2019 NXP Semiconductors...
- Page 5 LPDDR4 and MIPI panel output. 3.3 Flashing board images The board image files can be flashed into the target board using Universal Update Utility (UUU). Android™ Quick Start Guide, Rev. P9.0.0_2.3.0, 08/2019 NXP Semiconductors...
- Page 6 Specifies the directory in which there are the images to be flashed. If this option is not used, images in the current working directory are flashed. directory Table continues on the next page... Android™ Quick Start Guide, Rev. P9.0.0_2.3.0, 08/2019 NXP Semiconductors...
- Page 7 6. Wait for the uuu_imx_android_flash execution to complete. If there is not any error, you will get information on the command window indicating that images are already flashed. 7. Power off the board. Android™ Quick Start Guide, Rev. P9.0.0_2.3.0, 08/2019 NXP Semiconductors...
- Page 8 U-Boot > setenv bootcmd "bootmcu && boota mmc0" # for SD boot U-Boot > setenv bootcmd "bootmcu && boota mmc1" # for emmc boot U-Boot > saveenv • i.MX 8M Mini EVK DDR4 Board: Android™ Quick Start Guide, Rev. P9.0.0_2.3.0, 08/2019 NXP Semiconductors...
-
Page 9: Working With The I.mx 8M Quad Aiy Board
After you have completed download and setup, reboot the board and wait for the Android platform to boot up. Figure 6. Android Pie image 4 Working with the i.MX 8M Quad AIY Board Android™ Quick Start Guide, Rev. P9.0.0_2.3.0, 08/2019 NXP Semiconductors... - Page 10 The figures below show the different components of the i.MX 8M Quad AIY board. Figure 7. i.MX 8M Quad AIY board 4.2 Board images The table below describes the location in the board partitions of the software images in android_p9.0.0_2.3.0_image_8mqaiy.tar.gz. Android™ Quick Start Guide, Rev. P9.0.0_2.3.0, 08/2019 NXP Semiconductors...
- Page 11 • There are two USB ports on the i.MX 8M Quad AIY board: USB-to-UART, USB 3.0 host and USB 3.0 OTG. • The USB-to-UART port can be referenced as debug UART to output log information of software running on the board. Android™ Quick Start Guide, Rev. P9.0.0_2.3.0, 08/2019 NXP Semiconductors...
- Page 12 • If uuu_imx_android_flash.bat is used to flash images on a remote server through samba, you need to map the remote resource to the local environment first. Take the following command as an example: > net use z: \\192.168.1.1\daily_images Android™ Quick Start Guide, Rev. P9.0.0_2.3.0, 08/2019 NXP Semiconductors...
- Page 13 Save the environment variable set above. u-boot=> saveenv 4.5 Board reboot After you have completed download and setup, reboot the board and wait for the Android platform to boot up. Android™ Quick Start Guide, Rev. P9.0.0_2.3.0, 08/2019 NXP Semiconductors...
-
Page 14: Working With The I.mx 8Quadxplus Mek Board
Working with the i.MX 8QuadXPlus MEK Board Figure 8. Android Pie image 5 Working with the i.MX 8QuadXPlus MEK Board 5.1 Board hardware The figures below show the different components of the i.MX 8QuadXPlus MEK board. Android™ Quick Start Guide, Rev. P9.0.0_2.3.0, 08/2019 NXP Semiconductors... - Page 15 Working with the i.MX 8QuadXPlus MEK Board Figure 9. i.MX 8QuadXPlus MEK board Figure 10. i.MX mini SAS cable with DSI-to-HDMI adapter Figure 11. i.MX mini SAS cable with LVDS-to-HDMI adapter Android™ Quick Start Guide, Rev. P9.0.0_2.3.0, 08/2019 NXP Semiconductors...
- Page 16 LVDS-to-HDMI display with dual-camera support. system.img system_a and system_b partitions vendor.img vendor_a and vendor_b partitions dtbo-imx8qxp.img dtbo_a and dtbo_b partitions to support single LVDS-to- HDMI/MIPI-to-HDMI or dual LVDS-to-HDMI displays with dual-camera support. Android™ Quick Start Guide, Rev. P9.0.0_2.3.0, 08/2019 NXP Semiconductors...
- Page 17 Specifies which partition table image file to flash. For 8QuadXPlus, it can be followed with "7" or "28". If this option is not used, default "partition- table.img" is flashed. Erases user data after images are flashed. Table continues on the next page... Android™ Quick Start Guide, Rev. P9.0.0_2.3.0, 08/2019 NXP Semiconductors...
- Page 18 • Change SW2 to switch the board back to 1100 (from 1-4 bit) to enter SD boot mode.. 5.4 Booting After downloading the images, boot the board by connecting it to the power supply. Android™ Quick Start Guide, Rev. P9.0.0_2.3.0, 08/2019 NXP Semiconductors...
-
Page 19: Working With The I.mx 8M Nano Board
After you have completed download and setup, reboot the board and wait for the Android platform to boot up. Figure 13. Android Pie image 6 Working with the i.MX 8M Nano Board Android™ Quick Start Guide, Rev. P9.0.0_2.3.0, 08/2019 NXP Semiconductors... - Page 20 Working with the i.MX 8M Nano Board 6.1 Board hardware The figures below show the different components of the i.MX 8M Nano board. Figure 14. i.MX 8M Nano board Android™ Quick Start Guide, Rev. P9.0.0_2.3.0, 08/2019 NXP Semiconductors...
- Page 21 • To test the camera, connect the i.MX CSI MIPI Camera to the "Camera" port. • The BCM 1MW Wi-Fi/bluetooth module is used on the i.MX 8M Nano EVK DDR4 Board. Android™ Quick Start Guide, Rev. P9.0.0_2.3.0, 08/2019 NXP Semiconductors...
- Page 22 To achieve more flexibility, two script files are provided to invoke UUU to automatically flash all Android images. • uuu_imx_android_flash.sh for Linux OS • uuu_imx_android_flash.bat for Windows OS For this release, these two scripts are validated on UUU 1.2.135 version. Download corresponding version from github: Android™ Quick Start Guide, Rev. P9.0.0_2.3.0, 08/2019 NXP Semiconductors...
- Page 23 If the script is executed with this option, no images will be flashed. The script loads U-Boot to RAM and executes to fastboot mode. this option is used for development. Obviously, "-m" and "-d rpmsg" should be used together. Android™ Quick Start Guide, Rev. P9.0.0_2.3.0, 08/2019 NXP Semiconductors...
- Page 24 After downloading the images, boot the board by connecting it to the power supply. 6.4.1 Booting with single MIPI-to-HDMI/MIPI panel display In the U-Boot prompt, set the U-Boot environment variables as follows: Android™ Quick Start Guide, Rev. P9.0.0_2.3.0, 08/2019 NXP Semiconductors...
- Page 25 "androidboot.selinux=permissive" to the U-Boot's bootargs. Boot environment variables are as follows: U-Boot > setenv append_bootargs androidboot.selinux=permissive U-Boot > saveenv 6.5 Board reboot After you have completed download and setup, reboot the board and wait for the Android platform to boot up. Android™ Quick Start Guide, Rev. P9.0.0_2.3.0, 08/2019 NXP Semiconductors...
-
Page 26: Revision History
8M, i.MX 8QuadMax, and i.MX 8QuadXPlus GA release. P9.0.0_2.0.0-ga 04/2019 i.MX 8M, i.MX 8QuadMax, and i.MX 8QuadXPlus GA release. P9.0.0_2.3.0 08/2019 i.MX 8M Mini, i.MX 8M Quad, i.MX 8M Nano, and i.MX 8QuadXPlus Alpha release. Android™ Quick Start Guide, Rev. P9.0.0_2.3.0, 08/2019 NXP Semiconductors... - Page 27 How to Reach Us: Information in this document is provided solely to enable system and software implementers to use NXP products. There are no express or implied copyright licenses granted hereunder to design or Home Page: fabricate any integrated circuits based on the information in this document. NXP reserves the right to nxp.com make changes without further notice to any products herein.
Need help?
Do you have a question about the Androidi.MX 8M Mini and is the answer not in the manual?
Questions and answers