Jason.L Quadro A Assembly Instructions Manual
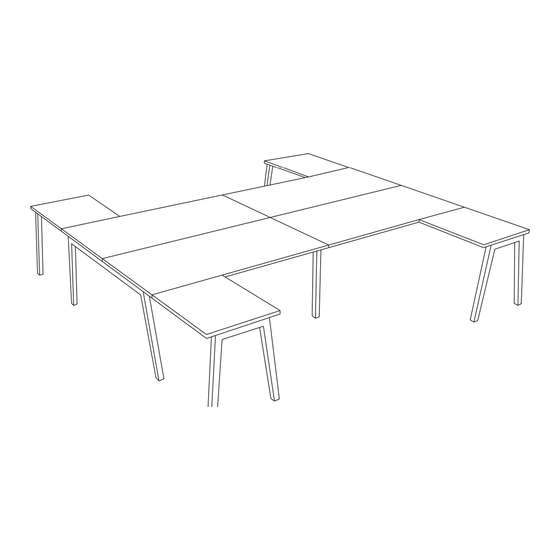
Leg 4 person corner workstation h configuration
Hide thumbs
Also See for Quadro A:
- Assembly instructions manual (15 pages) ,
- Assembly instructions manual (7 pages) ,
- Assembly instructions manual (7 pages)
Advertisement
Quick Links
www.jasonl.com.au
ASSEMBLY INSTRUCTIONS
Quadro A leg 4 person
Need help!
corner workstation
Call us on
1300 527 665
H configuration
Sizes: 1400Lx1800W , 1600Lx1800W , 1800Lx1800W mm
Tools Required:
Power screwdriver; Allen key set (provided)
2 persons required for installation
Page 1 of 11
Advertisement

Related Manuals for Jason.L Quadro A


Summary of Contents for Jason.L Quadro A
- Page 1 ASSEMBLY INSTRUCTIONS Quadro A leg 4 person Need help! corner workstation Call us on 1300 527 665 H configuration Sizes: 1400Lx1800W , 1600Lx1800W , 1800Lx1800W mm Tools Required: Power screwdriver; Allen key set (provided) 2 persons required for installation...
- Page 2 ASSEMBLY INSTRUCTIONS Quadro A leg 4 person Need help! corner workstation Call us on 1300 527 665 H configuration Sizes: 1400Lx1800W , 1600Lx1800W , 1800Lx1800W mm COMPONENTS Table top x4 Table top Return x4 Legs Quadro A x2 Legs Quadro A Return x4...
- Page 3 ASSEMBLY INSTRUCTIONS Quadro A leg 4 person Need help! corner workstation Call us on 1300 527 665 H configuration Sizes: 1400Lx1800W , 1600Lx1800W , 1800Lx1800W mm First we will set up the workstation frame without the returns Tools Required: Power screwdriver;...
- Page 4 ASSEMBLY INSTRUCTIONS Quadro A leg 4 person Need help! corner workstation Call us on 1300 527 665 H configuration Sizes: 1400Lx1800W , 1600Lx1800W , 1800Lx1800W mm STEP 01 STEP 02 Using Allen Key provided, attach 4 plastic brackets (H) per leg...
- Page 5 ASSEMBLY INSTRUCTIONS Quadro A leg 4 person Need help! corner workstation Call us on 1300 527 665 H configuration Sizes: 1400Lx1800W , 1600Lx1800W , 1800Lx1800W mm STEP 03 Adjust extendable beam (F) to desired length using markers and secure beam...
- Page 6 ASSEMBLY INSTRUCTIONS Quadro A leg 4 person Need help! corner workstation Call us on 1300 527 665 H configuration Sizes: 1400Lx1800W , 1600Lx1800W , 1800Lx1800W mm STEP 05 STEP 04 TOP VIEW Attach beam (F) to legs (C) and Connector frame (E) Frame looks like this.
- Page 7 ASSEMBLY INSTRUCTIONS Quadro A leg 4 person Need help! corner workstation Call us on 1300 527 665 H configuration Sizes: 1400Lx1800W , 1600Lx1800W , 1800Lx1800W mm We can now add the return frames to the main workstation Tools Required: Power screwdriver;...
- Page 8 ASSEMBLY INSTRUCTIONS Quadro A leg 4 person Need help! corner workstation Call us on 1300 527 665 H configuration Sizes: 1400Lx1800W , 1600Lx1800W , 1800Lx1800W mm STEP 06 Now attach the return beams (G) to return legs (D) using nut insert in legs. See point attached.
- Page 9 ASSEMBLY INSTRUCTIONS Quadro A leg 4 person Need help! corner workstation Call us on 1300 527 665 H configuration Sizes: 1400Lx1800W , 1600Lx1800W , 1800Lx1800W mm STEP 07 Attach Connector Plates (I) to Return Top (B) by tightening Screws (N)
- Page 10 ASSEMBLY INSTRUCTIONS Quadro A leg 4 person Need help! corner workstation Call us on 1300 527 665 H configuration Sizes: 1400Lx1800W , 1600Lx1800W , 1800Lx1800W mm STEP 8 nut insert nut insert TABLE TOP nut insert nut insert BOTTOM VIEW Place table tops (A) on top of frame - with cutout at the back of the desk.
- Page 11 ASSEMBLY INSTRUCTIONS Quadro A leg 4 person Need help! corner workstation Call us on 1300 527 665 H configuration Sizes: 1400Lx1800W , 1600Lx1800W , 1800Lx1800W mm STEP 9 If you purchased with screens divider Floor based screen divider assembly instruction: Bring partition towards one another as on the picture.
Need help?
Do you have a question about the Quadro A and is the answer not in the manual?
Questions and answers