Nikon D1 Manual
Nikon d1: reference manual
Hide thumbs
Also See for D1:
- Instructions for use manual (11 pages) ,
- Brochure & specs (4 pages) ,
- Fast track manual (2 pages)
Table of Contents
Advertisement
Quick Links
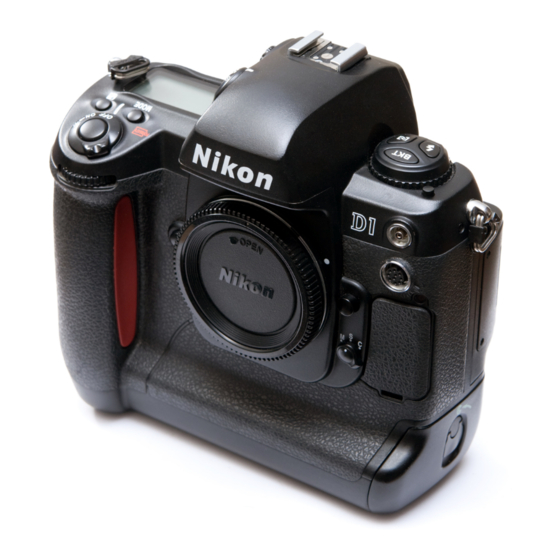
Getting to Know the D1
Parts of the D1
Focus mode
selector dial (pg. 33)
Lens release
button (pg. 6)
DC in, video out
connector cover (pg. 102)
10-pin remote
terminal (pg. 116)
Sync terminal for
external flash (pg. 95)
Self-timer
lamp (pg. 63)
Mode dial lock
release (pg. 26)
Eyelet for
camera strap
Auto bracketing
button (pg. 53–55)
Flash sync
mode button (pg. 96)
Mode dial (pg. 26)
AF area mode
button (pg. 34–35)
Accessory shoe (pg. 95)
ii
Depth-of-field preview
Exposure mode button
lock button (pg. 41–42)
Diopter adjustment
Getting to Know the D1: Parts of the D1
button (pg. 64)
Sub-command
dial
Power switch
(pg. 4)
Shutter-release
button (pg. 20–21)
Eyelet for
camera strap
Exposure
compensation
button (pg. 51–52)
(pg. 43–48)/ Format
button (pg. 13)
Top control
panel (pg. v)
Focal plane
indicator (pg. 64)
Metering selector
Metering selector
(pg. 41–42)
knob (pg. 63)
Advertisement
Table of Contents

Related Manuals for Nikon D1


Summary of Contents for Nikon D1
- Page 1 (pg. 13) Top control panel (pg. v) Focal plane indicator (pg. 64) Metering selector lock button (pg. 41–42) Metering selector (pg. 41–42) Diopter adjustment knob (pg. 63) Getting to Know the D1: Parts of the D1 dial (pg. 4)
- Page 2 Execute button (pg. 78) Image quality button (pg. 29)/ Select all button (pg. 78) Sensitivity button (pg. 30)/ Multiple select button (pg. 78) White balance button (pg. 31)/ Thumbnail button (pg. 78) Getting to Know the D1: Parts of the D1...
- Page 3 Shutter-release button lock (vertical shooting) Main command dial (vertical shooting) AF start (AF ON) button (vertical shooting) Tripod socket Video cable Camera strap EG-D1 AN-D1 Getting to Know the D1: Parts of the D1 (pg. 4) (pg. 4) (pg. 33)
-
Page 4: Top Control Panel
Black-and-white mode (pg. 28–29) Image quality display (pg. 28–29) Sensitivity/Number of exposures remaining/ File type/Custom settings number Getting to Know the D1: Parts of the D1 Day indicator (pg. 8–9) Shutter speed (pg. 43–44)/Exposure compensation (pg. 51)/Date and time (pg. 8) Aperture display (pg. -
Page 5: Viewfinder Display
(pg. 18) Flash-ready light (pg. 95) Frame counter (pg.22)/ Exposures remaining in buffer (pg. 22)/ Exposure compensation value (pg. 51) Electronic analog exposure display (pg. 48)/ Exposure compensation (pg. 54–55) Getting to Know the D1: Parts of the D1... -
Page 6: Lcd Monitor
At low temperatures, the response time of the LCD control panels may drop, but response time will return to normal when the temperature rises. Getting to Know the D1: Parts of the D1 5 Time of recording 6 Protected file... -
Page 7: Caring For The Camera And Battery
Caring for the Camera and Battery Do not drop The camera and lens may malfunction if subjected to strong shocks or vibration. Keep dry This product is not waterproof, and may malfunction if immersed in water or exposed to high levels of humidity. Rusting of the internal mechanism can cause irreparable damage. - Page 8 • The monitor is lit by a fluorescent backlight. Should the monitor begin to dim or flicker, contact your Nikon service representative. • Do not apply pressure to the LCD monitor, as this could cause damage or malfunction.
- Page 9 CAUTIONS Modifications The FCC requires the user to be notified that any changes or modifications made to this device that are not expressly approved by Nikon Corporation may void the user's authority to operate the equipment. Interface Cables Use the interface cables sold or provided by Nikon for your equipment. Using other interface cables may exceed the limits of Class B Part 15 of the FCC rules.
- Page 10 Notices • Reproduction, in whole or in part, of any of the manuals provided with your Nikon product requires prior permission from Nikon. • The information contained in this manual is subject to change without notice. • While Nikon makes every effort to produce perfect manuals, we appreciate any opportunity for improvement.
-
Page 11: Table Of Contents
Contents Getting to Know the D1 ... ii Caring for the Camera and Battery ... viii About This Manual ... 1 First Steps ... 3 Insert the Battery ... 4 Attach the Lens ... 6 Set the Time and Date ... 8 Choose a Language for the Menus ... - Page 12 Exposure Compensation ... 51 Auto Bracketing ... 53 Capture Preview Mode ... 56 Record-and-Review ... 58 Playing Photographs Back ... 60 Self Timer Mode ... 62 Diopter Adjustment ... 63 LCD Illuminator ... 63 Depth-of-Field Preview ... 64 Focal Plane Position ... 64 Custom Settings ...
-
Page 14: About This Manual
ABOUT THIS MANUAL Thank you for your purchase of a Nikon D1 digital camera. This chapter describes the basic layout of this manual. - Page 15 Describes the options available in the camera’s custom settings menu. Playback Details how to play back and delete images recorded with your camera. Flash Photography Lists the flash options available for the D1. Connections Describes how to connect your camera to a computer or television. Technical Notes Lists the accessories available for your camera, describes how to care for the camera’s CCD, and provides troubleshooting tips.
-
Page 16: First Steps
FIRST STEPS This chapter covers the steps you will take when using your camera for the first time, from inserting the battery to taking your first photograph. It describes the most commonly used settings for D-Type autofocus (AF) Nikkor lenses, as shown below. -
Page 17: Charge The Battery
Insert the Battery Insert the battery and check the battery indicator. .1 Charge the battery The D1 uses rechargeable EN-4 Ni-MH battery packs (available separately). Be sure the battery is fully charged before inserting it in the camera. Batteries can be charged in about 90 minutes using the MH-16 Quick Charger (available sepa- rately). - Page 18 .3 Turn the battery pack latch to the locked position .4 Check the battery indicator Turn the camera on (A) and confirm the battery level in the control panel on top of the camera (B). Battery fully charged Low battery Ready a fully-charged spare battery.
-
Page 19: Attach The Lens
Attach the Lens After making sure that the camera is off, mount the lens and set the aperture to its minimum setting (largest f-number). .1 Attach the lens to the camera body Turn the camera off (A). Align the mounting mark on the lens with the mounting mark on the camera body, then, being careful not to touch the lens-release button, turn the lens counter-clockwise until it locks into place (B). -
Page 20: Detaching The Lens
This can be prevented by attaching the BF-1A body cap to the camera when no lens is in place (note that the BF-1 body cap can not be used with the D1). -
Page 21: Set The Time And Date
The clock-calendar is powered by an independent battery with a life of about ten years. When no charge remains, the clock-battery replacement indicator will appear in the control panel on top of the camera. Take the camera to a Nikon-authorized service center, where the clock battery can be replaced for a fee. - Page 22 .2 Set the time and date To set the time and date, turn the camera on and hold the auto- bracketing button down for more than two seconds while pressing the exposure compensation button (A). The year indicator in the control panel on top of the camera will flash (B).
-
Page 23: Choose A Language For The Menus
Choose a Language for the Menus Camera menus and messages can be displayed in English, German, French, or Japanese. To select the language used: .1 Display the playback menu Holding the mode dial lock-release down, turn the mode dial to PLAY (playback mode). - Page 24 .3 Choose a language from the LANGUAGE menu Using the focus-area selector, highlight LANGUAGE and press the selector to the right to display the LANGUAGE menu. Highlight the desired language and press the focus-area selector to the right (or press the button) to put your choice into effect.
-
Page 25: Insert The Memory Card
Insert the Memory Card The D1 digital camera uses compact flash-memory cards to record photographs and other information. Before taking photographs, you will need to insert a memory card in the camera’s card slot. .1 Open the card slot After making sure the camera is off, open the door covering the card- slot cover release button (1) and press the card-slot cover release button (2) to open the card slot (3). -
Page 26: Formatting Memory Cards
Removing memory cards When removing memory cards, turn the camera off and open the card-slot cover. After confirming that the access lamp is off, stand the eject button up and press it down to eject the card. Do not attempt to remove the card while the access lamp is on . -
Page 27: Take A Photograph
Take a Photograph This section describes how to take a photograph using the most commonly-used settings. .1 Set the advance mode to S (single frame) Hold the mode dial lock-release down and turn the mode dial to S (single frame). See “Camera Settings: The Mode Dial” for more information. -
Page 28: Set Sensitivity To Iso 200 Equivalent
.3 Set sensitivity to ISO 200 equivalent Hold the button down (A) and turn the main command dial (B). The sensitivity display in the rear control panel will cycle through the sensitivity settings as shown below. Stop when the display shows 200 (ISO 200 equivalent). -
Page 29: Set The Focus Mode To S (Single Servo Af)
.5 Set the focus mode to S (single servo AF) Turn the focus mode selector until it clicks into place pointing to S (single servo AF). For more information on focus settings, see “Camera Settings.” .6 Set the AF area mode to single area AF Hold down the AF area mode button (A) and turn the main command dial (B). -
Page 30: Select The Center Focus Area
(B). Metering The D1 offers three metering modes: matrix, center-weighted, and spot (see “Camera Settings: Metering” for details). In matrix mode 3D color metering is used, which sets exposure based on a variety of data from all areas of the frame provided by a CCD sensor with 1005 (67 vertical 15 horizontal) metering pixels. -
Page 31: Flexible Program
(see “Custom Settings: Two-Button Reset”). Exposure mode The D1 offers a choice of four exposure modes: programmed auto, shutter-priority auto, aperture-priority auto, and manual. In programmed auto, the camera automat- ically adjusts exposure to produce the best results, as shown in “Technical Notes: Exposure Program (Programmed Auto).”... -
Page 32: Ready The Camera
.10 Ready the camera Hold the camera as shown above, with your elbow propped lightly against your body for support. Hold the hand-grip with your right hand and cradle the camera or lens with your left. The shutter-release button for portrait photographs can be used when the camera is in vertical shooting mode (B). -
Page 33: Half-Press The Shutter Release Button
.11 Half-press the shutter release button Center the focus brackets on your subject (A) and lightly press the shutter-release button half way (B). The camera will adjust focus automatically, and the results of the autofocus operation will appear in the viewfinder. The subject is in focus. -
Page 34: Take A Photograph
(CCD). It may also produce a white blur effect in the final photograph. The D1 is equipped with a combined electronic (CCD) and mechanical shutter. This shutter operates differently from the mechanical shutters found in film cameras, with the result that the interval between the sound made by the shutter and that made by the mirror will not decrease past a certain point, even at high shutter speeds. - Page 35 When the exposure remaining count reaches 0 When there is not enough memory available on the compact flash- memory card to store further photographs at current settings, the exposure remaining count will show zero and the Cd (card) indicator in the viewfinder and the CARD indicators in the control panels will flash.
-
Page 36: Play The Photograph Back
Play the Photograph Back Photographs taken with the D1 can be played back on the camera’s LCD monitor. If desired, photographs can also be deleted. .1 Turn the monitor on Press the button to turn the monitor on (A). The most recently taken photograph will be displayed (B). - Page 37 .2 Delete a photograph To delete the photograph currently displayed in the LCD monitor, press button (A). A confirmation dialog will be displayed (B). Press the button again (C) to delete the photograph and return to single image playback, where the next photograph in memory will be displayed.
-
Page 38: Camera Settings
CAMERA SETTINGS This chapter details most of the camera settings you will use when taking photographs. Information on custom settings, playback, and flash photogra- phy are provided in separate chapters. -
Page 39: The Mode Dial
The Mode Dial The mode dial is used to set the camera operating mode. The D1 can be operated in single-frame or continuous shooting modes, self-timer mode, playback mode, and PC mode. To set the operating mode, hold the mode dial lock button down and turn the mode dial to the desired setting. - Page 40 While photos are being transferred from the buffer to the memory card, you will only be able to take as many photographs as have already been transferred from the buffer to the card. When the shutter-release button is pressed half way, the number of con- secutive photographs that can be taken before the buffer fills up is displayed in the viewfinder and the control panel on top of the camera (see above).
-
Page 41: Image Quality
Custom Setting 28 (see “Custom Settings”). YCbCr format Models color data using measures of luminance (Y) and chrominance (Cb, Cr). This file type can be read using Nikon View DX or Nikon Capture software. NORM BASIC Camera Settings: Image Quality... - Page 42 TIFF formats are displayed in the rear control panel as shown below. YCbCr TIFF The approximate number of images that can be saved on 96 and 64 MB Nikon memory cards in each format are shown below. Format and file size HI (RAW, approx.
-
Page 43: Sensitivity (Iso Equivalency)
Sensitivity (ISO Equivalency) Sensitivity can be set higher than the default setting (ISO 200 equivalent) when taking photographs in low light conditions. Four settings (ISO 200, 400, 800, and 1,600 equivalent) are available. To choose a sensitivity setting, turn the main command dial while holding down button (A). -
Page 44: White Balance
Direct sunlight: Use this setting when taking photographs in direct sunlight. Color temperature is fixed at approximately 5200K (daylight). Flash: Use this setting with Nikon Speedlights. Color temperature is fixed at approximately 5400K. Overcast: Use this setting when taking photographs under overcast skies. -
Page 45: Using Preset White Balance
The D1 uses through-the-lens (TTL) metering to set white balance in auto and preset modes. This allows white balance to be set accurately when the subject is lit differently from the camera. Using preset white balance Preset white balance is useful when taking photographs under colored lighting. -
Page 46: Autofocus
Autofocus When the focus-mode selector (A) is set to S (single servo AF) or C (continuous servo AF), the camera focuses automatically when the shutter-release button is half-pressed (B), or the button is held down (see below). Single servo AF (focus priority): When the subject is at rest, the camera focuses when the shutter-release button is pressed half way. -
Page 47: Af Area Mode
AF Area Mode Autofocus can be set to focus only on the selected focus area (single area AF) or to shift focus from one area to the next depending on the movement of the subject (dynamic AF). By default, when dynamic AF is used in combination with continuous servo AF, the camera first focuses on the subject in the selected focus area and then shifts the focus area to keep this subject in focus. - Page 48 Autofocus modes Closest Focus AF area mode subject priority mode Single area AF Single On (default) Dynamic area servo AF Off (CSM 9) Single area AF Continuous Off (default) Dynamic area servo AF On (CSM 10) Camera Settings: AF Area Mode Focus area Focus area selection...
-
Page 49: Focus Area
Focus Area The D1 has five focus areas which together cover a wide area of the frame. By choosing the focus area according to your composition and the position of your subject, you can focus on an off-center subject without using focus lock. -
Page 50: Focus Lock
Focus Lock Focus lock can be used to focus on a subject not in any of the five focus areas, or on other occasions when you would otherwise be unable to focus on the subject using autofocus. The procedure for using focus lock differs depending on whether you are using- single or continuous servo AF. - Page 51 b In continuous servo AF, after confirming that the in- focus indicator ( ) appears in the viewfinder, press button. Both exposure and focus will be locked as long as the button is held down, even if you remove your finger from the shutter-release button.
-
Page 52: Getting Good Results With Autofocus
Autofocus performs best when: • The subject is well lit. To use autofocus with very dark subjects, use the AF-assist illuminator built into the Nikon SB-28DX Speedlight (available separately) and select the center focus area. • There is contrast between the subject and the background. For example, autofocus may not perform well on subjects that are the same color as the background. -
Page 53: Manual Focus
Note The D1’s built-in electronic range finder is compatible with most Nikkor lenses (including AF Nikkor lenses when used with manual focus) with a maximum aperture of f/5.6 or faster, and can be used when focusing on subjects in any of the five focus areas (see “Focus Area,”... -
Page 54: Metering
Metering The D1 offers a choice of three metering methods, which can be chosen according to how your subject is lit: Color matrix metering/3D color matrix metering: The D1 uses a 3D color matrix metering system. performed by a CCD sensor with 1,005 (67 vertical metering pixels, which sets exposure using a selection of data from all areas of the frame. - Page 55 Spot metering: The camera measures light only in a circle 4mm (0.15˝) in diameter and centered on the current focus area. The area metered occupies approximately two percent of the entire frame. This method can be used with back-lit subjects or on other occasions when the background is much darker or much brighter than your subject.
-
Page 56: Exposure Mode
Exposure Mode The D1 offers a choice of four exposure modes: programmed auto, shutter- priority auto, aperture-priority auto, and manual. This section discusses shutter-priority auto, aperture-priority auto, and manual exposure modes. For more information on programmed auto, see “First Steps.”... -
Page 57: Shutter-Speed Lock
Rotate the main command dial to choose a shutter speed. Shutter-speed lock If desired, you can lock shutter speed to the selected setting so that it does not change accidentally when you use the main command dial for other purposes. If you hold the button down while turning the main command dial to select the shutter speed (A), shutter speed will be locked when you release the... -
Page 58: Aperture-Priority Auto
— Aperture-priority auto In aperture-priority auto, you set the aperture and the camera automatically adjusts the shut- ter speed to produce the best exposure. Small apertures (high f-numbers) can be used to in- crease the depth of field, bringing background and foreground into focus. -
Page 59: Aperture Lock
Aperture lock If desired, you can lock aperture to the selected setting so that it does not change accidentally when you use the sub-command dial for other purposes. If you hold the button down while turning the sub-command dial to select the aperture (A), aperture will be locked when you release the lock indicators will appear in the viewfinder and the control panel on top of the camera (B). - Page 60 — Manual In manual exposure mode, you control both aperture and shutter speed. Shutter speed can be set for a long time exposure (bulb) or to fixed values between 30 and seconds. Aper- 16,000 ture can be set to any value between the mini- mum and maximum values for the lens.
- Page 61 Check exposure in the electronic analog exposure display in the viewfinder or the control panel on top of the camera, and readjust settings to achieve the desired result. Reading the electronic analog exposure display The electronic analog exposure display shows the amount the image will be over- or under-exposed if a photograph is taken at current settings.
-
Page 62: Auto-Exposure Lock
Auto-Exposure Lock When spot or center-weighted metering is used in combination with pro- grammed auto, shutter-priority auto, or aperture-priority auto, the camera determines exposure automatically with reference to lighting conditions in a limited area of the frame. Auto-exposure lock is used when you want auto exposure to be based on a subject that will not be in the focus area in the final composition. - Page 63 With the button held down, recompose your photograph (A) and shoot (B). While the button is held down, you can adjust shutter speed (when shutter-priority auto is selected as the exposure mode), aperture (aperture- priority auto), or flexible program (programmed auto). The aperture (in shutter-priority auto), shutter speed (aperture priority auto), or flexible program are automatically adjusted to produce the exposure set using auto-exposure lock.
-
Page 64: Exposure Compensation
Exposure Compensation Exposure compensation is used to deliberately change exposure from the optimum value as determined by the camera. This can be used, for example, to shoot subjects containing sharp lighting contrasts at a variety of different exposures. Exposure compensation is possible in any exposure mode. Press the button and rotate the main command dial. - Page 65 Compose your photograph, focus, and shoot. Normal exposure can be restored by setting exposure compensation to a value of 0.0, or by performing a two-button reset (see, “Two-Button Reset”). Exposure compensation is not reset when the camera is turned off. Camera Settings: Exposure Compensation...
-
Page 66: Auto Bracketing
Auto Bracketing Bracketing is used to take a series of photographs of the same subject using a variety of exposure values that “bracket” optimum value as determined by the camera (or, in manual mode, by the photographer). This can be used to take multiple shots of the same subject at different exposure settings without stopping to adjust exposure compensation manually. - Page 67 When Custom Setting 2 is set to Setting Exposure Display –2F1.0 –2F0.7 –2F0.3 +2F1.0 +2F0.7 +2F0.3 –3F1.0 –3F0.7 –3F0.3 +3F1.0 +3F0.7 +3F0.3 3F1.0 3F0.7 3F0.3 When Custom Setting 2 is set to increments of Setting Exposure Display –2F1.0 –2F0.5 +2F1.0 +2F0.5 –3F1.0 –3F0.5...
- Page 68 When Custom Setting 2 is set to increments of 1: Setting Exposure Display –2F1.0 +2F1.0 –3F1.0 +3F1.0 3F1.0 To take the first photograph in the series, compose a photograph, focus, and shoot. If the camera is set to continuous shooting mode (operating mode C), the camera will take the specified number of shots while the shutter-release button is held down and then stop automatically.
-
Page 69: Capture Preview Mode
Capture Preview Mode When the camera is set to single-frame shooting, or the self timer is used, you can use capture-preview mode to view photographs in the LCD monitor before they are saved to the memory card. This makes it possible to delete unwanted photographs before they are saved. - Page 70 If no other operation is performed, the monitor will stay on for the length of time specified in Custom Setting 18 or the playback menu “Auto Off” option (if this time is shorter than the time required to record the photograph, the monitor will remain on for five seconds after the image has been recorded to the card).
-
Page 71: Record-And-Review
Record-and-Review When the camera is set to single-frame shooting, or the self timer is used, you can choose to have photographs displayed automatically in the monitor immediately after they have been saved to the memory card. This allows you to delete unwanted photographs immediately after they have been taken. To use record-and-review: Pressing the button, rotate the main-command dial to select item 1 in... - Page 72 If no other operation is performed, the monitor will stay on for the length of time specified in Custom Setting 18 or the playback menu “Auto Off” option (if this time is shorter than the time required to record the photograph, the monitor will remain on for five seconds after the image has been recorded to the card).
-
Page 73: Playing Photographs Back
Playing Photographs Back Photographs already stored on the memory card can be played back without setting the camera to playback (PLAY) mode. This playback feature can be used in single-frame shooting, continuous shooting, and self-timer modes. To play photographs back: Press the shutter-release button half way to wake the camera up. - Page 74 The operations that can be performed while playing photographs back are as follows: To end playback Press the button or half-press the shutter-release button. photograph currently on display will disappear and the monitor will turn off. To stop the monitor from turning off automatically If no other operation is performed, the monitor will stay on for the length of time specified in Custom Setting 18 or the playback menu “Auto Off”...
-
Page 75: Self Timer Mode
Self Timer Mode The D1’s built-in self timer is ideal for photographs in which photographers wish to appear themselves. The camera should be placed on a stable, level surface (a tripod is recommended). To use the self timer: Holding down the mode dial lock release, rotate the mode dial to select Compose the picture and focus. -
Page 76: Diopter Adjustment
Diopter Adjustment The viewfinder is equipped with diopter adjustment to accommodate individual differences in vision. Pull the diopter knob out and rotate it until the focus brackets in the viewfinder are in sharp focus. Diopter can be adjusted between –3 DP and +1 DP. Corrective lenses (available separately) allow diopter to be ad- justed between –5 DP and + 3 DP. -
Page 77: Depth-Of-Field Preview
Depth-of-Field Preview To check the depth of field for the aperture setting in the current exposure mode, hold down the depth-of-field preview button. The lens will be stopped down to the aperture selected by the camera in programmed-auto or shutter-priority auto exposure modes, or to the value selected by the user in aperture-priority auto or manual modes. -
Page 78: Custom Settings
CUSTOM SETTINGS Custom settings are available for a variety of camera functions. Settings can be changed singly or in combination according to your preferences and the task at hand. -
Page 79: Changing Custom Settings
(e.g., “1-0” for “Item 1, option 0”). The D1 offers a total of 32 items (0–31), each with its own menu of options. Select an option for the chosen item by rotating the sub-command dial. -
Page 80: Custom Settings Options
Custom Settings Options 0. Custom Settings The camera can store up to two sets of custom settings (Set A and Set B). Using Custom Setting 0, you can recall either of these sets. Any changes to settings apply to the current set. Option: A Custom Set A (default) b Custom Set B 1. - Page 81 5. Anti-Vibration Mode (Delay Exposure until Mirror Shock Has Subsided) By default, the image is captured at the same time the shutter is released. To minimize mirror shock, you can set the camera to capture the image after the shutter is released. Option: 0 No delay (default) 1 Release delay in effect 6.
- Page 82 10. Dynamic AF Mode in Continuous-Servo AF This item can be used to activate or deactivate closest subject priority when dynamic AF is used with continuous-servo autofocus. Option: 0 Closest subject priority disabled (default) 1 Closest subject priority enabled 11. Auto Exposure/Flash Exposure Bracketing By default, when a Speedlight is used with auto bracketing (see “Camera Settings: Auto Bracketing), flash exposure bracketing and auto-exposure bracketing will be performed simultaneously.
- Page 83 14. Center-Weighted Metering Area By default, center-weighted metering assigns the greatest weight to a circle in the center of the viewfinder 8 mm (0.32˝) in diameter. The diameter of the area assigned the greatest weight can be changed to 6 mm (0.24˝), 10 mm (0.39˝), or 13 mm (0.51˝), or exposure can be based on the average lighting for the entire frame.
- Page 84 19. Aperture Setting On certain lenses, aperture varies with focal length or lens-to-film distance. For example, some Zoom-Nikkor lenses’ maximum aperture varies with focal length, while some Micro-Nikkor lenses’ maximum aperture varies with lens- to-film distance. By default, the aperture set using the sub-command dial in aperture-priority or manual exposure modes is preserved as either focal length or lens-to-film distance changes.
- Page 85 23. Sharpening The D1 can be set to increase or decrease the sharpness of edges in photographs recorded using the camera. Option: 0 Normal (default) 1 Low 2 High 3 None 24. Tone Compensation This setting controls the image compensation performed by the camera when a photograph is taken.
- Page 86 1 RAW data format available 29. Auto File Numbering Mode The D1 stores photographs in numbered files and folders. Because no two photographs or folders on any given memory card will have the same number at the same time, there is no possibility of confusion so long as you continue to use a single memory card without formatting it.
-
Page 87: Quick Guide To Custom Settings Options
31. Sensitivity Up By default, sensitivity can be set to a values equivalent to ISO 200, 400, 800, or 1,600. Sensitivity up can be used to increase sensitivity by a factor of +1 or +2 over ISO 1600. These settings can be used to achieve high shutter speeds at night-time sporting events, or to achieve optimal expo- sure when taking photographs of poorly-lit subjects. - Page 88 Custom Setting Option Meaning Diameter of meter- 14: Center-weight- 6, 8, 10, ing area in mm (“A” ed metering 13, A is average for entire area frame) 15: Time delay for 4, 6, 8, auto meter- Delay in seconds switch-off 16: Self-timer 2, 5, 10, Duration in seconds...
-
Page 89: Two-Button Reset
Two-Button Reset Two-button reset restores camera and custom settings to their default values. To reset camera settings, hold the buttons down together for more than two seconds. The following camera settings will be reset to their default values: Setting Default Image quality Normal (color) Sensitivity... -
Page 90: Playback
PLAYBACK This chapter describes the D1’s playback options, including viewing photo- graphs and photograph information, deleting photographs, and the playback menu. -
Page 91: Playback Controls
Playing Photographs Back Playback Controls The buttons next to the rear control panel and the functions, one for changing camera settings and another in playback mode. Button Name in playback mode Function in playback mode Menu Thumbnail Execute Select All Multiple Select Cancel Single-Frame Playback... - Page 92 After rotating the focus area selector lock to the unlocked position, use the focus area selector to view other photographs or photo information. Pressing the focus area selector up or down displays the other photo- graphs in memory one at a time. To scroll quickly to a particular frame number without viewing intervening photos, hold the selector down for more than two seconds.
-
Page 93: Thumbnail Playback
Thumbnail Playback The D1 can display the photographs stored in the flash memory card as thumbnail images. In this mode, up to nine images can be displayed at a time. Holding down the mode dial lock release, turn the mode dial (A) to PLAY (playback mode) and press the nine preview images (C). -
Page 94: Deleting Images
"The Playback Menu," below). To view or delete images in other folders, select "D1 NC_D1" or "DCF_ALL" using the FOLDERS item in the SET UP submenu. The D1 can not display photographs taken with other digital cameras full screen. It can display thumbnail previews of photographs taken with cameras that conform to the Design Rule for Camera File Systems (DCF). -
Page 95: The Playback Menu
The Playback Menu The playback menu offers options for deleting multiple images, creating slide shows, protecting photographs from deletion, and hiding photographs during playback. It also includes options for setting up photos for printing at print services or on printers that support the Digital Print Order Format (DPOF). To use the playback menu: Holding down the mode dial lock release, turn the mode dial to PLAY (playback mode). - Page 96 To select the currently highlighted item, press the focus area selector to the right. A submenu of options for the currently selected item will be displayed. To return to the playback menu without making any changes to settings, press the focus area selector to the left or press the To make changes to settings, highlight the desired option (A) and press the button (B) or press the focus-area selector to the right.
- Page 97 Delete The DELETE submenu contains the following op- tions: SELECTED: Delete multiple selected pho- tographs ALL: Delete all photographs in the current folder PRINT SET: Delete print-order files created using the PRINT option SELECTED When this option is selected, a thumbnail menu showing the images in the current folder will be displayed.
- Page 98 Slideshow The SLIDE SHOW submenu contains the following options: START: Start a slide show FRAME INTVL: Select the time each image will be displayed START When this option is selected, the camera will display the photographs in memory one at a time in the order they were taken (photographs hidden using the HIDE IMAGE option will not be displayed).
-
Page 99: Hide Image
Protect The PROTECT option in the playback menu allows you to change the protected status of selected im- ages. Images can be chosen from a thumbnail menu, where protected images are marked with a Protected images can not be deleted (although they are erased when the memory card is formatted), and have read-only status when viewed on a computer. -
Page 100: Print Setup
Print Setup The PRINT SET option in the playback menu allows images to be selected for printing using a printer or print service that supports the Digital Print Order Format, or DPOF. Data concerning the images and other information to be printed are saved in print order files on the flash memory card. - Page 101 VIDEO OUTPUT: Select the video format used when the camera is con- nected to a television set or VCR. CARDFORMAT: Format memory cards for use in the D1. These options are described in detail on the pages that follow. SET UP...
- Page 102 Creating a new folder automatically resets the frame number display in the control panel on top of the camera to 1. When creating new folders with the NEW command, the D1 only uses the last folder created to store all subsequent photographs. Thus, if you use the NEW option to create in succession the three folders “101 NC_D1,”...
- Page 103 Options The OPTIONS submenu contains the following items: HISTOGRAM: When this item is checked, a histogram is displayed when images are played back. HIGHLIGHT: When this item is checked, high- lights are indicated by a blink- ing display when images are played back.
-
Page 104: Auto Off
HIGHLIGHT When this item is checked, the brightest portions of the image (image highlights) blink on and off. In capture-preview and record-and-review modes, the image and highlights are displayed sepa- rately, with both the image and the highlight display reduced to occupy one-quarter of the monitor. -
Page 105: Video Output
VCR that complies with the PAL standard Card format The CARDFORMAT option in the setup menu can be used to format memory cards for use in the D1. The card format menu is shown at right. To format the memory card, highlight FORMAT using... -
Page 106: Flash Photography
FLASH PHOTOGRAPHY The D1 can be used with the SB-28DX (available separately) for sophisticated flash photographs using the D1’s unique 3D multi-sensor balanced fill-flash control. -
Page 107: Through-The-Lens Flash Photography
When the SB-28DX Speedlight (available separately) is attached to the D1 and set to TTL (through-the-lens) mode, it automatically selects a flash mode designed for the D1 (TTL mode is only available when the SB-28DX is attached). The following settings are available:... -
Page 108: Accessory Shoe
Accessory shoe The SB-28DX, SB-28, SB-27, SB-26, SB-25, SB-24, SB-23, SB-22s, and SB-29 Speedlights can be attached directly to the accessory shoe without a sync cable. The shoe is equipped with a safety lock that keeps the Speedlight affixed to the camera when Speedlights provided with a locking pin (the SB-28DX, SB-28, SB-27, SB- 26, SB-25, SB-22s, and SB-29) are attached. -
Page 109: Flash Sync Modes
Flash Sync Modes Five sync modes are available: Front-curtain sync: This mode is recommended in most situations. When using the SB-26, SB-25, or SB-24, set the sync mode selector on the Speedlight to NORMAL. Slow sync: A lower shutter speed is used in programmed auto and aperture-priority auto exposure modes to bring out background details. - Page 110 To set the flash sync mode, hold down the flash mode button while turning the main command dial. The camera will cycle through the available flash modes in the order shown below. Flash Photography: Flash Sync Modes Programmed auto or aperture priority auto Shutter-priority auto or manual exposure...
-
Page 111: Compatible Speedlights
Compatible Speedlights The D1 can be used with the Speedlights listed below. Balanced Standard Non-TTL fill-flash auto Speedlight SB-28DX (cordless) SB-28 — — (cordless) SB-27 — — (cordless) SB-26 — — (cordless) SB-25 — — (cordless) SB-24 — — (cordless) - Page 112 When using an SB-27 with the D1, set the SB-27 to the Forced A mode. The SB-26 can be set to slave mode for wireless slave flash photography. When the wireless slave selector is set to D, shutter speed will be set to a value under sec.
-
Page 113: Using A Speedlight
Using a Speedlight This section describes the steps involved in using a SB-28DX Speedlight for 3D multi-sensor balanced fill-flash photography. After attaching the Speedlight, choose any metering method other than spot. Choose an exposure mode and confirm shutter speed and aperture. Choose a flash sync mode as described above under “Flash Sync Modes.”... -
Page 114: Connections
CONNECTIONS This chapter describes how to connect the D1 to a computer, television set, or VCR. -
Page 115: Connecting To A Television Or Vcr
Connecting to a Television or VCR Using the EG-D1 video cable, you can connect the D1 to a television or video cassette recorder (VCR) to view images on the television screen or record them on tape. Follow these steps to play photographs back on a television set: Open the cover protecting the camera’s VIDEO OUT and DC IN connectors... -
Page 116: Connecting To A Computer
Connecting to a Computer The D1 can be connected directly to a computer via its IEEE 1394 interface, when images can be transferred to the computer using Nikon View DX or Nikon Capture software (available separately). Using Nikon Capture , you can control your camera from your computer for advanced studio photography. - Page 117 It is recommended that the camera be powered by the EH-4 AC adapter (available separately) when you are using the Nikon digital camera D1 with Nikon View DX . When using an EN-4 battery pack, be aware that leaving the camera connected when the battery is exhausted may shorten battery life.
-
Page 118: Reading Photographs From Memory Cards
CF card reader or, if your computer is equipped with a PCMCIA Type II or Type III card slot, an EC-AD1 PC-card adapter (available separately from Nikon). Using a CF Card Reader The steps involved in connecting a CF card reader and inserting memory cards may be found in the documentation provided with your card reader. - Page 119 See the Nikon View DX reference manual for details. The D1 can read and play back only those images that conform to the Design Rule for Camera File Systems (DCF). It may not be able to read JPEG or TIFF files created by a computer or by another make of camera.
-
Page 120: Technical Notes
TECHNICAL NOTES This chapter contains information on optional accessories, camera care, troubleshooting, and camera specifications. -
Page 121: Replacing The Focusing Screen
Using the tweezers, push the front edge of the holder upward until it clicks into place. Notes Do not touch the camera mirror or the surface of the focusing screens. Use only screens designated for use in the D1 or the Nikon F100 film camera. Technical Notes: Replacing the Focusing Screen... -
Page 122: Compatible Lenses
Compatible Lenses CPU lenses are recommended for use in the D1. particularly recommended, as you will have access to the complete range of camera functions only when a D-Type lens is attached. The following lenses can be used with the D1. - Page 123 11 Auto Extension Ring PK-11A, 12, or 13 required. 12 Exposure determined by presetting lens aperture on bellows. Release shutter after exposure metering. Nikkor lenses that can The following Nikkor lenses can not be used with the D1: • TC-16A AF Teleconverter • Non-AI lenses •...
- Page 124 The diagonal picture angle of a 35mm camera is roughly 1.5 times that of the D1. Consequently when a lens of a given focal length is attached to the D1, the corresponding focal length in 35mm format at the D1’s picture angle can be calculated by multiplying the focal length of the lens by 1.5.
-
Page 125: Cleaning The Ccd
Cleaning the CCD The charged-coupled device (CCD) that serves as the D1’s picture element is fitted with a low-pass filter to prevent moiré. While this filter prevents dirt from getting onto the CCD, any dirt or dust that finds its way onto the filter may, depending on shooting conditions, appear in photographs taken with the camera. - Page 126 (II).” Note that the EH-4 AC adapter (available separately) is required to perform this operation; if you do not have an AC adapter, you will need to take the camera to a Nikon-authorized service center for cleaning.
-
Page 127: Optional Accessories
Optional Accessories At the time of writing, the following accessories were available for the D1: EN-4 Rechargeable Battery Pack The EN-4 is a rechargeable nickel-metal hydride (Ni-MH) battery pack designed exclusively for use in the D1. MH-16 Quick-Charger The MH-16 can be used to recharge EN-4 battery packs. - Page 128 Nikon filters can be divided into three types: screw-in, drop-in and rear- interchange. With the exception of the R60, exposure compensation need not be adjusted when a Nikon filter is attached (in the case of the R60, set exposure compensation to +1). Filters manufactured by other makers may interfere with autofocus or electronic rangefinding.
- Page 129 SD-6, -7 and SK-6 are not available in Europe. The SK-6A is available only in Europe. Accessories for the Remote Terminal The D1 is equipped with a ten-pin remote termi- nal for remote-control photography, automatic photography, and connection to other devices.
- Page 130 Software Two software packages are available for the D1: Nikon View DX , which allows you to browse the contents of the camera’s memory when the camera is connected to the computer via its IEEE 1394 interface, and Nikon Capture , which offers remote control and image enhancement features.
-
Page 131: Troubleshooting
Troubleshooting Should any of the following indicators appear in the viewfinder or control panel displays, check the list below before consulting your retailer or Nikon representative. Indication Problem Control Viewfinder panel Lens aperture ring is not set to smallest aperture. - Page 132 Indication Problem Control Viewfinder panel Subject too bright; photo will be overexposed. Subject too dark; photo will be underexposed. Shutter speed set to bulb bulb bulb (long time expo- (blinking) (blinking) sure) in shutter-priority Programmed auto or shutter-priority auto P or S selected with no lens in (blinking) (blinking)
- Page 133 Solution also Release shutter. If indication persists or appears frequently, take camera to Nikon-autho- rized service center for inspection. Choose different sync mode or use flash that supports red-eye reduc- pg. 98 tion.
-
Page 134: Error Messages
LCD monitor. Below is a list of error messages that may be displayed by the D1 and the steps that should be taken to deal with them. - Page 135 Control LCD Monitor Solution panel This error appears when you attempt to play back images after all photographs in the cur- rent folder have been hidden using HIDE IM- ALL IMAGES AGE. It will not be possible to play back or ARE HIDDEN delete images until you have chosen a different folder or used HIDE IMAGE to allow at least...
-
Page 136: Specifications
Specifications Type: Single-lens reflex digital camera with interchangeable lenses Operating environment Temperature: 0 – 40 C (32 – 104 F) Humidity: Less than 85% (no condensation) Image sensor: 23.7 15.6 mm, 12-bit RGB CCD with 2.7 million pixels, effec- tive pixel count 2.66 million pixels (2,012... - Page 137 S (shutter-priority auto) A (aperture-priority auto) M (manual) Image size: 36 mm Lens mount: Nikon F mount (with AF coupling and AF contacts) Lenses: Type-D AF Nikkor lenses (excluding IX Nikkor)—all functions supported Other type-D Nikkor lenses—all functions except autofocus supported Other AF Nikkor lenses (excluding F3AF)—all functions ex-...
- Page 138 AI-P or AF Nikkor lens other than D-Type, multi-sensor balanced fill-flash for D1 is used. If the SB-28DX is combined with a non-CPU Nikkor lens, balanced TTL flash for the D1 can be used with center-weighted metering. (2) Auto aperture (AA) flash: supported with SB-28DX and CPU...
- Page 139 Note The LCD illuminator will gradually get darker over time. This is normal; if desired, the illuminator can be replaced for a fee by a Nikon-authorized technician. (low battery), (battery 153 (H) 86 (D) mm (6.2...
-
Page 140: Exposure Program (Programmed Auto)
Exposure Program (Programmed Auto) The following chart shows the exposure program used when the exposure mode is set to programmed auto. (ISO 200, lens with maximum aperture of f/1.4 and a minimum aperture of f/16 (e.g., AF 50 mm f/1.4D) F1.4 F2.8 F5.6... -
Page 141: Index
Index Symbols 3D color matrix metering. See Metering 3D multi-sensor balanced fill-flash for the D1. See Flash photogra- A (Aperture-priority auto exposure mode). See Exposure mode A (Auto white balance). See White balance AC adapter ... 114 Accessories, optional ... 114–117 Accessory shoe ... - Page 142 EH-4 AC adapter. See AC adapter Electronic analog exposure display ... v, vi, 48 Electronic rangefinder ... 40, 109 EN-4 NiMH battery pack. See Battery Exposure compensation .. 51, 69, 76 Exposure mode ... 18, 42, 109 aperture priority auto ... 45, 100 manual ...
- Page 143 Single-servo AF. See Autofocus SLIDE SHOW ... 85 Slow sync. See Flash photography Speedlight ... 94, 98–100, 116 See also Flash photography Spot metering. See metering Standard TTL flash for the D1. See Flash photography Sync terminal ... 95 Index...
- Page 144 Thumbnail mode ... 80 Time exposure. See Long time exposure Tone compensation ... 72 Two-button reset ... 76 VIDEO OUTPUT ... 92 Viewfinder diopter ... 63 White balance ... 15, 31–32 YCbCr. See Image quality YCbCr-TIFF ... 29 Index...
Need help?
Do you have a question about the D1 and is the answer not in the manual?
Questions and answers