Table of Contents
Advertisement
Quick Links
MODEL T33127
BENCHTOP HOLLOW-CHISEL
MORTISER
OWNER'S MANUAL
(For models manufactured since 11/21)
COPYRIGHT © NOVEMBER, 2021 BY GRIZZLY INDUSTRIAL, INC.
WARNING: NO PORTION OF THIS MANUAL MAY BE REPRODUCED IN ANY SHAPE
OR FORM WITHOUT THE WRITTEN APPROVAL OF GRIZZLY INDUSTRIAL, INC.
#SS22100 PRINTED IN CHINA
V1.11.21
Advertisement
Table of Contents

Related Manuals for Grizzly T33127


Summary of Contents for Grizzly T33127
- Page 1 (For models manufactured since 11/21) COPYRIGHT © NOVEMBER, 2021 BY GRIZZLY INDUSTRIAL, INC. WARNING: NO PORTION OF THIS MANUAL MAY BE REPRODUCED IN ANY SHAPE OR FORM WITHOUT THE WRITTEN APPROVAL OF GRIZZLY INDUSTRIAL, INC. #SS22100 PRINTED IN CHINA V1.11.21...
- Page 2 This manual provides critical safety instructions on the proper setup, operation, maintenance, and service of this machine/tool. Save this document, refer to it often, and use it to instruct other operators. Failure to read, understand and follow the instructions in this manual may result in fire or serious personal injury—including amputation, electrocution, or death.
-
Page 3: Table Of Contents
Table of Contents INTRODUCTION ..........................2 Contact Info ..........................2 Manual Accuracy ........................2 Identification ..........................3 Machine Data Sheet ........................4 SECTION 1: SAFETY ........................6 Safety Instructions for Machinery ....................6 Additional Safety for Mortising Machines ................... 8 SECTION 2: POWER SUPPLY ...................... -
Page 4: Introduction
ID label (see below). This information is required for us to provide proper tech support, and it helps us determine if updated documentation is available for your machine. Manufacture Date Serial Number Model T33127 (Mfd. Since 10/21) -
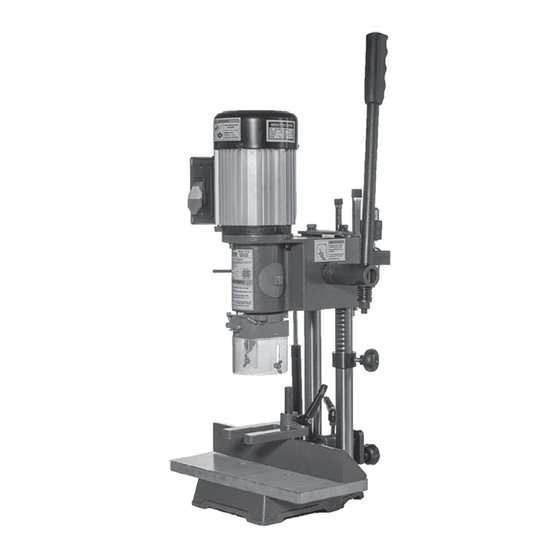
Page 5: Identification
D. Hand Lever: Raises and lowers headstock. loosened, allows fence to move. E. Storage Rack: Stores chisels, hex wrench- M. Gas Spring: Supports headstock. es, and extra drill chuck. Depth Stop: Limits depth headstock can travel. Model T33127 (Mfd. Since 10/21) -
Page 6: Machine Data Sheet
MACHINE DATA SHEET Customer Service #: (570) 546-9663 · To Order Call: (800) 523-4777 · Fax #: (800) 438-5901 MODEL T33127 BENCHTOP HOLLOW‐CHISEL MORTISER Product Dimensions: Weight................................60 lbs. Width (side-to-side) x Depth (front-to-back) x Height............... 13-1/2 x 22 x 30-1/2 in. - Page 7 The information contained herein is deemed accurate as of 10/14/2021 and represents our most recent product specifications. Model T33127 PAGE 2 OF 2 Due to our ongoing improvement efforts, this information may not accurately describe items previously purchased. Model T33127 (Mfd. Since 10/21)
-
Page 8: Section 1: Safety
Never operate under the influence of drugs or injury or blindness from flying particles. Everyday alcohol, when tired, or when distracted. eyeglasses are NOT approved safety glasses. Model T33127 (Mfd. Since 10/21) - Page 9 Make sure they are properly installed, you experience difficulties performing the intend- undamaged, and working correctly BEFORE ed operation, stop using the machine! Contact our operating machine. Technical Support at (570) 546-9663. Model T33127 (Mfd. Since 10/21)
-
Page 10: Additional Safety For Mortising Machines
Failure to do so could result in serious per- sibility of operator injury. If normal safety sonal injury, damage to equipment, or poor precautions are overlooked or ignored, seri- work results. ous personal injury may occur. Model T33127 (Mfd. Since 10/21) -
Page 11: Section 2: Power Supply
Model T33127 (Mfd. Since 10/21) - Page 12 Two-prong outlets do not meet the grounding requirements for this machine. Do not modify or use an adapter on the plug provided—if it will not fit the outlet, have a qualified electrician install the proper outlet with a verified ground. -10- Model T33127 (Mfd. Since 10/21)
-
Page 13: Section 3: Setup
• Flat Head Screwdriver ⁄ " ......1 have resolved any issues between Grizzly or the • Open-End Wrench 17mm ......1 shipping agent. You MUST have the original pack- • Hex Wrench 3mm ........1 aging to file a freight claim. -
Page 14: Inventory
—Shoulder Bolt M10-1.5 x 40mm ....1 —Hex Nut M10-1.5 ........1 —Fender Washer 13mm ......1 —Fender Washer 19mm ......1 —Bushing ⁄ " ..........1 —Adjustable Handle ........1 Figure 2. T33127 inventory. -12- Model T33127 (Mfd. Since 10/21) -
Page 15: Hardware Recognition Chart
Hardware Recognition Chart USE THIS CHART TO MATCH UP HARDWARE DURING THE INVENTORY AND ASSEMBLY PROCESS. Flat Head Screw -13- Model T33127 (Mfd. Since 10/21) -
Page 16: Cleanup
Always test on a small, inconspicu- nent respiratory illness. Reduce your risk ous location first. by wearing a respirator and capturing the dust with a dust-collection system. -14- Model T33127 (Mfd. Since 10/21) -
Page 17: Bench Mounting
Another option is a "direct mount" (see example Figure 6. Installing hand lever clutch. below) where the machine is secured directly to the workbench with lag screws and washers. Lag Screw Flat Washer Machine Base Workbench Figure 5. "Direct Mount" setup. -15- Model T33127 (Mfd. Since 10/21) - Page 18 Figure 8 Fence (see Adjusting Depth Stop on Page 23). Fence Guide Collar Block Compression Spring Depth Figure 10. Fence installed. Depth Stop Stop Collar Knob Figure 8. Depth stop securing headstock at highest position. -16- Model T33127 (Mfd. Since 10/21)
- Page 19 Tighten set screw, then tighten micro-adjust- ment knob until it touches machine (see Figure 12). Micro- Adjustment Adjustable Knob Handle Hold- Set Screw Down Figure 14. Hold-down installed. Micro- Adjustment Bracket Figure 12. Micro-adjustment assembly installed. -17- Model T33127 (Mfd. Since 10/21)
-
Page 20: Joining Drill Chuck & Arbor
(#2 x B16). Store chuck key by clipping to outside of chuck cover. Figure 17. Assembling arbor and chuck. Attempt to separate drill chuck and arbor by hand —if they separate, repeat Steps 3–4. -18- Model T33127 (Mfd. Since 10/21) -
Page 21: Test Run
Clear all setup tools away from machine. Connect machine to power supply. Turn machine ON, verify motor operation, and then turn machine OFF. The motor should run smoothly and without unusual problems or noises. -19- Model T33127 (Mfd. Since 10/21) -
Page 22: Section 4: Operations
Read books/magazines or get formal training before beginning any proj- ects. Regardless of the content in this sec- tion, Grizzly Industrial will not be held liable for accidents caused by lack of training. Never mortise treated lumber—the smoke is extremely poisonous. -
Page 23: Installing Mortising Chisel
Casting ⁄ " ⁄ " ⁄ " ⁄ " Figure 19. T33127 chisel and auger dimensions. Cap Screw Tools Needed Bushing Hex Wrench 5mm ..........1 Auger Chuck Key ............1 Chisel Machinist's Square ..........1 To install mortising chisel: Figure 20. -
Page 24: Adjusting Fence
— If binding does occur, loosen bushing cap Figure 23. Micro-adjustment bracket for screw and rotate chisel 90°. adjusting fence position. 10. Reinstall chuck access cover. When fence is in desired position, tighten fence lock handle. -22- Model T33127 (Mfd. Since 10/21) -
Page 25: Adjusting Hold-Down
Raise depth stop to bottom of headstock and Note: When placed in position shown in tighten knob. Figure 24, hold-down will accommodate workpiece slightly taller than fence. Hold- down may also be flipped over to secure thicker workpieces. -23- Model T33127 (Mfd. Since 10/21) -
Page 26: Adjusting Hand Lever
(see Figure 27). hub. Push hand lever left, ensuring that teeth in hub and clutch mesh. Figure 27. Aligning chisel with mortise outline. Position and lock hold-down (see Adjusting Hold-Down on Page 23). -24- Model T33127 (Mfd. Since 10/21) -
Page 27: Installing Drill Chuck & Arbor
However, NEVER use a cheater pipe or handle extender on the handle. You could break the hand lever and The T33127 comes with a spare drill chuck and be seriously injured. arbor to install as an attachment in the machine. -
Page 28: Section 5: Accessories
To reduce this risk, only install accessories recommended for this machine by Grizzly. NOTICE Refer to our website or latest catalog for additional recommended accessories. T20501—Face Shield Crown Protector 4"... - Page 29 OD shank to fit ⁄ " drill press collars. Made in Japan. Japan. Figure 36. T10019 ⁄ " Premium Mortising Chisel. Figure 34. T10017 ⁄ " Premium Mortising Chisel. www.grizzly.com 1-800-523-4777 order online at or call -27- Model T33127 (Mfd. Since 10/21)
-
Page 30: Section 6: Maintenance
It is important that a small amount Cleaning the Model T33127 is relatively easy. is used and none is applied to the chisel. Bees Vacuum excess wood chips and sawdust, and wax coming into contact with the finished surfaces wipe off the remaining dust with a dry cloth. -
Page 31: Section 7: Service
4. Test by rotating shaft; rotational grinding/loose shaft requires bearing replacement. 5. Chuck or cutter at fault. 5. Replace out-of-round chuck, dull, or bent cutter. 6. Spindle Bearings at fault. 6. Test by rotating spindle; rotational grinding/loose shaft requires bearing replacement. -29- Model T33127 (Mfd. Since 10/21) - Page 32 Auger skips/jumps 1. Proper mortising sequence not followed. inside mortise. Workpiece raises as 1. Hold-down not installed/loose. 1. Install hold-down. Properly position hold down for chisel is raised up. workpiece thickness and secure (Page 23). -30- Model T33127 (Mfd. Since 10/21)
-
Page 33: Replacing Gas Spring
Note: Ball studs on gas spring are pressed in and cannot be replaced. Do NOT attempt to remove them. When ordering replacement parts from Grizzly the new gas spring will Figure 38. Location of gas spring. have ball studs already pressed in. -
Page 34: Section 8: Wiring
Technical Support at (570) 546-9663. The photos and diagrams included in this section are best viewed in color. You can view these pages in color at www.grizzly.com. -
Page 35: Wiring Diagram
Switch Circuit Paddle Switch Breaker Capacitor KEDU+HY18 20/12A CBB60 125/250V 24 uF Figure 40. Switch box. 250 VAC Circuit Breaker Ground Kuoyuh 6A 125/250VAC Junction Box 120V Motor READ ELECTRICAL SAFETY -33- Model T33127 (Mfd. Since 10/21) ON PAGE 32! -
Page 36: Section 9: Parts
SECTION 9: PARTS We do our best to stock replacement parts when possible, but we cannot guarantee that all parts shown are available for purchase. Call (800) 523-4777 or visit www.grizzly.com/parts to check for availability. Main 29-1 29-2 29-3 29-4... - Page 37 MORTISING CHISEL 1/4" PT33127037 PLASTIC COVER PT33127084 DRILL CHUCK ARBOR MT#2 X B16 PT33127038 COMPRESSION SPRING 2 X 19 X 28MM BUY PARTS ONLINE AT GRIZZLY.COM! -35- Model T33127 (Mfd. Since 10/21) Scan QR code to visit our Parts Store.
-
Page 38: Labels & Cosmetics
Safety labels help reduce the risk of serious injury caused by machine hazards. If any label comes off or becomes unreadable, the owner of this machine MUST replace it in the original location before resuming operations. For replacements, contact (800) 523-4777 or www.grizzly.com. BUY PARTS ONLINE AT GRIZZLY.COM! -36- Model T33127 (Mfd. -
Page 39: Warranty & Returns
WARRANTY & RETURNS Grizzly Industrial, Inc. warrants every product it sells for a period of 1 year to the original purchaser from the date of purchase. This warranty does not apply to defects due directly or indirectly to misuse, abuse, negligence, accidents, repairs or alterations or lack of maintenance.
Need help?
Do you have a question about the T33127 and is the answer not in the manual?
Questions and answers