Table of Contents
Advertisement
Quick Links
Advertisement
Table of Contents

Related Manuals for Electrolux FQV741XEV


Summary of Contents for Electrolux FQV741XEV
- Page 1 FQV741XEV Oven User Manual...
-
Page 2: Table Of Contents
13. ENERGY EFFICIENCY.................. 34 WE’RE THINKING OF YOU Thank you for purchasing an Electrolux appliance. You’ve chosen a product that brings with it decades of professional experience and innovation. Ingenious and stylish, it has been designed with you in mind. So whenever you use it, you can be safe in the knowledge that you’ll get great results every time. -
Page 3: Safety Information
ENGLISH SAFETY INFORMATION Before the installation and use of the appliance, carefully read the supplied instructions. The manufacturer is not responsible for any injuries or damages that are the result of incorrect installation or usage. Always keep the instructions in a safe and accessible location for future reference. -
Page 4: Safety Instructions
Always use oven gloves to remove or put in • accessories or ovenware. Before carrying out any maintenance, disconnect the • appliance from the power supply. Ensure that the appliance is switched off before • replacing the lamp to avoid the possibility of electric shock. - Page 5 ENGLISH • Do not use multi-plug adapters and • Do not operate the appliance with wet extension cables. hands or when it has contact with • Make sure not to cause damage to water. the mains plug and to the mains •...
- Page 6 Do not not use any abrasive products, close the furniture panel until the abrasive cleaning pads, solvents or appliance has cooled down metal objects. completely after use. • If you use an oven spray, follow the safety instruction on it's packaging.
-
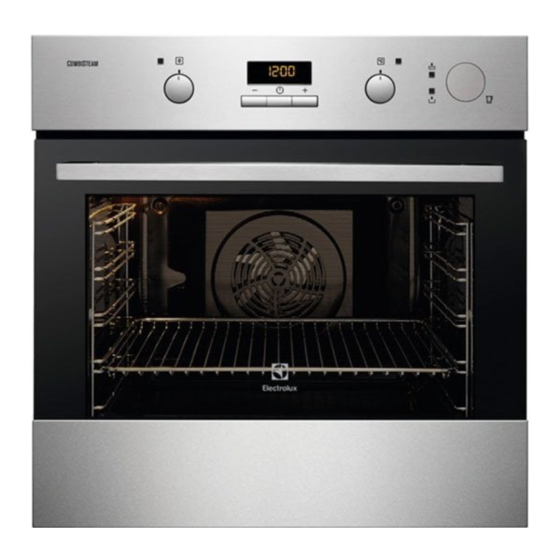
Page 7: Product Description
ENGLISH 3. PRODUCT DESCRIPTION 3.1 General overview Control panel Knob for the oven functions Power lamp / symbol Electronic programmer Knob for the temperature Temperature indicator / symbol Water tank indicator Water drawer Heating element Lamp Aqua cleaning container Shelf support, removable Draining pipe Water outlet valve Shelf positions... -
Page 8: Daily Use
This is normal. Make sure that the airflow in the room is sufficient. 5. DAILY USE 1. Turn the knob for the oven functions WARNING! to select an oven function. Refer to Safety chapters. 2. Turn the knob for the temperature to select a temperature. - Page 9 ENGLISH Oven function Application Turbo Grilling To roast larger meat joints or poultry with bones on one shelf position. Also to make gratins and to brown. True Fan Cook‐ To bake on up to three shelf positions at the same ing / Defrost time and to dry food.
- Page 10 5.9 Emptying the water tank Use only water as the liquid. Do not use filtered CAUTION! (demineralised) or Make sure that the appliance distilled water. Do not is cool before you start to use other liquids. empty the water tank.
-
Page 11: Clock Functions
ENGLISH 6. CLOCK FUNCTIONS 6.1 Clock functions table Clock function Application TIME OF DAY To set, change or check the time of day. DURATION To set how long the appliance operates. To set when the appliance deactivates. TIME DELAY To combine DURATION and END function. MINUTE MIND‐... -
Page 12: Using The Accessories
Appliance turns on automatically later on, The Minute Minder starts automatically works for the set DURATION time and after 5 seconds. stops at the set END time. At the set time 3. When the set time ends, an acoustic an acoustic signal sounds. - Page 13 ENGLISH The injector and the injector tube Small indentation at the top increase safety. The indentations are also anti-tip devices. The high rim around the shelf prevents cookware from slipping of the shelf. 7.2 Accessories for steam cooking The steam kit accessories "C"...
- Page 14 7.3 Steam cooking in a dietary baking dish Put the food onto the steel grill in the baking dish and put the lid on it. 1. Put the injector tube into the special hole in the lid of the dietary baking dish.
-
Page 15: Additional Functions
ENGLISH 2. Put the baking dish onto the first or CAUTION! second shelf position from the Do not use the lid of the bottom. dish. Make sure that you do not crush the injector tube or let it touch a heating WARNING! element on the top of the oven. -
Page 16: Hints And Tips
9. HINTS AND TIPS aluminium foil on the components WARNING! when you cook. This can change the Refer to Safety chapters. baking results and cause damage to the enamel. The temperature and baking times in the tables are 9.2 Baking cakes guidelines only. - Page 17 ENGLISH Food Top / Bottom Heat True Fan Cooking Time Com‐ (min) ments Tempera‐ Shelf po‐ Tempera‐ Shelf po‐ ture (°C) sition ture (°C) sition Buttermilk 60 - 80 In a 26 cm cheese‐ cake cake mould Apple 2 (left and 80 - 100 In two 20 cake (Ap‐...
- Page 18 Food Top / Bottom Heat True Fan Cooking Time Com‐ (min) ments Tempera‐ Shelf po‐ Tempera‐ Shelf po‐ ture (°C) sition ture (°C) sition Biscuits / 140 - 150 1, 3 and 5 35 - 45 In a baking...
- Page 19 ENGLISH Food Top / Bottom Heat True Fan Cooking Time Com‐ (min) ments Tempera‐ Shelf po‐ Tempera‐ Shelf po‐ ture (°C) sition ture (°C) sition Bread 2 (2 and 25 - 40 6 - 8 rolls in a bak‐ rolls ing tray 230 - 250 230 - 250...
- Page 20 Food Top / Bottom Heat True Fan Cooking Time Com‐ (min) ments Tempera‐ Shelf po‐ Tempera‐ Shelf po‐ ture (°C) sition ture (°C) sition English 60 - 70 On a wire roast beef, shelf medium English 70 - 75...
- Page 21 ENGLISH Food Quantity Tempera‐ Time (min) Shelf po‐ ture (°C) sition Pieces 1st side 2nd side Fillet max. 12 - 15 12 - 14 steaks Beef max. 10 - 12 6 - 8 steaks Sausages 8 max. 12 - 15 10 - 12 Pork max.
- Page 22 Pork Food Quantity (kg) Temperature Time (min) Shelf posi‐ (°C) tion Shoulder, neck, 1 - 1.5 160 - 180 90 - 120 1 or 2 ham joint Chop, spare rib 1 - 1.5 170 - 180 60 - 90...
- Page 23 ENGLISH 9.8 Defrost Food Quantity Defrosting Further defrost‐ Comments time (min) ing time (min) Chicken 1000 100 - 140 20 - 30 Place the chicken on an upturned saucer placed on a large plate. Turn halfway through. Meat 1000 100 - 140 20 - 30 Turn halfway through.
- Page 24 Food Temperature Time (h) Shelf position (°C) 1 position 2 positions Apple slices 60 - 70 6 - 8 1 / 4 Pears 60 - 70 6 - 9 1 / 4 9.10 True Fan + Steam Cakes and pastries Food Tempera‐...
- Page 25 ENGLISH Flans Food Tempera‐ Time Shelf po‐ Comments ture (°C) (min) sition Vegetables filled 170 - 180 30 - 40 In a mould Lasagne 170 - 180 40 - 50 In a mould Potato gratin 160 - 170 50 - 60 1 (2 and 4) In a mould Meat Food...
- Page 26 Food Temperature Time (min) Shelf po‐ Comments (°C) sition Pasta and 10 - 15 Reheat on a plate sauce Side dishes (e.g. 10 - 15 Reheat on a plate rice, potatoes, pasta) One-plate 10 - 15 Reheat on a plate...
-
Page 27: Care And Cleaning
ENGLISH Food Temperature (°C) Time (min) Shelf position Poached chicken 25 - 35 breast Kasseler (smoked 80 - 100 loin of pork) Fish Food Temperature (°C) Time (min) Shelf position Trout 25 - 30 Salmon filet 25 - 30 Side dishes Food Temperature (°C) Time (min) - Page 28 10.4 Removing the shelf WARNING! supports Make sure that the oven is cool before you touch To clean the oven, remove the shelf it. There is a risk of supports. burns. 1. Pull the front of the shelf support 10.6 Cleaning the water tank...
- Page 29 ENGLISH CALCIUM QUANTITY TABLE INDICATED FROM W.H.O. (World Health Organization) Calcium de‐ Water hardness Water classifi‐ Run decalcifi‐ posit cation cation every (French de‐ (German de‐ grees) grees) 0 - 60 mg/l 0 - 6 0 - 3 Sweet of soft 75 cycles - 2.5 months 60 - 120 mg/l...
- Page 30 4. Identify the hinge to the left side of 7. Put the door on a soft cloth on a the door. stable surface. 8. Hold the door trim (B) on the top edge of the door at the two sides and push inwards to release the clip seal.
-
Page 31: Troubleshooting
ENGLISH 10.8 Replacing the lamp Make sure that you put the glass panels (A and B) back in the correct sequence. Put a cloth on the bottom of the interior The first panel (A) has a decorative of the appliance. It prevents damage to frame. - Page 32 Problem Possible cause Remedy The oven does not heat The fuse is blown. Make sure that the fuse is the cause of the malfunc‐ tion. If the fuse is blown again and again, contact a qualified electrician. The display shows "12.00". There was a power cut.
-
Page 33: Installation
ENGLISH We recommend that you write the data here: Model (MOD.) ......... Product number (PNC) ......... Serial number (S.N.) ......... 12. INSTALLATION 12.2 Securing the appliance to WARNING! the cabinet Refer to Safety chapters. 12.1 Building In min. 550 min. 560 595 +/-1 12.3 Electrical installation The manufacturer is not... -
Page 34: Energy Efficiency
3680 3 x 1.5 13. ENERGY EFFICIENCY 13.1 Product Fiche and information according to EU 65-66/2014 Supplier's name Electrolux Model identification FQV741XEV Energy Efficiency Index 105.9 Energy efficiency class Energy consumption with a standard load, con‐ 0.93 kWh/cycle ventional mode Energy consumption with a standard load, fan- 0.90 kWh/cycle... - Page 35 ENGLISH 14. ENVIRONMENTAL CONCERNS appliances marked with the symbol Recycle materials with the symbol with the household waste. Return the Put the packaging in relevant containers product to your local recycling facility or to recycle it. Help protect the contact your municipal office. environment and human health by recycling waste of electrical and electronic appliances.
- Page 36 www.electrolux.com/shop...