Table of Contents
Advertisement
Advertisement
Table of Contents

Related Manuals for NETGEAR EN104TP


Summary of Contents for NETGEAR EN104TP
-
Page 2: Start Here
Start Here Congratulations on your purchase of the NETGEAR EN106 , or Model EN108 Ethernet hub. The hubs deliver standards-based, plug-and-play networking solutions for small businesses, home offices, and low- density workgroups of larger companies. In this installation guide, all three hubs are referred to collectively as the Model... -
Page 3: Package Contents
Mounting kit (for wall installation) • This installation guide • Warranty & Owner Registration Card • Power adapter Model EN104 /EN106 Model EN108 EN108 10 BASE-T HUB Link/Rx Partition Normal/Uplink hub, /EN108 Ethernet Hub Installation Guide Power adapter and cord 8722FA... -
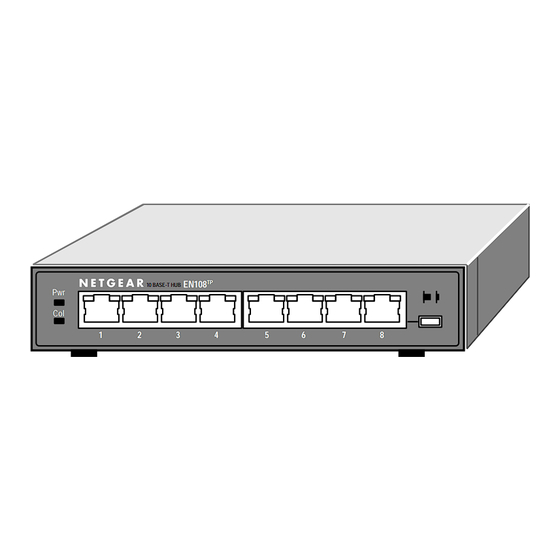
Page 4: Product Illustration
The front panel of the Model EN104 Model EN106 hub has six RJ-45 10BASE-T ports, and the Model EN108 hub has eight RJ-45 10BASE-T ports. Two LEDs—the Link LED and the Rx LED—are built into each 10BASE-T port. Model EN104... -
Page 5: Normal/Uplink Push Button
The Normal/Uplink push button allows you to select Normal (MDI-X) wiring for direct PC connection. The push button also allows you to select Uplink (MDI) wiring for connection to a hub or a switch through port 4 on the Model EN104... -
Page 6: Installation Procedures
Install the Hub To install your hub on a flat surface, you do not need any special tools. Be sure the hub is positioned with at least 2 inches of space on all sides for ventilation. -
Page 7: Connect A Pc To The Hub
10BASE-T Ethernet interface to the RJ-45 ports on your hub by using twisted pair Ethernet cables. To connect any of the RJ-45 ports on your hub to a PC, use a regular straight-through UTP cable. If you are connecting using port 4 on the Model EN104... -
Page 8: Connect The Hub To A Network
100 meters (m) in length. The 10BASE-T ports, with the exception of port 4 on the Model EN104 Model EN106 hub, or port 8 on the Model EN108 Normal) ports. Use the following table as a guide for selecting the appropriate network cable. -
Page 9: Cascade The Hub
When PC “A” communicates with PC “B,” the communication path goes from hub 4 to hub 2, to hub 1, to hub 3, and then to hub 5 (or five paths). - Page 10 The following illustration shows cascading hubs together daisy-chain style and indicates the setting of the Normal/Uplink push button on each hub. Model EN104 Model EN106 EN106 10 BASE-T HUB Model EN108 EN108 10 BASE-T HUB Model EN104 /EN106 EN104 10 BASE-T HUB...
-
Page 11: Verify The Installation
Verify the Installation To complete the installation, connect the power cord first to the power receptacle on the hub rear panel and then to the power outlet on the wall. When power has been applied to the hub: • The green Pwr (Power) LED on the front panel is on. -
Page 12: Troubleshooting Information
Hub Integrity If required, verify the integrity of the hub by resetting it. Turn power to the switch off and then back on. If the problem continues and you have completed all the preceding diagnoses, contact NETGEAR Customer Support. -
Page 13: Twisted Pair Cables
The figures illustrate the use of straight-through and crossover twisted pair cables. Uplink or twisted pair cable MDI port Normal or MDI-X port twisted pair cable Model EN104 /EN106 Straight-through Normal or MDI-X port Normal or Crossover MDI-X port /EN108 Ethernet Hub Installation Guide 8146EA... - Page 14 Port 4 on the Model EN104 Port 6 on the Model EN106 Port 8 on the Model EN108 Output Transmit Data + Output Transmit Data - Input Receive Data + Input Receive Data - Not used /EN108 Ethernet Hub Installation Guide...
-
Page 15: Technical Specifications
Power Consumption: Model EN104 TP hub Model EN106 TP hub Model EN108 TP hub DC output voltage (Power adapter): Model EN104 TP hub Model EN106 TP hub and Model EN108 TP hub Physical Specifications Dimensions: Model EN104 Model EN106 hub and... - Page 16 Safety Agency Approvals for Power Adapter CE mark, commercial UL listed (UL 1950) CSA certified (CSA 22.2 #950) TUV licensed (EN 60 950) T-Mark Model EN104 /EN106 /EN108 Ethernet Hub Installation Guide...
- Page 17 In the interest of improving internal design, operational function, and/or reliability, NETGEAR reserves the right to make changes to the products described in this document without notice. NETGEAR does not assume any liability that may occur due to the use or application of the product(s) or circuit layout(s) described herein.
-
Page 18: Customer Support
France: 0800-90-2078 Germany: 0130-817305 Japan: 0120-66-5402 Korea: 00308-11-0319 New Zealand: 0800-444-626 Sweden: 020-790086 United Kingdom: (44) 171-571-5120 U.S./Canada: 800-211-2069 Internet/World Wide Web The NETGEAR Web page is at http://NETGEAR.baynetworks.com. Defective or damaged merchandise can be returned to your point-of-sale. *M-EN100TPNA-1*...
Need help?
Do you have a question about the EN104TP and is the answer not in the manual?
Questions and answers