Advertisement
Quick Links
aspenhome
ah
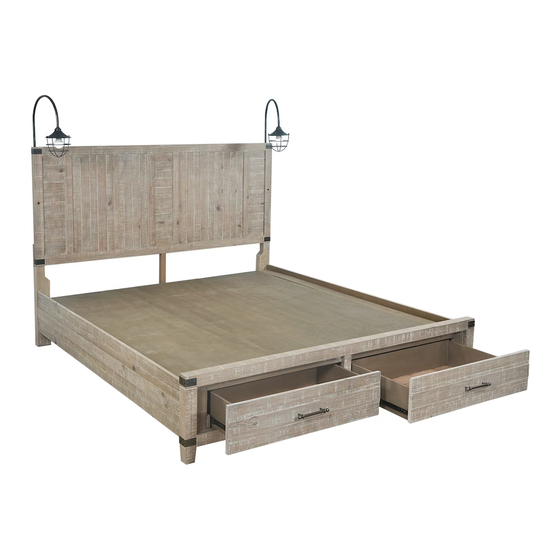
ITEM NO: I349-412-WST
I349-402-WST
I349-403D-WST
Thank you for purchasing this quality product. Be sure to check all packing material carefully for
small parts that may come loose inside the carton during shipment.
I349-412
I349-402
BEFORE USING THIS PRODUCT PLEASE READ, UNDERSTAND, AND FOLLOW THESE INSTRUCTIONS.
Save these instructions for future reference.
Page 1/7
Queen Panel HB w/ 2 Lamps
Queen Rails
Queen Storage FB
UNIT SHOULD BE INSTALLED BY 2 OR MORE PERSONS.
I349-403D
FOR INDOOR USE ONLY
MADE IN VIETNAM
ASSEMBLY INSTRUCTIONS
R
All Beds need to be set up in the exact final
location so that after full assembly it will not
need to be moved. Moving the bed will cause
the support legs to move out of perpendicular
(90 degree), weaken the support system, and
may allow the bed to collapse.
TOOLS REQUIRED (NOT PROVIDED)
PHILLIPS SCREWDRIVER
Swing Lamp
Assembly instructions for the Swing Lamps
are in the Lamp package. Follow the below
instructions when attaching the swing lamps
to this headboard.
06-06-2022
Advertisement

Related Manuals for aspenhome I349-412-WST


Summary of Contents for aspenhome I349-412-WST
- Page 1 ASSEMBLY INSTRUCTIONS ITEM NO: I349-412-WST Queen Panel HB w/ 2 Lamps I349-402-WST Queen Rails I349-403D-WST Queen Storage FB Thank you for purchasing this quality product. Be sure to check all packing material carefully for small parts that may come loose inside the carton during shipment.
- Page 2 ASSEMBLY INSTRUCTIONS ITEM NO: I349-412-WST Queen Panel HB w/ 2 Lamps I349-402-WST Queen Rails I349-403D-WST Queen Storage FB HARDWARE LIST: I349-412 COMPONENTS LIST: I349-412 Description Quantity Description Quantity Sketch Sketch Bolt Ø5/16" x 1-3/4"(18) 1 PC 5 PCS Headboard Bolt Ø5/16"...
- Page 3 ASSEMBLY INSTRUCTIONS ITEM NO: I349-412-WST Queen Panel HB w/ 2 Lamps I349-402-WST Queen Rails I349-403D-WST Queen Storage FB STEP 2: Attach the wood stretcher to the legs by using 2 bolts(A), lock washers(C) and flat washers(D). Completely tighten all bolts.
- Page 4 ASSEMBLY INSTRUCTIONS ITEM NO: I349-412-WST Queen Panel HB w/ 2 Lamps I349-402-WST Queen Rails I349-403D-WST Queen Storage FB STEP 5: Screw the bolts(F) into HB & FB. Make sure the slat bearer is in the UPPER position. Align the bolts with the holes in the end of side rails and attach the side rails to HB & FB using half moon Washers(G), Lock Washers(H) and hex nuts (I).Then use a hex wrench to tighten all...
- Page 5 ASSEMBLY INSTRUCTIONS ITEM NO: I349-412-WST Queen Panel HB w/ 2 Lamps I349-402-WST Queen Rails I349-403D-WST Queen Storage FB STEP 8: Arrange slats on the slat bearers and then lay the decking on top of the slats. Make sure the top and bottom slats are situated underneath the pre-drilled holes as shown below in STEP 9.
- Page 6 ASSEMBLY INSTRUCTIONS ITEM NO: I349-412-WST Queen Panel HB w/ 2 Lamps I349-402-WST Queen Rails I349-403D-WST Queen Storage FB FOR SWING LAMP ASSEMBLY: STEP 1: Attach each of the swing lamp ("1" on the component list for swing lamp) to the back of the headboard with 4 flat head wood screws ("A" on the hardware bag for swing lamp) as shown below.
- Page 7 ASSEMBLY INSTRUCTIONS ITEM NO: I349-412-WST Queen Panel HB w/ 2 Lamps I349-402-WST Queen Rails I349-403D-WST Queen Storage FB STEP 5: Insert the plugs to the socket, lift (do not push or drag) Swingable Metal Arm the bed assembly to the desired location and rotate the swing lamps to the desired angle.
- Page 8 ASSEMBLY INSTRUCTIONS ITEM NO: I349-412-WST Queen Panel HB w/ 2 Lamps I349-402-WST Queen Rails I349-403-WST Queen Low Profile FB Thank you for purchasing this quality product. Be sure to check all packing material carefully for small parts that may come loose inside the carton during shipment.
- Page 9 ASSEMBLY INSTRUCTIONS ITEM NO: I349-412-WST Queen Panel HB w/ 2 Lamps I349-402-WST Queen Rails I349-403-WST Queen Low Profile FB HARDWARE LIST: I349-412 COMPONENTS LIST: I349-412 Description Quantity Description Quantity Sketch Sketch Bolt Ø5/16" x 1-3/4"(18) 1 PC 5 PCS Headboard Bolt Ø5/16"...
- Page 10 ASSEMBLY INSTRUCTIONS ITEM NO: I349-412-WST Queen Panel HB w/ 2 Lamps I349-402-WST Queen Rails I349-403-WST Queen Low Profile FB STEP 3: Attach the center support leg to headboard and wood stretcher by using 3 bolts(A), lock washers(C) and flat washers(D).
- Page 11 ASSEMBLY INSTRUCTIONS ITEM NO: I349-412-WST Queen Panel HB w/ 2 Lamps I349-402-WST Queen Rails I349-403-WST Queen Low Profile FB This End Up STEP 5: Attach the support legs with leveler to the slats. Adjust the levelers on bottom of support legs when necessary.
- Page 12 ASSEMBLY INSTRUCTIONS ITEM NO: I349-412-WST Queen Panel HB w/ 2 Lamps I349-402-WST Queen Rails I349-403-WST Queen Low Profile FB STEP 5: Screw the bolts(F) into HB & FB. Make sure the slat bearer is in the position (a). Align the bolts with the holes in the end of side rails and attach the side rails to HB & FB using half moon Washers(G), Lock Washers(H) and hex nuts (I).Then use a hex wrench to...
- Page 13 ASSEMBLY INSTRUCTIONS ITEM NO: I349-412-WST Queen Panel HB w/ 2 Lamps I349-402-WST Queen Rails I349-403-WST Queen Low Profile FB FOR SWING LAMP ASSEMBLY: STEP 1: Attach each of the swing lamp ("1" on the component list for swing lamp) to the back of the headboard with 4 flat head wood screws ("A"...
- Page 14 ASSEMBLY INSTRUCTIONS ITEM NO: I349-412-WST Queen Panel HB w/ 2 Lamps I349-402-WST Queen Rails I349-403-WST Queen Low Profile FB Swingable Metal Arm STEP 5: Insert the plugs to the socket, lift (do not push or drag) the bed assembly to the desired location and rotate the swing Small Bolt lamps to the desired angle.
- Page 15 ASSEMBLY INSTRUCTIONS ITEM NO: I349-415-WST King Panel HB w/ 2 Lamps I349-407-WST King Low Profile FB I349-406-WST King Rails I349-410-WST Cal King Rails Thank you for purchasing this quality product. Be sure to check all packing material carefully for small parts that may come loose inside the carton during shipment.
- Page 16 ASSEMBLY INSTRUCTIONS ITEM NO: I349-415-WST King Panel HB w/ 2 Lamps I349-407-WST King Low Profile FB I349-406-WST King Rails I349-410-WST Cal King Rails HARDWARE LIST: I349-415 COMPONENTS LIST: I349-415 Description Quantity Description Quantity Sketch Sketch Bolt Ø15/16" x 1-3/4"(18)
- Page 17 ASSEMBLY INSTRUCTIONS ITEM NO: I349-415-WST King Panel HB w/ 2 Lamps I349-407-WST King Low Profile FB I349-406-WST King Rails I349-410-WST Cal King Rails STEP 2: Attach the wood stretcher to the legs by using 2 bolts(A), lock washers(C) and flat washers(D). Completely tighten all bolts.
- Page 18 ASSEMBLY INSTRUCTIONS ITEM NO: I349-415-WST King Panel HB w/ 2 Lamps I349-407-WST King Low Profile FB I349-406-WST King Rails I349-410-WST Cal King Rails This End Up STEP 5: Attach the support legs with leveler to the slats. Adjust the levelers on bottom of support legs when necessary.
- Page 19 ASSEMBLY INSTRUCTIONS ITEM NO: I349-415-WST King Panel HB w/ 2 Lamps I349-407-WST King Low Profile FB I349-406-WST King Rails I349-410-WST Cal King Rails STEP 5: Screw the bolts(F) into HB & FB. Make sure the slat bearer is in the position (a).
- Page 20 ASSEMBLY INSTRUCTIONS ITEM NO: I349-415-WST King Panel HB w/ 2 Lamps I349-407-WST King Low Profile FB I349-406-WST King Rails I349-410-WST Cal King Rails FOR SWING LAMP ASSEMBLY: STEP 1: Attach each of the swing lamp ("1" on the component list for swing lamp) to the back of the headboard with 4 flat head wood screws ("A"...
- Page 21 ASSEMBLY INSTRUCTIONS ITEM NO: I349-415-WST King Panel HB w/ 2 Lamps I349-407-WST King Low Profile FB I349-406-WST King Rails I349-410-WST Cal King Rails Swingable Metal Arm STEP 5: Insert the plugs to the socket, lift (do not push or drag)
- Page 22 ASSEMBLY INSTRUCTIONS ITEM NO: I349-415-WST King Panel HB w/ 2 Lamps I349-407D-WST King Storage FB I349-406-WST King Rails I349-410-WST Cal King Rails Thank you for purchasing this quality product. Be sure to check all packing material carefully for small parts that may come loose inside the carton during shipment.
- Page 23 ASSEMBLY INSTRUCTIONS ITEM NO: I349-415-WST King Panel HB w/ 2 Lamps I349-407D-WST King Storage FB I349-406-WST King Rails I349-410-WST Cal King Rails HARDWARE LIST: I349-415 COMPONENTS LIST: I349-415 Description Description Quantity Quantity Sketch Sketch Bolt Ø5/16" x 1-3/4"(18) 1 PC...
- Page 24 ASSEMBLY INSTRUCTIONS ITEM NO: I349-415-WST King Panel HB w/ 2 Lamps I349-407D-WST King Storage FB I349-406-WST King Rails I349-410-WST Cal King Rails STEP 2: Attach the wood stretcher to the legs by using 2 bolts(A), lock washers(C) and flat washers(D). Completely tighten all bolts.
- Page 25 ASSEMBLY INSTRUCTIONS ITEM NO: I349-415-WST King Panel HB w/ 2 Lamps I349-407D-WST King Storage FB I349-406-WST King Rails I349-410-WST Cal King Rails STEP 5: Screw the bolts(F) into HB & FB. Make sure the slat bearer is in the UPPER position.
- Page 26 ASSEMBLY INSTRUCTIONS ITEM NO: I349-415-WST King Panel HB w/ 2 Lamps I349-407D-WST King Storage FB I349-406-WST King Rails I349-410-WST Cal King Rails STEP 8: Arrange slats on the slat bearers and then lay the decking on top of the slats. Make sure the top and bottom slats are situated underneath the pre-drilled holes as shown below in STEP 10.
- Page 27 ASSEMBLY INSTRUCTIONS ITEM NO: I349-415-WST King Panel HB w/ 2 Lamps I349-407D-WST King Storage FB I349-406-WST King Rails I349-410-WST Cal King Rails STEP 11: For Cal King bed, insert wood caps into the holes on headboard and footboard. For regular King bed, skip this step.
- Page 28 ASSEMBLY INSTRUCTIONS ITEM NO: I349-415-WST King Panel HB w/ 2 Lamps I349-407D-WST King Storage FB I349-406-WST King Rails I349-410-WST Cal King Rails Swingable Metal Arm STEP 5: Insert the plugs to the socket, lift (do not push or drag)
- Page 29 LED Light QTY: 2 Sets/Ctn Safety Warning Designed to be used with Aspenhome Lamp only. The manufacturer is not liable for damage or injury caused by incorrect assembly or use. Keep the assembly instruction for future reference. Important Safety Instructions...
- Page 30 Swing Lamp Assembly Instructions STEP 1: Unscew 3 cap bolts attached on the lampshade by a hex wrench (C) and take out the metal grid as the diagram shown below. Save hardware to replace the metal grid in STEP 3. STEP 2: Install the LED bulb in the lampshade as the diagram shown below.
Need help?
Do you have a question about the I349-412-WST and is the answer not in the manual?
Questions and answers