
Related Manuals for Amada ML-7 Series


Summary of Contents for Amada ML-7 Series
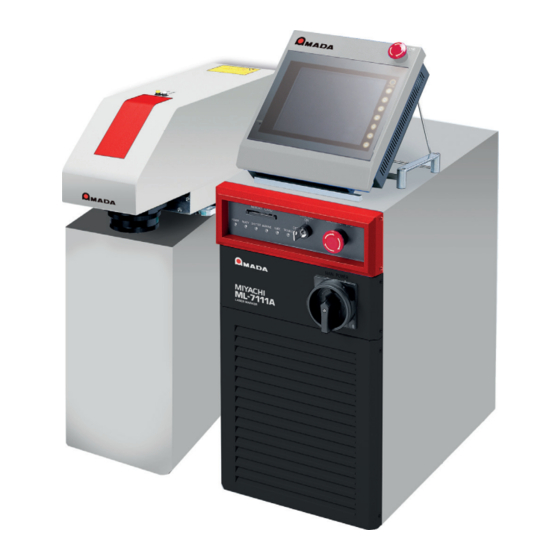
- Page 1 LD-Pumped Laser Marker ML-7 Series ML-9001A OPERATION MANUAL Specifications Z11OM1158223-20...
-
Page 2: Organization Of This Manual
Instructions for marking from the Operating Unit touch panel. Notes ■ • This documentation is intended for ML-7 series (ML-7111A/7112AH/7064A) and ML-9001A markers. Figures and screenshots are based on the ML-7111A, unless information for other markers is significantly different. • Unauthorized reproduction of this manual in whole or in part is prohibited. -
Page 3: Chapter Overview
Chapter Overview ML-7111A, ML-7112AH, Chapter 1 Overview of the ML-9001A, ML-7064A Summary of laser marker features Chapter 2 Part Names and Functions Marker part names and functions Chapter 3 System Configuration Chapter System configuration, constituent parts, and included accessories Chapter Chapter 4 Marker Specifications Detailed marker specifications... -
Page 5: Table Of Contents
4.1 Basic Specifications ..............20 4.2 Marking Area Specifications............21 4.3 External Specifications..............22 Control Unit ....................22 ■ Operating Unit ....................22 ■ Head Unit (Mounted on a Standard Scanner, Interchangeable EXP/Standard Scanner, or High-Precision Scanner) 23 ■ ML-7 Series/ML-9001A... - Page 6 Overview of the ML-9001A..........42 1.1 Features ..................42 SHG Laser Marking................42 ■ ML-9001A..................... 42 ■ Chapter 2 Part Names and Functions ..........44 2.1 Control Unit .................. 44 Front ......................44 ■ Back ......................46 ■ ML-7 Series/ML-9001A...
- Page 7 ■ Back ......................67 ■ 2.3 Head Unit (Right-Angled Head and Straight Head) ..... 68 Right-Angled Head ..................68 ■ Straight Head ....................68 ■ 2.4 Operating Unit ................71 Front ......................71 ■ Side ......................72 ■ ML-7 Series/ML-9001A...
- Page 8 Detailed Specifications ................108 ■ 6.1.2 Preparing Data ..............109 Overview of Sample Data................109 ■ Examples of Preparing Data Elements ............110 ■ 6.2 DataMatrix Specifications............113 6.2.1 DataMatrix Symbol Specifications........113 Detailed Specifications ................113 ■ ML-7 Series/ML-9001A...
- Page 9 During 4-axis control (when using EX4) ............. 143 ■ If a transfer unit error occurs (after ACK timeout)........144 ■ When NAK (awaiting transfer unit operation) is used......... 145 ■ 7.4 Remote Interlock (REM. I/L)............146 7.4.1 Connection Examples ............. 146 ML-7 Series/ML-9001A...
- Page 10 Contents 7.4.2 Time Chart ..............147 Index ..................148 ML-7 Series/ML-9001A...
- Page 11 ML-7111A Overview of the ML-7111A Chapter Summary of laser marker features Part Names and Functions Chapter Marker part names and functions System Configuration Chapter System configuration, constituent parts, and included accessories Marker Specifications Chapter Detailed marker specifications...
-
Page 12: Ml-7111A
• Large, easy-to-read screen for graphics The Windows-based operating window provides a large, easy-to-see drawing area. • Improved usability The basic screen for normal use consists of just two main screens for drawing and marker operations for a simple working environment. ML-7 Series/ML-9001A... - Page 13 DataMatrix marking data • Supports registration of multiple marking conditions Up to 1,023 conditions may be specified. • Auto backup Specify an interval (in time or number of operations) for automatic data backup. Chapter ML-7 Series/ML-9001A...
-
Page 14: Chapter 2 Part Names And Functions
Chapter Part Names and Functions 2.1 Control Unit ■Front Control Unit Incorporates the control board, electronic cooling unit, RF unit, and power supply unit. You can monitor operating status from the Operating Unit or from a computer. ML-7 Series/ML-9001A... - Page 15 An error occurred. TROUBLE *1 All indicators are lit during self-diagnostics, starting with POWER. (Refer to the Operating Unit manual.) *2 READY blinks during LD cooldown after the LD is turned OFF. (Refer to the Operating Unit manual.) ML-7 Series/ML-9001A...
-
Page 16: Back
Used, for example, to select a Start No. from the external device. c Operating Unit Connector For communications with the Operating Unit. If you do not plan to use this option, leave the unit as it was delivered (with the connector inserted). ML-7 Series/ML-9001A... - Page 17 If you do not plan to use this option, leave the unit as it was delivered (with the connector inserted). If a computer and the Operating Unit are both connected to the Control Unit, do not operate them simultaneously. Otherwise, memory card data may become corrupted, preventing normal marking or the marker to start. ML-7 Series/ML-9001A...
-
Page 18: Head Unit
Focuses the laser beam upon the marking area. This lens keeps the scanning distance proportional to the mirror's rotation angle to keep the focal distance consistent for all points within the marking area. f Fan Vents heat from inside the Head Unit. ML-7 Series/ML-9001A... -
Page 19: Top
(Refer to the Installation/Maintenance manual.) d Laser Input Unit Insert the optical fiber to input the LD light. Do not dismount or remove it from the Head Unit. (Never remove two fixing screws.) ML-7 Series/ML-9001A... -
Page 20: Operating Unit
Once pressed, the button will remain depressed. To reset this button, turn in the direction indicated by the arrows. Frequent use of the emergency stop button will significantly affect the LD service life. Use this button to stop the device only in emergency situations. ML-7 Series/ML-9001A... -
Page 21: Side
2.3 Operating Unit ■Side ML-7111A Chapter Connector for the Operating Unit Connecting Cable For connecting the Control Unit. b Fixing Foot For mounting the Operating Unit on the Control Unit. Option Wall-Mounting type ML-7 Series/ML-9001A... -
Page 22: Chapter 3 System Configuration
Windows 10 Pro 64 bit Japanese/English version 3 m, 5 m, 8 m, 10 m USB Cable *1 Use of the Operating Unit, or a computer, or both can be selected. *2 The USB cable is used only to connect a computer. ML-7 Series/ML-9001A... -
Page 23: Included Accessories
Quantity Component Quantity Cleaning paper Marking program Operation manual for Class 4 laser caution label ML-7 Series/ML-9001A Invisible laser radiation label Operation manual for LMDraw6 Protective eyewear Hex wrench (for M4 hex screws) Warning labels (small, medium, 2 each Hex wrench (for M5 hex screws) and large) 3.4 Options... -
Page 24: Chapter 4 Marker Specifications
At 10 to 60 Hz: 0.1 G max. operations Note that marking quality is not guaranteed under all conditions. Vibration during 0.5 G max. transport Voltage fluctuation and Voltage –10%/+6%; frequency ±3% frequency fluctuation Oil mist, dust 0.1 mg/m max. ML-7 Series/ML-9001A... -
Page 25: Marking Area Specifications
494 mm 3 µm 4 µm 6 µm Position resolution 0.01-17,000 mm/s 0.01-18,000 mm/s 0.01-28,000 mm/s Marking speed *1 Computated value. Not the actual position accuracy. *2 Computated value. Confirm the appropriate speed for marking during actual marking operations. ML-7 Series/ML-9001A... -
Page 26: External Specifications
Control Unit ■ (Unit: mm) Transporting handle Operations and display Optical fiber cable CONTROL EMERGENCY STOP MEMORY CARD POWER READY SHUTTER MARKING GUIDE TROUBLE MAIN POWER Main switch outlet outlet inlet outlet (35) Chapter Operating Unit ■ (Unit: mm) ML-7 Series/ML-9001A... -
Page 27: Head Unit (Mounted On A Standard Scanner, Interchangeable Exp/Standard Scanner, Or High-Precision Scanner)
150 150 f270 327 3 313 3 f420 508 5 494 5 294 294 *1 Values in Column A are for a head mounted on a standard scanner. Add 5 mm for heads mounted on a high-precision scanner. ML-7 Series/ML-9001A... -
Page 28: Head Unit (Camera-Equipped High-Precision Scanner)
299 3 f270 329 3 313 3 f420 510 5 494 5 *1 Numbers indicate laser focal distance. The laser focus may differ from focus indicated on the monitor. Always run a sample test to confirm actual focus. ML-7 Series/ML-9001A... - Page 29 ML-7112AH Overview of the ML-7112AH Chapter Summary of laser marker features Part Names and Functions Chapter Marker part names and functions System Configuration Chapter System configuration, constituent parts, and included accessories Marker Specifications Chapter Detailed marker specifications...
-
Page 30: Ml-7112Ah
• Full-featured drawing functions • Able to import files in the AutoCAD 2009 DXF format • Able to handle high-capacity marking data with compact flash card • More powerful hatching functions for easier creation of figures with hatching ML-7 Series/ML-9001A... - Page 31 DataMatrix marking data • Supports registration of multiple marking conditions ML-7112AH Up to 1,023 conditions may be specified. • Auto backup Specify an interval (in time or number of operations) for automatic data backup. Chapter ML-7 Series/ML-9001A...
-
Page 32: Chapter 2 Part Names And Functions
2.1 Control Unit Incorporates the controller, electronic cooling unit, RF unit, and power supply unit. You can monitor operating status from a computer. ■Front EMERGENCY STOP CF CARD MAIN POWER LD CONTROL POWER READY SHUTTER MARKING GUIDE TROUBLE ML-7 Series/ML-9001A... - Page 33 Turn to the ON position to supply power. Turn to the OFF position to cut the power supply and stop the unit. e Control Key Switch Turn the key switch ON to prepare the LD. Turn OFF to deactivate the LD. ML-7 Series/ML-9001A...
- Page 34 Turn OFF the main switch and check the power supply and voltage. g Front Cover An air filter is located behind this cover. Clean the air filter at regular intervals. (Refer to the Installation/Maintenance manual.) ML-7 Series/ML-9001A...
-
Page 35: Back
Leave the unit as it was delivered (with the connector inserted). d Head Unit Connector (D-Sub 25-Pin, Female) For connection to the Head Unit using the connecting cable. e USB Connector For communications with a computer. Used to send data to/receive data from a computer. ML-7 Series/ML-9001A... - Page 36 Extended I/O Control Connector (D-Sub 15-Pin, Female) (Option) Extended connector for I/O signals for unit control from an external device. Used, for example, to select a Start No. from the external device. n RS-232C Communication Connector (D-Sub 9-Pin, Male) (Option) For external communications. ML-7 Series/ML-9001A...
-
Page 37: Head Unit
Remove the cover and vacuum off any dust or dirt. (The appropriate cleaning interval will depend on the characteristics of the operating environment.) (Refer to the Installation/Maintenance manual.) h Fiber Interlock Turns OFF the Laser Marker when the fiber interlock connector is removed. ML-7 Series/ML-9001A... -
Page 38: Top
LD Alarm Lamp Green when the LD is on. e Laser Input Unit Insert the optical fiber to input the LD light. Do not dismount or remove it from the Head Unit. (Never remove two fixing screws.) ML-7 Series/ML-9001A... -
Page 39: Chapter 3 System Configuration
Keyboard/mouse/USB 1.1 4-pin x 1 Windows 7 Professional 32/64 bit Japanese/English version (SP1), Operating system Windows 8.1 32/64 bit Japanese/English version, or Windows 10 Pro 64 bit Japanese/English version USB cable (Not included) 3 m, 5 m, 8 m, 10 m ML-7 Series/ML-9001A... -
Page 40: Included Accessories
Component Quantity Cleaning paper Marking program Operation manual for Protective eyewear ML-7 Series/ML-9001A Hex wrench (for M4 hex screws) Operation manual for LMDraw6 Crimp contact for power cable Power cable for 100V AC 3.4 Options The following items are available as options:... -
Page 41: Chapter 4 Marker Specifications
At less than 2 Hz: 0.5 G max. (including intermittent vibration) Vibration during At 10 to 60 Hz: 0.1 G max. operations Note that marking quality is not guaranteed under all conditions. Vibration during 0.5 G max. transport ML-7 Series/ML-9001A... -
Page 42: Marking Area Specifications
100 mm 100 mm Work distance 175 mm 2 µm Position resolution 0.01 to 11,000 mm/s Marking speed *1 Computated value. Not the actual position accuracy. *2 Computated value. Confirm the appropriate speed for marking during actual marking operations. ML-7 Series/ML-9001A... -
Page 43: External Specifications
4.3 External Specifications 4.3 External Specifications ML-7112AH Control Unit ■ (Unit: mm) Fiber guard Fiber cable radius: at least 150 Air outlet Air outlet Air inlet Caster Chapter ML-7 Series/ML-9001A... -
Page 44: Head Unit
Chapter 4 Marker Specifications Head Unit ■ (Unit: mm) ML-7112AH (396) (59) SHUTTER LD ON 4-Mounting holes for M5 32.5 I/F IN SCANNER IN FIBER I/L FIBER IN RF IN Optical fiber Air inlet Processing 150 min. Processing surface surface Transporting handle Air outlet Chapter □100 □100 ML-7 Series/ML-9001A... - Page 45 ML-9001A Overview of the ML-9001A Chapter Summary of laser marker features Part Names and Functions Chapter Marker part names and functions System Configuration Chapter System configuration, constituent parts, and included accessories Marker Specifications Chapter Detailed marker specifications...
-
Page 46: Ml-9001A
Choose the best marking range for the shape of your workpiece, in diameter of 80 mm, or areas of 100 x 100 mm, 150 x 150 mm, 175 x 175 mm, or 225 x 225 mm. • Large, easy-to-read screen for graphics The Windows-based operating window provides a large, easy-to-see drawing area. ML-7 Series/ML-9001A... - Page 47 DataMatrix • Supports registration of multiple marking conditions Chapter Up to 1,023 conditions may be specified. • Auto backup Specify an interval (in time or number of operations) for automatic data backup. ML-7 Series/ML-9001A...
-
Page 48: Chapter 2 Part Names And Functions
Chapter Part Names and Functions 2.1 Control Unit ■Front Control Unit Incorporates the control board, electronic cooling unit, RF unit, and power supply unit. You can monitor operating status from the Operating Unit or from a computer. ML-7 Series/ML-9001A... - Page 49 An error occurred. TROUBLE *1 All indicators are lit during self-diagnostics, starting with POWER. (Refer to the Operating Unit manual.) *2 READY blinks during LD cooldown after the LD is turned OFF. (Refer to the Operating Unit manual.) ML-7 Series/ML-9001A...
-
Page 50: Back
Used, for example, to select a Start No. from the external device. c Operating Unit Connector For communications with the Operating Unit. If you do not plan to use this option, leave the unit as it was delivered (with the connector inserted). ML-7 Series/ML-9001A... - Page 51 If you do not plan to use this option, leave the unit as it was delivered (with the connector inserted). If a computer and the Operating Unit are both connected to the Control Unit, do not operate them simultaneously. Otherwise, memory card data may become corrupted, preventing normal marking or the marker to start. ML-7 Series/ML-9001A...
-
Page 52: Head Unit
Focuses the laser beam upon the marking area. This lens keeps the scanning distance proportional to the mirror's rotation angle to keep the focal distance consistent for all points within the marking area. f Fan Vents heat from inside the Head Unit. ML-7 Series/ML-9001A... -
Page 53: Top
(Refer to the Installation/Maintenance manual.) d Laser Input Unit Insert the optical fiber to input the LD light. Do not dismount or remove it from the Head Unit. (Never remove two fixing screws.) ML-7 Series/ML-9001A... -
Page 54: Operating Unit
Once pressed, the button will remain depressed. To reset this button, turn in the direction indicated by the arrows. Frequent use of the emergency stop button will significantly affect the LD service life. Use this button to stop the device only in emergency situations. ML-7 Series/ML-9001A... -
Page 55: Side
2.3 Operating Unit ■Side ML-9001A Chapter Connector for the Operating Unit Connecting Cables For connecting the Control Unit. b Fixing Foot For mounting the Operating Unit on the Control Unit. Option Wall-Mounting type ML-7 Series/ML-9001A... -
Page 56: Chapter 3 System Configuration
Windows 10 Pro 64 bit Japanese/English version 3 m, 5 m, 8 m, 10 m USB Cable *1 Use of the Operating Unit, or a computer, or both can be selected. *2 The USB cable is used only to connect a computer. ML-7 Series/ML-9001A... -
Page 57: Included Accessories
Component Quantity ML-9001A Cleaning paper Marking program Operation manual for Class 4 laser caution label ML-7 Series/ML-9001A Visible laser radiation label Operation manual for LMDraw6 Protective eyewear Hex wrench (for M4 hex screws) Warning labels (small, medium, 2 each Hex wrench (for M5 hex screws) and large) 3.4 Options... -
Page 58: Chapter 4 Marker Specifications
Vibration during At 10 to 60 Hz: 0.1 G max. operations Note that marking quality is not guaranteed under all conditions. Vibration during 0.5 G max. transport Voltage fluctuation and Voltage -10%/+6%; Frequency ± 3% frequency fluctuation ML-7 Series/ML-9001A... -
Page 59: Marking Area Specifications
Work distance 327 mm 434 mm 4 µm 4 µm Position resolution 0.01-20,000 mm/s 0.01-27,000 mm/s Marking speed *1 Computated value. Not the actual position accuracy. *2 Computated value. Confirm the appropriate speed for marking during actual marking operations. ML-7 Series/ML-9001A... -
Page 60: External Specifications
■ ML-9001A (Unit: mm) Transporting handle Operations and display Optical fiber cable CONTROL EMERGENCY STOP MEMORY CARD POWER READY SHUTTER MARKING GUIDE TROUBLE MAIN POWER Main switch outlet outlet inlet outlet (35) Chapter Operating Unit ■ (Unit: mm) ML-7 Series/ML-9001A... -
Page 61: Head Unit (Mounted On A Standard Scanner, Interchangeable Exp/Standard Scanner, Or High-Precision Scanner)
347 4 327 4 175 175 f410 448.5 5 434 5 225 225 *1 Values in Column A are for a head mounted on a standard scanner. Add 5 mm for heads mounted on a high-precision scanner. ML-7 Series/ML-9001A... -
Page 62: Head Unit (Camera-Equipped High-Precision Scanner)
277 3 f300 349 4 327 4 f410 451 5 434 5 *1 Numbers indicate laser focal distance. The laser focus may differ from focus indicated on the monitor. Always run a sample test to confirm actual focus. ML-7 Series/ML-9001A... - Page 63 ML-7064A Overview of the ML-7064A Chapter Summary of laser marker features Part Names and Functions Chapter Marker part names and functions System Configuration Chapter System configuration, constituent parts, and included accessories Marker Specifications Chapter Detailed marker specifications...
-
Page 64: Ml-7064A
• Large, easy-to-read screen for graphics The Windows-based operating window provides a large, easy-to-see drawing area. • Improved usability The basic screen for normal use consists of just two main screens for drawing and marker operations for a simple working environment. ML-7 Series/ML-9001A... - Page 65 • Supports registration of multiple marking conditions ML-7064A Up to 1,023 conditions may be specified. • Auto backup Specify an interval (in time or number of operations) for automatic data backup. Chapter ML-7 Series/ML-9001A...
-
Page 66: Chapter 2 Part Names And Functions
We recommend backing up your data at periodic intervals to prevent data loss. (Refer to the Installation/Maintenance manual.) Use only the specified memory cards. Use of non-specified commercial cards may result in aberrant function. ML-7 Series/ML-9001A... - Page 67 Frequent use of the emergency stop button will significantly affect the LD service life. Use this button to stop the device only in emergency situations. g Air Intake An air intake for air cooling of the Control Unit. ML-7 Series/ML-9001A...
-
Page 68: Back
CN7 connector). Be sure to connect the cables correctly. Incorrect connections may damage the equipment. g POD Connector For communicating with the Operating Unit. h RS-232C Connector (D-Sub 9-Pin, Male) For external communications via RS-232C. ML-7 Series/ML-9001A... - Page 69 Power inlet for single-phase, 200V AC power supply to which power cable is connected. Always connect the primary power ground to the frame ground (FG) terminal of the Head Unit. q CN2 Connector Used to connect the Chiller Unit power supply (200V AC). ML-7 Series/ML-9001A...
-
Page 70: Chiller Unit
The current fluid temperature is shown in green; the set value is shown in red. c Air Intake Air intake for air cooling of the Chiller Unit. d Exhaust Vent Vent for exhaust air from the Chiller Unit. e Water Gauge Displays the water level of the coolant tank. ML-7 Series/ML-9001A... -
Page 71: Back
Power inlet for single-phase, 200V AC power from the Control Unit. g CN4 Connector Power outlet for 100V AC power supply for the Head Unit scanner. h Coolant Filter Filter for the coolant. i Ion-Exchange Resin Maintains constant coolant resistance value. ML-7 Series/ML-9001A... -
Page 72: Head Unit (Right-Angled Head And Straight Head)
Chapter 2 Part Names and Functions 2.3 Head Unit (Right-Angled Head and Straight Head) Two types of Head Unit are available: the Right-Angled Head and Straight Head. Given below are the specifications common to both types. ■Right-Angled Head ML-7064A Chapter ■Straight Head ML-7 Series/ML-9001A... - Page 73 Rear the rear. (See figure at right.) When replacing an aperture, clean dust around an aperture body and the Head Unit before opening the lid to prevent dust from entering the inside. ML-7 Series/ML-9001A...
- Page 74 Dust blown by the air from air conditioner may enter inside the Head Unit. j RF IN Connector Connector supplying the Q switch drive. k Water IN Inlet supplying coolant from the Chiller Unit. ML-7064A l Water OUT Outlet for water discharged to the Chiller Unit. Chapter ML-7 Series/ML-9001A...
-
Page 75: Operating Unit
Once pressed, the button will remain depressed. To reset this button, turn in the direction indicated by the arrows. Frequent use of the emergency stop button will significantly affect the LD service life. Use this button to stop the device only in emergency situations. ML-7 Series/ML-9001A... -
Page 76: Side
Chapter 2 Part Names and Functions ■Side ML-7064A Chapter Connector for the Operating Unit Connecting Cable For connecting the Control Unit. b Fixing Foot For mounting the Operating Unit on the Control Unit. Option Wall-Mounting type ML-7 Series/ML-9001A... -
Page 77: Chapter 3 System Configuration
1 GB or more (32 bit), 2 GB or more (64 bit) Computer Hard disk space 5 GB or more Display resolution 1024 x 768 dots or more Optical drive CD-ROM drive Interface Keyboard/mouse/USB 1.1 4-pin x 1 ML-7 Series/ML-9001A... -
Page 78: Included Accessories
Label (laser emission label) Control Unit CN4 Shorting Connector 1 set Label (laser safety labels) Protective eyewear Water Supply Pump Marker program Cleaning Paper Barrier filter Operation manual for ML-7 Series/ Ion-exchange resin ML-9001A Operation manual for LMDraw6 ML-7 Series/ML-9001A... -
Page 79: Options
- ○ ○ - - ○ ○ - - ○ ○ - - ○ ○ - - ○ ○ - - ○ ○ - - ○ ○ - - ○ ○ - - None ○ - - - ML-7 Series/ML-9001A... -
Page 80: Chapter 4 Marker Specifications
At less than 10 Hz: 0.5 G max. (including intermittent vibrations) Vibration during At 10 to 60 Hz: 0.1 G max. operations Note that marking quality is not guaranteed under all conditions. Vibration during 0.5 G max. transport Voltage fluctuation and frequency Voltage ±10%; frequency ±2% fluctuation ML-7 Series/ML-9001A... -
Page 81: Marking Area Specifications
313 mm 411 mm 4 µm 4 µm Position resolution * 0.01-18,000 mm/s 0.01-20,000 mm/s Marking speed * *1 Computated value. Not the actual position accuracy. *2 Computated value. Confirm the appropriate speed for marking during actual marking operations. ML-7 Series/ML-9001A... -
Page 82: External Specifications
Control and Chiller Units ■ (Unit: mm) Key switch, power 440 2 500 2 Temperature regulator ML-7064A Water gauge outlet Air inlet Air outlet Filter Ion exchange resin inlet Air outlet Air inlet Air outlet Operating Unit ■ Chapter (Unit: mm) ML-7 Series/ML-9001A... -
Page 83: Head Unit (Right-Angled Head: Mounted On A Standard Scanner Or High-Precision Scanner)
81 1 97 1 93 1 f100 102 1 118 1 107 1 f150 164 2 180 1 170 1 f270 354 3 370 1 313 1 f350 414 1 430 1 411 1 ML-7 Series/ML-9001A... -
Page 84: Head Unit (Straight Head: Mounted On A Standard Scanner Or High-Precision Scanner)
(Space for cables and hoses) Chapter f lens f75 lens 101 1 93 1 f100 lens 121 1 107 1 f150 lens 183 2 170 1 f270 lens 352 3 313 1 f350 lens 430 1 411 1 ML-7 Series/ML-9001A... - Page 85 ML-7111A ML-7112AH ML-9001A ML-7064A Serial Interface Specifications Chapter RS-232C communication specifications for the marker QR Code and DataMatrix Specifications Chapter QR code and DataMatrix specifications and instructions for preparing data elements Interface Specifications Chapter General marker interface specifications...
-
Page 86: Chapter 5 Serial Interface Specifications
Request To Send Clear To Send - - Frame Ground: safety ground or cable shield - Use a connecting cable with a shield line. Make sure that the case you connect to is designed to resist electromagnetic interference (EMI). ML-7 Series/ML-9001A... -
Page 87: Connection Example: Connected To A Computer
5.1 Cable Specifications Connection Example: Connected to a Computer ■ ML-7111A Marker Computer Shield line ML-7112AH Signal Pin No. Signal Pin No. ML-9001A ML-7064A Case Chapter ML-7 Series/ML-9001A... -
Page 88: Communication Settings
LMDraw6 and the operating unit. Also, when the data is changed in RS-232C communications, the display does not change immediately depending on the condition of LMDraw6, for example, any changes added on LMDraw6. RS-232C ML-7 Series/ML-9001A... -
Page 89: Communication Codes
2046 bytes Computer or less Command Check- Marker 2046 bytes or less Write commands (commands with "W" at the end) will generate an NAK response during marking. Use the MSR command to confirm marking is not currently underway. ML-7 Series/ML-9001A... -
Page 90: Communications Protocol
This result is converted into an ASCII string (a 2-byte hexadecimal number), which is added to the transmission as the checksum. To set the marking speed at 3.00 mm/s Code sent: 0x02,0x53,0x50,0x57,0x33,0x30,0x30,0x03,0x39,0x32 ETX 9 ASCII code: STX Change marking 3.00 mm/s ETX Checksum speeds ML-7 Series/ML-9001A... -
Page 91: Numerical Notation
To indicate a comma used as a comma, add the special character “\” before the character. Characters after “\” are not treated as delimiters. Use “\,” to designate a comma. To express “\,” use “\\”. ・ Strings can be up to 48 bytes unless otherwise specified. ML-7 Series/ML-9001A... -
Page 92: Commands
Variable number continuous change Marking data Layout number Number of cells of “Number of cells” Marking data DataMatrix, Cell part number, Part number setting Matrix skip Matrix number Matrix skip command Layout number cancel* Layout selection Filename (Filename designation) ML-7 Series/ML-9001A... -
Page 93: Command Details
The setting increment is 0.1 A. (2) LOR/LOW (Current offset) Read/Write the LD current offset set on the system. The setting increment is 1%. (3) SPR/SPW (Marking speed) Read/Write the marking speed set on the system. The setting increment is 0.01 mm/s. ML-7 Series/ML-9001A... - Page 94 Writing 0 (to stop marking) is valid under both local and remote control. (12) GLR/GLW (Guide beam) Read/Write the guide beam activation status. In this setting, 0 = OFF and 1 = ON. These commands are used exclusively for models ML-7111A, ML-7112AH, and ML- 7064A. ML-7 Series/ML-9001A...
- Page 95 (t6) are displayed. Read (SRR s0) ■ Computer -> : SRR1 (Change 1 to 0 to have the marker return the registered serial Marker numbers delimited by commas.) Marker -> : t1, t2, t3, t4, t5, t6, t7, t8 Computer ML-7 Series/ML-9001A...
- Page 96 Up to 10 sets of character type+string may be specified. All data elements are comma-delimited. Example When setting variable data #7 as follows: 123 in the 2nd standard font, Figure = 1 Computer -> : VDW7, 1, 123\, , 2, 1 Marker ML-7 Series/ML-9001A...
- Page 97 Obtain (read) the value of the existing layout number and specified line or change (write) the settings. Read (MRR s0, s1) ■ Layout number Line no. Example When obtaining the value of layout #1 and line #1 Computer -> : MRR1, 1 Marker ML-7 Series/ML-9001A...
- Page 98 Type and string are not changed. ,0,ABC Specified Type and string are replaced. Specified string is deleted. Specified Not specified (After all strings are deleted from variable data, variable data cannot be edited.) ,99,ABC Specified Wrong value ,99, Not specified ML-7 Series/ML-9001A...
- Page 99 Serial ITF (optional) Variable Serial DataMatrix (optional) Serial Serial QR Code (optional) Code 39 Code 128 Barcode ITF Serial Code 128 (optional) Specify the number when the string type is 2, 4, 5, 10, 11, 12, or 13. ML-7 Series/ML-9001A...
- Page 100 Also used to write for arbitrary number of cells of DataMatrix and cell part. ■Read (DMR) “Number of cells” number L shape symbol part number Cell part number Margin part number Computer -> : DMR Marker Marker -> : S0, S1, S2, S3 Computer ML-7 Series/ML-9001A...
- Page 101 ・ The number of registrable parts is up to 16 due to limit of the BMP color palette. ・ When this function is used, the BMP marking function cannot be used. For how to import image files, refer to the manual for LMDraw6. ML-7 Series/ML-9001A...
- Page 102 This function cancels the skip designated by ARD command. t0:Layout number (1 - 1023) Computer -> : ARI t0 Marker The matrix skip command for the layout number designated by t0 is canceled. This command is used exclusively for models ML-7111A, ML-7064A, and ML-9001A. ML-7 Series/ML-9001A...
- Page 103 3 Upload the registered layout file on the work folder from the memory card, then save it. Precaution when using layout files registered with MRS commands on the Operating Unit When using layout files registered with MRS commands on the Operating Unit, use SVL commands to save the layout files on a memory card. ML-7 Series/ML-9001A...
- Page 104 ・ When the binary data for the part itself is incorrect, the data error occurs at marking start. ・ Since amount of communication data is limited, up to 2KB of data can be registered. ・ Part data is registered on RAM only, not saved to the memory card. ML-7 Series/ML-9001A...
- Page 105 When all parts are targeted, it takes some time to save them. (28) SVV (Variable save to memory card) Save the variable data developed on RAM to the memory card. Computer -> : SVV Marker (29) TRB (Error code acquisition) Clear the current error. Computer -> : ERR Marker ML-7 Series/ML-9001A...
- Page 106 Auto transmission of errors * When 1 (auto transmission ON) is selected, S0 to 3 are sent each time the status changes. * Note that enabling the marker initializes the settings, disabling auto transmission of all items. ML-7 Series/ML-9001A...
- Page 107 If the conditions are 9600 bps, Stop bit 1 bit even parity, no checksum, and no delimiter ETX (initial settings) Computer -> : BAW 1, 0, 2, 0, 0 Marker Except for checksum, these conditions take effect when the marker is restarted. ML-7 Series/ML-9001A...
- Page 108 ML-7064A Check- Computer Check- Marker ■Write (WSW) t0: Warmup times (number of bidirectional scans) (when omitted: 10 times) Example When warmup is in progress To warm up the scanner by executing 5 warmup scans Check- Computer Chapter Marker ML-7 Series/ML-9001A...
- Page 109 ICR/ICW commands are used exclusively for the ML-7064A, a water-cooled model. Read (WCR) ■ Chapter Example If replaced on May 13, 2005. Computer -> : WCR Marker Marker -> : 20050513 Computer Write (WCW) ■ Example If replacing on May 13, 2005. Computer -> : WCW20050513 Marker ML-7 Series/ML-9001A...
-
Page 110: Communication Period
V00-05D or older approx. 50-100 ms approx. 82-132 ms ML-7111A/9001A/7064A V00-06A or later approx. 10-20 ms approx. 42-52 ms V00-05D or older approx. 50-100 ms approx. 82-132 ms ML-7112AH V00-06A or later approx. 10-20 ms approx. 42-52 ms ML-7 Series/ML-9001A... -
Page 111: Chapter 6 Qr Code And Datamatrix Specifications
Requires a four-cell margin around the code around the code Micro QR Code Timing pattern Position detection pattern Separator Cell Margin Requires a two-cell margin around the code The position detection pattern is a square of seven cells per side. ML-7 Series/ML-9001A... -
Page 112: Detailed Specifications
Chapter ○ : Supported × : Not supported (5) Inversion No (default) (6) Mask number Set to “auto configure”; cannot be changed (7) Appending Not supported (8) Input of compound data Not supported (9) Maximum characters 100 characters ML-7 Series/ML-9001A... -
Page 113: Preparing Data
(Cell) (Cell) File name: Mqr-m-10 File name: Qr-20-m File name: Qr-fuji (Micro QR) (Model 1) (Model 1) Chapter File name: Qrk File name: Qr-m-1 File name: Qr-m-2 (Micro QR) (Model 1) (Model 1) File name: Qr-m-20 (Model 1) ML-7 Series/ML-9001A... -
Page 114: Examples Of Preparing Data Elements
Cell for marking dots (Example: Height = Width = 100) Register figure data so that the laser beam is emitted for 0.001 second (1 ms) at the origin, as shown below. -100, 100 100, 100 Chapter -100, -100 100, -100 ML-7 Series/ML-9001A... - Page 115 Example 4 Position Detection Pattern for inverted codes (Example: Height = Width = 350) Register figure data based on a figure symmetrical relative to the origin, as shown below. -350, 350 350, 350 Chapter -350, -350 350, -350 ML-7 Series/ML-9001A...
- Page 116 Note that the margin height and width are 20000 and cannot be changed. ML-9001A ML-7064A -00800, 20800 20800, 20800 00000, 20000 20000, 20000 00000, 00000 20000, 00000 -00800, -00800 20800, -00800 Chapter ML-7 Series/ML-9001A...
-
Page 117: Datamatrix Specifications
DataMatrix is read, this is detected as an error based on the marking conditions. Detailed Specifications ■ (1) DataMatrix creation program ECC200-compatible (2) Style Indicates the DataMatrix format. (3) Number of Cells (10 10) to (144 144) <Normal style> (4) Maximum characters 100 characters ML-7 Series/ML-9001A... -
Page 118: Preparing Data
The following sample QR code data is prepared for the marker: File name: 0 File name: Ec100-20 File name: Ec200-20 File name: Kuro-d (Cell) File name: Kuro-d2 File name: L (Cell) (L shape) Chapter File name: L2 (L shape) ML-7 Series/ML-9001A... -
Page 119: Examples Of Preparing Data Elements
Cell for marking dots (Example: Height = Width = 100) Register figure data so that the laser beam is emitted for 0.001 second (1 ms) at the origin, as shown below. -100, 100 100, 100 Chapter -100, -100 100, -100 ML-7 Series/ML-9001A... - Page 120 Actual number of cells For example, the width of an L shape relative to its height is as follows when creating an 18-cell DataMatrix with 360 x 360 units (same as Example 3): Width of L shape = Chapter ML-7 Series/ML-9001A...
- Page 121 Note that the margin height and width are 20000 and cannot be changed. -00800, 20800 20800, 20800 ML-9001A 00000, 20000 20000, 20000 ML-7064A 00000, 00000 20000, 00000 -00800, -00800 20800, -00800 Chapter ML-7 Series/ML-9001A...
-
Page 122: Chapter 7 Interface Specifications
D-Sub 9-pin (open-circuited), the Head Unit's Connector for Unit:Female Safety Shutter closes, disabling Connector for User Device:Male marking. This connector is (Lock M2.6) connected to the emergency- stop main interlock, chamber interlock, door interlock or other similar interlocks. ML-7 Series/ML-9001A... - Page 123 HDB-CTH (Hirose Electric Co., Ltd.) D-Sub 25-pin Male Connector: HDBB-25P (Hirose Electric Co., Ltd.) ML-7064A Case: HDB-CTH (Hirose Electric Co., Ltd.) D-Sub 50-pin Female Connector: DD-50SF-N (Japan Aviation Electronics Industry Ltd.) Case: DD-C8-J13-F4-1 (Japan Aviation Electronics Industry Ltd.) Chapter ML-7 Series/ML-9001A...
-
Page 124: External Input And Output (Ext. I/O)
Operating Unit, or via RS-232C communication. Invalid when “Local” is selected. *2 Stops all serial counters. *3 Signals for individual counters can be enabled or disabled. *4 When “Remote” is selected, a layout cannot be switched via a computer. ML-7 Series/ML-9001A... -
Page 125: Output Signals
Only for the ML-7064A (water-cooled model): A warning is emitted if the coolant temperature or coolant pressure exceed the normal range, or if the temperature of the optional temperature- compensating scanner exceeds the normal range. Chapter ML-7 Series/ML-9001A... -
Page 126: Connection Examples
11, 12, 13, 14, 15, TLP197G 17, 18, 22, 23 Load * The polarity of the input power supply may be either + or -. +24V Emergency Stop * For CE models only Chapter Short Internal User connection ML-7 Series/ML-9001A... -
Page 127: When Using A Contact Signal
■When using a contact signal ML-7111A Internal External ML-7112AH ML-9001A TLP180 ML-7064A 2, 3, 4, 5, 6, 7,24,25 11, 12, 13, 14, 15, TLP197G 17, 18, 22, 23 Load +24V Emergency Stop * For CE models only Short Chapter Internal User connection ML-7 Series/ML-9001A... -
Page 128: When Using An Open-Collector Signal
Internal External ML-7112AH ML-9001A TLP180 ML-7064A 2, 3, 4, 5, 6 7, 24, 25 11, 12, 13, 14, 15, TLP197G 17, 18, 22, 23 Load +24V Emergency Stop * For CE models only Chapter Short Internal User connection ML-7 Series/ML-9001A... -
Page 129: Time Chart
*2 Marking start input is not valid while remote status output is OFF. *3 Local/remote switching input is remote for the rising edge and local for the falling edge. Local/remote switching input can be supplied from the Operating Unit, a computer, or a device connected via RS-232C. Chapter ML-7 Series/ML-9001A... -
Page 130: If Laser Errors Occur
LD ON output, marking in progress output, and marking ready output. *5 After eliminating errors and supplying error reset input ON, when laser start input is turned ON, LD ON output and marking ready output both switch ON. Chapter ML-7 Series/ML-9001A... -
Page 131: If Data Errors Occur
Start of Marking Marking stop input *6 After marking stop input, marking resumes from the beginning. (It is not possible to resume from the point at which it was stopped.) Supply marking stop input while marking-in-progress output is ON. ML-7 Series/ML-9001A... -
Page 132: After An Emergency Stop
*9 If laser startup input is turned OFF when the LD is ON, startup ready output switches off during LD cooldown. Additionally, after the LD switches off, do not turn the main switch or Power Keyswitch OFF while the LD cooldown message is displayed on the Operating Unit or computer monitor. ML-7 Series/ML-9001A... -
Page 133: If The Counter Is Used (Count Reset And Count Up Enabled)
*12 When error reset input switches on, data error output switches off, and marking ready output switches on. Marking stops after the final value on the counter is marked. Depending on the layout marking order, some marking data may not be marked. Chapter ML-7 Series/ML-9001A... -
Page 134: When Counter Stop Is Used (Increment Of 1)
*15 The counter value is increased or decreased during marking. If multiple counters are used under the same conditions for a single layout and if marking is stopped halfway, the counter values may not be the same. Chapter ML-7 Series/ML-9001A... -
Page 135: Extended External Input And Output
*1 When the inductive load such as solenoid and relay is used, the spike voltage generated when driving the load may cause equipment to malfunction. Suppress the spike voltage by connecting the surge absorber or the diode to the load. ML-7 Series/ML-9001A... -
Page 136: Input Signals (Ext2. I/O: Ml-7064A)
*1 When the inductive load such as solenoid and relay is used, the spike voltage generated when driving the load may cause equipment to malfunction. Suppress the spike voltage by connecting the surge absorber or the diode to the load. ML-7 Series/ML-9001A... -
Page 137: Connection Examples
ML-7064A TLP180 2, 3, 4, 5, 6, 7, 8, 9, 10, 11, 12 2,3,4,5,6,7,8, 9,12,16,17 AQV212SX +24V TLP197G Load DC24V Load * The input power polarity may be + or -. +24V Filter ML-7111A, ML-7112AH, ML-9001A ML-7064A Chapter ML-7 Series/ML-9001A... -
Page 138: When Using A Contact Signal
■When using a contact signal ML-7111A Internal External Internal External ML-7112AH TLP180 TLP180 ML-9001A 2, 3, 4, 5, 6, 7, 8, 9, 10, 11, 12 ML-7064A 2,3,4,5,6,7,8, 9,12,16,17 AQV212SX +24V TLP197G Load Load +24V Filter ML-7111A, ML-7112AH, ML-9001A ML-7064A Chapter ML-7 Series/ML-9001A... -
Page 139: When Using An Open-Collector Signal
■When using an open-collector signal ML-7111A Internal External Internal External ML-7112AH TLP180 TLP180 ML-9001A 2, 3, 4, 5, 6, 7, 8, 9, 10, 11, 12 2,3,4,5,6,7,8, ML-7064A 9,12,16,17 AQV212SX +24V TLP197G Load Load +24V Filter ML-7111A, ML-7112AH, ML-9001A ML-7064A Chapter ML-7 Series/ML-9001A... -
Page 140: Time Chart
OFF. *3 Marking start input is valid while marking ready output is ON and remote status output is ON. *4 Local/remote switching can be specified from the Operating Unit, a computer, or device connected via RS-232C. ML-7 Series/ML-9001A... -
Page 141: During Data Errors (Errors From Unregistered Layouts)
Output Start no. confirmation Marking start input Marking in progress output Marking ready output Start of Marking End of Marking Data error output Error Occurs Error reset output Reset Local/remote switching input Remote status Local Remote Chapter output ML-7 Series/ML-9001A... -
Page 142: Carriage Control Input And Output (Axis. I/O)
Control unit System Configuration 7.3.1 Input and Output Signals ■Input Signals Input format:Photo-coupler input Input rating: 24 V DC Chapter Pin No. Signal Signal description Awaiting operation. Corresponds to STB signal. Operation completed. Corresponds to STB signal. DI common ML-7 Series/ML-9001A... -
Page 143: Output Signals
Y()-axis data D11 EXY12 Y()-axis data D12 EXY13 Y()-axis data D13 EXY14 Y()-axis data D14 EXY15 Y()-axis data D15 OUTC2 Common to OUT8-OUT15 DSC (OUT8) EX data identification EXD (OUT9) Identification of 2 or 4 axes STB (OUT10) Strobe ML-7 Series/ML-9001A... - Page 144 *1 When the inductive load such as solenoid and relay is used, the spike voltage generated when driving the load may cause equipment to malfunction. Suppress the spike voltage by connecting the surge absorber or the diode to the load. Chapter ML-7 Series/ML-9001A...
-
Page 145: Connection Examples
14, 15, 16, 17 Load +24 V EXXC EXYV 19, 20, 21, 22, 23, 24, 25, 26, 27, 28, TD62004F 29, 30, 31, 32, 33, 34 Load +24 V EXYC OUTV2 36, 37, 38, 39 TD62004F Load Chapter +24 V OUTC2 ML-7 Series/ML-9001A... -
Page 146: Time Chart
Output EXD Strobe output STB Input ACK to end Chapter carrier operation Marking processing Stop Stop Transfer unit Stop Stop Stop processing *1 T1: The strobe signal output delay time is set on a computer or the Operating Unit. ML-7 Series/ML-9001A... -
Page 147: During 4-Axis Control (When Using Ex4)
EX data identification Unspecified Unspecified Unspecified Output DSC Identification of Unspecified Unspecified Unspecified 2 or 4 axes Output EXD Strobe output STB Input ACK to end carrier operation Marking processing Stop Stop Transfer unit Chapter Stop Stop Stop processing ML-7 Series/ML-9001A... -
Page 148: If A Transfer Unit Error Occurs (After Ack Timeout)
Marking processing Stop Transfer unit Stop processing *2 T2: Wait time after transfer unit operation ends (ACK) If a transfer unit error occurs, resolve the error and provide error reset input before supplying marking start input once again. ML-7 Series/ML-9001A... -
Page 149: When Nak (Awaiting Transfer Unit Operation) Is Used
Strobe output STB Input ACK to end carrier operation Input NAK to await carrier operation ACK timeout output TER Chapter Error reset input Marking processing Stop Stop *3 If the NAK signal is ON, there is no T2 monitoring. ML-7 Series/ML-9001A... -
Page 150: Remote Interlock (Rem. I/L)
Connect this connector to the main interlock, door interlock or other similar interlocks. Connect these interlocks in series, as necessary. The short-circuiting connector is installed on shipment. 7.4.1 Connection Examples 24 V Contact signal Internal User connection (For CE models only) Chapter Contact signal Internal Dual E-Stop Unit User connection ML-7 Series/ML-9001A... - Page 151 (For CE models only) Remote interlock input Marking ready output Laser error output Error reset intput When error reset input is turned on after remote interlock input is turned off, marking ready output is turned on. Chapter ML-7 Series/ML-9001A...
- Page 152 Communications Protocol ....86 Components ....18 Frequency Fluctuation ..20 Computer Power Cable ....74 Front Cover .....12 Connecting Cable ..... 18 Fully Air-cooled ....8 Connector for the Operating Unit Connecting Function Switches ....16 Cables ......17 ML-7 Series/ML-9001A...
- Page 153 ....54 Mass ...... 20 RS-232C Communication Connector ..13 Max. Output ....20 RS-232C Connector ....64 Memory Card ....19 Memory Card Slot ..... 11 Multi-Axis Control Card ....75 Safety Interlock ....14 Scanner Connector ....64 ML-7 Series/ML-9001A...
- Page 154 Water hose ......73 Water IN ......70 Water OUT ......70 Water Supply Pump ....74 Work Distance ....21 X-axis Galvanoscanner .... 14 ........ 60 Y-axis Galvanoscanner .... 14 YVO4 ......8 YVO4 SHG ......42 ML-7 Series/ML-9001A...
Need help?
Do you have a question about the ML-7 Series and is the answer not in the manual?
Questions and answers