Dremel 100 Operating/Safety Instructions Manual
Hide thumbs
Also See for 100:
- Operating/safety instructions manual (68 pages) ,
- Manual (64 pages) ,
- Operating/safety instructions manual (30 pages)

Related Manuals for Dremel 100


Summary of Contents for Dremel 100
- Page 1 IMPORTANT: Read Before Using Operating/Safety Instructions 3000 GlobalTestSupply www. .com Find Quality Products Online at: sales@GlobalTestSupply.com...
-
Page 2: Safety Symbols
Safety Symbols The definitions below describe the level of severity for each signal word. Please read the manual and pay attention to these symbols. This is the safety alert symbol. It is used to alert you to potential personal injury hazards. Obey all safety messages that follow this symbol to avoid possible injury or death. - Page 3 wear eye protection. Protective equipment cannot be controlled with the switch is Disconnect the plug from the power source such as dust mask, non-skid safety shoes, hard dangerous and must be repaired. and/or the battery pack from the power tool hat, or hearing protection used for appropriate Prevent unintentional starting.
- Page 4 Safety Rules for Rotary Tools - (cont.) any other accessory must properly fit the Always hold the tool firmly in your hand(s) spindle or collet of the power tool. during the start-up. The reaction torque of the Accessories that do not match the mounting motor, as it accelerates to full speed, can cause Use clamps to support workpiece whenever hardware of the power tool will run out of...
- Page 5 Safety Rules for Rotary Tools - (cont.) modification is a misuse and may result in kickback. When a cut-off wheel grabs, the This product is not intended for use as a serious personal injury. wheel itself usually breaks. When a rotary file, dental drill, in human or veterinary medical high-speed cutter or tungsten carbide cutter applications.
-
Page 6: Additional Safety Warnings
Risk of injury to user. The power cord must only Some dust created by electrician’s rubber gloves and footwear will be serviced by a Dremel Service Facility.. Do not use AC only rated tools with a DC power sanding, sawing, further enhance your personal safety. - Page 7 Symbols IMPORTANT: Some of the following symbols may be used on your tool. Please study them and learn their meaning. Proper interpretation of these symbols will allow you to operate the tool better and safer. Symbol Designation / Explanation Volts (voltage) Amperes (current) Hertz (frequency, cycles per second) Watt (power)
- Page 8 Symbols (continued) IMPORTANT: Some of the following symbols may be used on your tool. Please study them and learn their meaning. Proper interpretation of these symbols will allow you to operate the tool better and safer. Symbol Designation / Explanation Designates Li-ion battery recycling program Designates Ni-Cad battery recycling program Alerts user to read manual...
-
Page 9: Functional Description And Specifications
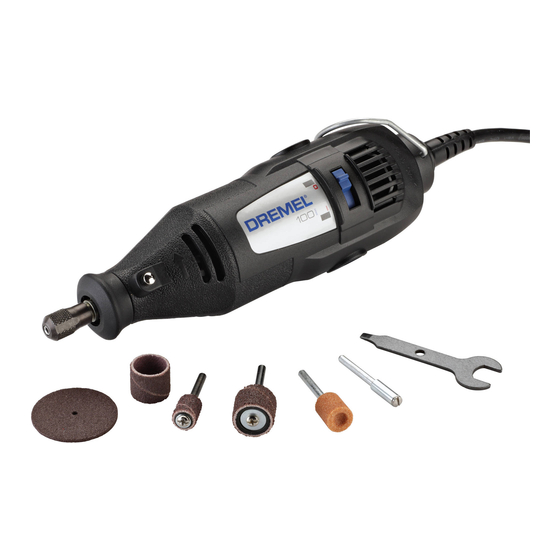
Functional Description and Specifications Disconnect the plug from the power source before making any assembly, adjustments or changing accessories. Such preventive safety measures reduce the risk of starting the tool accidentally. Models 100 & 200 High Speed Rotary Tools SWITCH (100 SINGLE SPEED) - Page 10 Assembly Always unplug Rotary Tool before changing accessories, changing collets or servicing your Rotary Tool. EZ TWIST™ SHAFT INTEGRATED LOCK WRENCH/NOSE BUTTON COLLET COLLET COLLET WRENCH TIGHTEN LOOSEN LOOSEN COLLET NUT — To loosen, first press shaft is gripped by the collet. Avoid excessive TIGHTEN tightening of the collet nut when there is no bit inserted.
- Page 11 BALANCING ACCESSORIES — For precision storage. If you do not use the hanger, remove it work, it is important that all accessories be in from the tool and snap it back into place good balance (much the same as the tires on underneath the cord so it will be out of the way your automobile).
- Page 12 For best control in close work, grip the Rotary It is this high speed, along with its compact Tool like a pencil between your thumb and size and wide variety of special accessories forefinger (Figure A). and attachments, that makes the Rotary Tool differ ent from other tools.
-
Page 13: Operating Speeds
RPM of the tool. relatively slow speed because at high speed the friction of the accessory generates heat (MODEL 100) and may cause damage to the material. Slow speeds (15,000 RPM or less) usually are On the single speed model, there is an ON- best for polishing operations employing the felt OFF switch. -
Page 14: Maintenance Information
Use only Dremel , high-performance accessories. ® Maintenance Information Service MAINTENANCE OF REPLACEABLE BRUSHES ON MODELS 100, 200 & 3000 Preventive maintenance pe r formed unauthorized per so n nel may result in The brushes should be inspected frequently misplacing... - Page 15 If one brush is worn out, replace both brushes. Make sure the brushes are installed as illus trated. The curved surface Models 100, 200, and 3000 have double ball of the brush must match the curvature of bearing construction. Under normal use they Cleaning the commutator.
- Page 16 COLLETS EZ Lock Mandrel No 402 If you expect to use a variety of accessories, The Dremel EZ Lock makes accessory we recommend that in the beginning you changes easy as PULL - TWIST - RELEASE. purchase a complete set of four collets. Store...
- Page 17 Dremel Accessories (Continued) Engraving Cutters Silicon Carbide Grinding Stones (blue/green) This group has a wide variety of sizes and shapes, and are made for intricate work on Tougher than aluminum oxide points, these ceramics (greenware), wood carvings, are made es pecially for use on hard jewelry and scrimshaw.
- Page 18 Dremel Accessories (Continued) Bristle Brushes Polishing Accessories These are excellent cleaning tools on silverware, jew elry and antiques. The three These include an impregnated polishing shapes make it possible to get into tight point and an impregnated polishing wheel for corners and other difficult places.
- Page 19 Cuts ceramic wall tile, cement board, and and lose their grit. Bands come in fine plaster. Use with Dremel No 565/566 Cutting medium and coarse grades. Flapwheels Guide attachment. grind and polish flat or contoured surfaces.
- Page 20 Glass Drill Bits Diamond tipped drill bits for use on glass and ceramic wall tile. Lubricant included. Dremel Chuck This chuck allows you to quickly and easily change accessories on Dremel Rotary Tools without changing collets. Accepts accessories with 1/32” - 1/8” shank. Read Collet Fan instruction manual.
- Page 21 Replacing Screw Mandrel Accessories Mandrel No. 401 is used with the felt down straight on the screw Mandrel, and be polishing tip and wheels. Thread the tip on to turned all the way to the collar. the screw carefully. The felt tip must thread Mandrel N°...
- Page 22 When using with Dremel chuck, back the mandrel out FIG. 3 slightly before tightening. 2. Pull spring-loaded sleeve DOWN towards tool with one hand and hold.
- Page 23 EZ Drum Operating Instructions ™ EZ Drum™ Mandrel No. EZ407SA has a FIG. 1 spring loaded sleeve and is used with Always make sure the sanding bands. rotary tool is “OFF” and disconnect the plug from the power source or the battery pack from the tool before changing accessories.
-
Page 24: Speed Settings
Speed Settings Not all speed settings can be achieved on 100 and 200 series tool. For certain applications, a variable speed tool is required. Speed Settings: 2 (5,000 - 8,000 RPM) 4 (9,000 - 15,000 RPM) 6 (16,000 - 21,000 RPM) 8 (22,000 - 27,000 RPM) 10 (28,000 - 35,000 RPM) * Speed for light cuts, Caution - burning on deep grooves. - Page 25 Speed Settings (Continued) Not all speed settings can be achieved on 100 and 200 series tool. For certain applications, a variable speed tool is required. Speed Settings: 2 (5,000 - 8,000 RPM) 4 (9,000 - 15,000 RPM) 6 (16,000 - 21,000 RPM) 8 (22,000 - 27,000 RPM) 10 (28,000 - 35,000 RPM) * Speed for light cuts, Caution - burning on deep grooves.
- Page 26 Speed Settings (Continued) Not all speed settings can be achieved on 100 and 200 series tool. For certain applications, a variable speed tool is required. Speed Settings: 2 (5,000 - 8,000 RPM) 4 (9,000 - 15,000 RPM) 6 (16,000 - 21,000 RPM) 8 (22,000 - 27,000 RPM) 10 (28,000 - 35,000 RPM) * Speed for light cuts, Caution - burning on deep grooves.
- Page 27 Speed Settings (Continued) Not all speed settings can be achieved on 100 and 200 series tool. For certain applications, a variable speed tool is required. Speed Settings: 2 (5,000 - 8,000 RPM) 4 (9,000 - 15,000 RPM) 6 (16,000 - 21,000 RPM) 8 (22,000 - 27,000 RPM) 10 (28,000 - 35,000 RPM) * Speed for light cuts, Caution - burning on deep grooves.
-
Page 28: Dremel Limited Warranty
WORKMANSHIP ARE NOT COVERED BY THIS WARRANTY. No employee, agent, dealer or other person is authorized to give any warranties on behalf of Dremel. If Dremel inspection shows that the problem was caused by problems with material or workman ship within the limitations of the warranty, Dremel will repair or replace the product free of charge and return product prepaid.
Need help?
Do you have a question about the 100 and is the answer not in the manual?
Questions and answers