Sena Outstar S User Manual
Bluetooth helmet
Hide thumbs
Also See for Outstar S:
- Manual (234 pages) ,
- Quick start manual (14 pages) ,
- Quick start manual (14 pages)
Table of Contents
Advertisement
Quick Links
Advertisement
Table of Contents

Related Manuals for Sena Outstar S


Summary of Contents for Sena Outstar S
- Page 1 USER’S GUIDE Version 1.1.0 ENGLISH...
-
Page 2: Table Of Contents
TABLE OF CONTENTS ABOUT THE OUTSTAR S 1.1 Product Features 1.2 Product Details 1.3 Detachable Inner Parts 1.4 Package Contents WEARING THE HELMET 2.1 Putting on the Helmet 2.2 Removing the Helmet 2.3 Removing the Shield Visor 2.4 Installing the Shield Visor 2.5 Removing the Cheek Pads... - Page 3 OTHER BLUETOOTH DEVICES 4.1 Phone Pairing 4.1.1 Initially Pairing the OUTSTAR S 4.1.2 Pairing When the OUTSTAR S is Turned Off 4.1.3 Pairing When the OUTSTAR S is Turned On 4.2 Second Mobile Phone Pairing - Second Mobile Phone, GPS, and SR10 4.3 GPS Pairing...
- Page 4 TABLE OF CONTENTS CONTINUED BLUETOOTH INTERCOM 7.1 Intercom Pairing 7.1.1 Using the Smart Intercom Pairing (SIP) 7.1.2 Using the Button 7.2 Last-Come, First-Served 7.3 Two-Way Intercom 7.4 Multi-Way Intercom 7.4.1 Starting a Three-Way Intercom Conference 7.4.2 Starting a Four-Way Intercom Conference 7.4.3 Ending Multi-Way Intercom 7.5 Three-Way Conference Phone Call with...
- Page 5 TABLE OF CONTENTS CONTINUED 10.2.4 Smart Volume Control (Default: Disable) 10.2.5 VOX Phone (Default: Enable) 10.2.6 VOX Intercom (Default: Disable) 10.2.7 VOX Sensitivity (Default: 3) 10.2.8 HD Voice (Default: Enable) 10.2.9 HD Intercom (Default: Enable) 10.2.10 Voice Prompts (Default: Enable) 10.2.11 Sidetone (Default: Disable) 10.2.12 Advanced Noise Control™...
-
Page 6: About The Outstar S
1. ABOUT THE OUTSTAR S 1.1 Product Features Bluetooth ® Four-Way Intercom Intercom up to 900 m (0.6 mi)* Audio Multitasking™ Audio Source Priority Advanced Noise Control™ * in open terrain OUTSTAR S Bluetooth Helmet | 6 ®... -
Page 7: Product Details
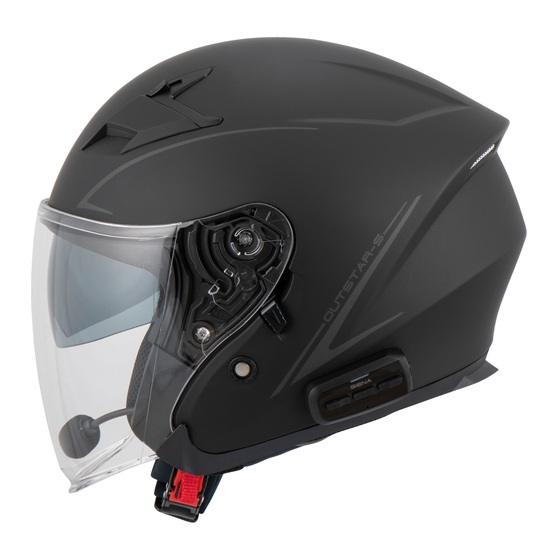
1 ABOUT THE OUTSTAR S 1.2 Product Details Shield Visor Top Vent Shell Rear Vent Inner Sun Visor Shield Ratchet Speakers Inner Sun Visor Lever Microphone Strap Adjuster Chinstrap One-touch Buckle Status LED (-) Button Center Button Charging LED DC Power (+) Button Charging &... -
Page 8: Detachable Inner Parts
1 ABOUT THE OUTSTAR S 1.3 Detachable Inner Parts Inner Pad Cheek Pad (R) Cheek Pad (L) 1.4 Package Contents OUTSTAR S Helmet Helmet Pouch USB Power & Data Cable Boom Microphone Reflex Stickers (4)* (USB-C) Sponges (2) * Included only in Europe package... -
Page 9: Wearing The Helmet
2. Gently pull the padded chinstrap outward and slide the helmet off your head. Note: Fastening the chinstrap after removing the helmet will help avoid scratching surfaces it’s placed upon. Quick-release retention system Strap Adjuster Chinstrap One-touch Buckle OUTSTAR S Bluetooth Helmet | 9 ®... -
Page 10: Removing The Shield Visor
2. Insert hooks B-E into the shield ratchet while pushing the shield ratchet lever upward. 3. Release the shield ratchet lever to lock the shield visor into place. 4. Repeat the process on the opposite side. OUTSTAR S Bluetooth Helmet | 10 ®... -
Page 11: Removing The Cheek Pads
1. Pass the chinstrap through the hole of the cheek pad and insert the cheek pad’s plastic plate into the space between the shell and EPS. 2. Snap the three fasteners of the cheek pad into place. 3. Repeat the process on the opposite side. OUTSTAR S Bluetooth Helmet | 11 ®... -
Page 12: Removing The Inner Pad
2.8 Installing the Inner Pad 1. Align and install the plastic plate on the four sleeves of the front section. 2. Snap the two rear buttons of the inner pad into place. OUTSTAR S Bluetooth Helmet | 12 ®... -
Page 13: Removing The Inner Sun Visor
3. Repeat Step 2 on the opposite side. 2.10 Installing the Inner Sun Visor 1. Insert the inner sun visor tab into its slot until you hear a click. 2. Repeat the process on the opposite side. OUTSTAR S Bluetooth Helmet | 13 ®... -
Page 14: Pre-Ride Helmet Inspection
CAUTION: Never ride with the chinstrap unfastened or incorrectly adjusted. The chinstrap should fit correctly and should not become loose when pulled. The fastener is not correctly closed if the chinstrap becomes loose when pulled. OUTSTAR S Bluetooth Helmet | 14 ®... -
Page 15: Getting Started
3.1 Downloadable Sena Software 3.1.1 Sena Utility App By simply pairing your phone with your Bluetooth system, you can use the Sena Utility App for quicker, easier set up and management. Sena Utility • Download the Sena Utility App on Google Play Store Store. -
Page 16: Charging
• Please make sure to take off your helmet while charging. The Bluetooth system automatically turns off during charging. • Any 3rd party USB charger can be used with Sena products if the charger is approved by either the FCC, CE, IC or other locally approved agencies that Sena accepts. -
Page 17: Checking The Battery Level
You can raise or lower the volume by tapping the (+) Button or the (-) Button. Volume is set and maintained independently at different levels for each audio source (i.e., phone, intercom), even when the Bluetooth system is rebooted. Volume Up Volume Down OUTSTAR S Bluetooth Helmet | 17 ®... -
Page 18: Pairing The Bluetooth System With Other Bluetooth Devices
The Bluetooth system can pair with multiple Bluetooth devices such as a mobile phone, GPS, MP3 player, or Sena SR10 Two-Way Radio Adapter via Mobile Phone Pairing, Second Mobile Phone Pairing, and GPS Pairing. -
Page 19: Pairing When The Outstar S Is Turned Off
4 PAIRIng THE BLUETOOTH SySTEM WITH OTHER BLUETOOTH DEVICES 4.1.2 Pairing When the OUTSTAR S is Turned Off 1. While the Bluetooth system is off, press and hold the Center Button and the (+) Button for 5 seconds. Blinking HOLD “... -
Page 20: Second Mobile Phone Pairing - Second Mobile Phone, Gps, And Sr10
“ Configuration HOLD menu” 2. Tap the (+) Button. Blinking “ Second mobile phone pairing” 3. Select OUTSTAR S in the list of Bluetooth devices detected. If your Bluetooth mobile phone asks for a PIN, enter OUTSTAR S 0000. Device B 4.3 GPS Pairing... -
Page 21: Advanced Selective Pairing: Hands-Free Or A2Dp Stereo
HOLD menu” 2. Tap the (+) Button 3 times. Blinking “ Phone selective pairing” 3. Select OUTSTAR S in the list of Bluetooth devices detected. If your Bluetooth mobile phone asks for a PIN, enter OUTSTAR S 0000. Device B 4.4.2 Media Selective Pairing - A2DP Profile... - Page 22 4 PAIRIng THE BLUETOOTH SySTEM WITH OTHER BLUETOOTH DEVICES 3. Select OUTSTAR S in the list of Bluetooth devices detected. If your Bluetooth mobile phone asks for a PIN, enter OUTSTAR S 0000. Device B OUTSTAR S Bluetooth Helmet | 22...
-
Page 23: Mobile Phone Usage
5.2 Speed Dialing 5.2.1 Assigning Speed Dial Presets Speed Dial Presets could be assigned through the Sena Device Manager or the Sena Utility App. 5.2.2 Using Speed Dial Presets 1. Enter into the Speed Dial menu. - Page 24 5 MOBILE PHOnE USAgE 3. Call one of your Speed Dial Presets numbers. “ Speed dial (#)” 4. Redial the last number called. “ Last number redial” OUTSTAR S Bluetooth Helmet | 24 ®...
-
Page 25: Stereo Music
• When Audio Multitasking is enabled, if an intercom call is made when you are listening to music, music sharing will not work. • Music sharing will be terminated if the Bluetooth system starts a multi-way intercom conference. OUTSTAR S Bluetooth Helmet | 25 ®... -
Page 26: Bluetooth Intercom
7.1.1 Using the Smart Intercom Pairing (SIP) SIP allows you to quickly pair with your friends for intercom communication by scanning the QR code on the Sena Utility App without remembering the button operation. 1. Pair the mobile phone with the Bluetooth system. -
Page 27: Using The Button
(B) is paired with you (A) correctly. 7. Repeat steps 4-6 to pair with Intercom Friends (C) and (D). Note: The Smart Intercom Pairing (SIP) is not compatible with Sena products that use Bluetooth 3.0 or below. 7.1.2 Using the Button Users (You, B) enter into Intercom Pairing. -
Page 28: Last-Come, First-Served
Bluetooth system (A), and Bluetooth system (B) is the Third Intercom Friend of Bluetooth system (A). Intercom Pairing Order Last-Come, First-Served Intercom Friend1 Intercom Intercom Friend1 Friend2 Intercom Intercom Intercom Friend1 Friend2 Friend3 OUTSTAR S Bluetooth Helmet | 28 ®... -
Page 29: Two-Way Intercom
Friend1 Friend2 Friend3 Start/End Conversation with the First Intercom Friend D Intercom Friend1 Start/End Conversation with the Second Intercom Friend C Intercom Friend2 Start/End Conversation with the Third Intercom Friend B Intercom Friend3 OUTSTAR S Bluetooth Helmet | 29 ®... -
Page 30: Multi-Way Intercom
(A). Intercom Intercom Friend1 Friend2 4. Now you (A) and two Intercom Friends (B and C) are having a Three-Way Intercom Conference. Intercom Intercom Friend1 Friend2 OUTSTAR S Bluetooth Helmet | 30 ®... - Page 31 Note: When you disconnect the second friend (B), you will be disconnected with the third participant (D) as well. This is because the third participant (D) is connected with you via the second friend (B). OUTSTAR S Bluetooth Helmet | 31 ®...
-
Page 32: Three-Way Conference Phone Call With Intercom Users
1. Go through intercom pairing with up to three Bluetooth systems you want to have Group Intercom with. Blinking “ Group intercom” “ Group intercom connected” When all of the Bluetooth systems are connected together. Terminate Group Intercom “ Group intercom HOLD terminated” OUTSTAR S Bluetooth Helmet | 32 ®... -
Page 33: Universal Intercom
Universal Intercom allows you to have intercom conversations with users of non-Sena Bluetooth headsets. Non-Sena Bluetooth headset can be connected to the Sena Bluetooth system if they support the Bluetooth Hands-Free Profile (HFP). You can pair the Bluetooth system with only one non-Sena headset at a time. The intercom distance depends on the performance of the Bluetooth headset to which it’s... -
Page 34: Multi-Way Universal Intercom
1. You (A) need to be paired with a non-Sena Bluetooth headset (B) and another headset (C) for the Three-Way Conference Intercom. - Page 35 (C), and a non-Sena Bluetooth headset (D). Non-Sena Non-Sena Headset Headset Four-Way Universal Intercom Case 2 2) You (A), a non-Sena Bluetooth headset (B), and two other Bluetooth systems (C and D). Non-Sena Headset OUTSTAR S Bluetooth Helmet | 35...
-
Page 36: Function Priority
Note: If you select music as the Audio Source Priority, the order of priority will change as below: (highest) Mobile phone Bluetooth stereo music Intercom (lowest) Music sharing by Bluetooth stereo music OUTSTAR S Bluetooth Helmet | 36 ®... -
Page 37: Configuration Setting
Second Mobile Phone Pairing None GPS Pairing None Phone Selective Pairing None Media Selective Pairing None Delete All Pairings Execute Remote Control Pairing Execute Universal Intercom Pairing Execute Factory Reset Execute Exit Configuration Execute OUTSTAR S Bluetooth Helmet | 37 ®... -
Page 38: Delete All Pairings
Remote Control device in pairing mode. 10.2 Software Configuration Setting You can change the settings of the Bluetooth system through the Sena Device Manager or the Sena Utility App. Sena Utility Sena Device Manager 10.2.1 Speed Dial... -
Page 39: Smart Volume Control (Default: Disable)
“Hello” loudly or by blowing air into the microphone. VOX phone is temporarily disabled if you are connected to intercom. If this feature is disabled, you have to tap the Center Button to answer an incoming call. OUTSTAR S Bluetooth Helmet | 39 ®... -
Page 40: Vox Intercom (Default: Disable)
• Refer to the manufacturer of your Bluetooth device that will be connected to the Bluetooth system to see if it supports HD Voice. • HD Voice is active only when Audio Multitasking is disabled. OUTSTAR S Bluetooth Helmet | 40 ®... -
Page 41: Hd Intercom (Default: Enable)
10.2.12 Advanced Noise Control™ (Default: Enable) When Advanced Noise Control is enabled, the background noise is reduced during an intercom conversation. When it is disabled, the background noise is mixed with your voice during intercom. OUTSTAR S Bluetooth Helmet | 41 ®... -
Page 42: Audio Multitasking™ (Default: Disable)
The volume of the foreground audio can be adjusted using the Bluetooth system. How much background audio that is heard can be adjusted using the Sena Utility App. HD Intercom, HD Voice, and Audio Source Priority become disabled temporarily when Audio Multitasking is enabled. -
Page 43: Background Volume (Default: Level 5)
10 COnFIgURATIOn SETTIng 10.2.14 Background Volume (Default: Level 5) The Background Volume can be adjustable only when the Audio Multitasking turns on. Level 9 is the highest volume and level 0 is the lowest. OUTSTAR S Bluetooth Helmet | 43 ®... -
Page 44: Troubleshooting
11. TROUBLESHOOTING Please visit sena.com for more troubleshooting information. • Customer Support: sena.com 11.1 Fault Reset When the Bluetooth system is not working properly, you can easily reset the unit: 1. Locate the Pinhole Fault Reset Button below the Center Button. -
Page 45: Maintenance And Care
Store the helmet in a dry, dark, well-ventilated location, out of the reach of children and animals. Always position the helmet so that it cannot fall to the floor. Damage that occurs in this way is not covered by the warranty. OUTSTAR S Bluetooth Helmet | 45 ®... - Page 46 ® for Bluetooth capabilities. The Bluetooth word mark and logos are owned by the Bluetooth ® SIG, Inc. and any use of such marks by Sena is under license. iPhone and iPod touch are registered trademarks of Apple Inc. ®...
Need help?
Do you have a question about the Outstar S and is the answer not in the manual?
Questions and answers