
Related Manuals for Esatto EDW6012S


Summary of Contents for Esatto EDW6012S
- Page 1 Model/s Version EDW6012S V1.1 0123 EDW6012W Everything you need for your 60cm Freestanding Dishwasher is in this User Manual...
- Page 2 — requirements of your appliance to ensure optimum performance. Telephone 1300 11 4357 Again, thank you for choosing an Esatto appliance and we look forward to being of service to you. Kind Regards, The Residentia Team www.esatto.house...
-
Page 3: Table Of Contents
Contents Page 2 Page 4 Welcome Safety Instructions Page 5 Page 6 Your Dishwasher Quick Start Guide Page 7 Page 8 Control Panel Installation Instructions Page 10 Page 11 Preparing Loading & Loading Dishes Recommendations Page 14 Page 14 Rinse Aid &... - Page 4 User Manual Safety Instructions Warning! • S ome dishwasher detergents are strongly alkaline. When using your dishwasher , follow the precautions They can be extremely dangerous if swallowed. listed below: Avoid contact with the skin and eyes and keep children away from the dishwasher when the door is open. • I nstallation and repair can only be carried out by a • ...
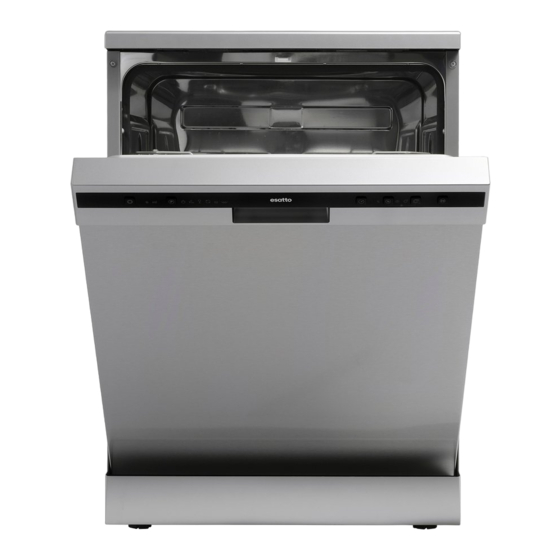
- Page 5 Your Dishwasher PRODUCT OVERVIEW IMPORTANT: Important! To get the best performance from your dishwasher, read all operating instructions To get the best performance from your dishwasher, read all operating instructions before using it for the first time. before using it for the first time. Inner pipe Lower spray arm Filter assembly Dispenser upper spray arm Cup rack...
- Page 6 User Manual Quick Start Guide QUICK USER GUIDE QUICK USER GUIDE QUICK USER GUIDE Please read the corresponding content on the instruction manual for detailed Please read the corresponding content in the instruction manual for detailed operating method. QUICK USER GUIDE QUICK USER GUIDE operating method. Please read the corresponding content on the instruction manual for detailed Please read the corresponding content on the instruction manual for detailed STEP 1: operating method.
-
Page 7: Control Panel
Control Panel 1. Power button Press this button to turn on your dishwasher. 2. Warning indicators Rinse Aid If the “ ” indicator is lit, the dishwasher is low on dishwasher rinse aid and requires a refill. Program End If the “ ” indicator is lit, it means the Program Cycle has finished. 3. Program Select the appropriate washing program, the selected program indicator will be lit. 4. Program indicators Intensive 65° C For heaviest soiled crockery, such as pots, pans, casserole dishes and dishes that have been sitting with dried food on them for some time. ECO 50° C ... - Page 8 hind it, and the sides, along the adjacent cabinets or walls. The dishwasher is uipped with water supply and drain hoses that can be positioned either to the right the left sides to facilitate proper installation. evelling the appliance User Manual nce the appliance is positioned for levelling, e height of the dishwasher may be altered via Installation Instructions...
- Page 9 Installation Instructions (Continued) WARNING: How to drain excess water from hoses A hose that attaches to a sink spray can burst if it is If the sink is 1000 higher from the floor, the excess installed on the same water line as the dishwasher. water in hoses cannot be drained directly into the sink. If your sink has one, it is recommended that the hose It will be necessary to drain excess water from hoses be disconnected and the hole plugged. into a bowl or suitable container that is held outside and lower than the sink.
-
Page 10: Preparing & Loading Dishes
User Manual Preparing & Loading Dishes Load hollow items such as cups, glass downwards so that water cannot colle Dishes and items of cutlery must not l • Long bladed knives stored in an upright position • Consider buying utensils which are identified as To avoid damage, glasses should not t dishwasher-proof. - Page 11 Loading Recommendation Loading The Baskets According To AS/NZS 2007.1 Loading The Baskets According To AS/NZS 2007.1 Loading the baskets according to AS/NZS 2007.1: 1.Upper basket: 1.Upper basket: 1. UPPER BASKET Item Number Number Item Cups Cups Saucers Saucers Glasses Glasses 3.Cutlery basket: 2. LOWER BASKET...
- Page 12 on your dishes, which can leave spots and streaks. It also improves drying by allowing water to roll off the dishes. Your dishwasher is designed to use liquid rinse aids. WARNING User Manual Only use branded rinse aid for dishwasher. Never fill the rinse aid dispenser with any other substances (e.g.
-
Page 13: Rinse Aid & Detergent
Rinse Aid & Detergent (Continued) Filling The Detergent Dispenser Filling The Detergent Dispenser STEP 1: Press the release catch on the detergent dispenser to open the cover Push latch to open Press the release catch on the detergent Add detergent into the larger cavity STEP 2: dispenser to open the cover. - Page 14 User Manual PROGRAMMING THE DISHWASHER Operation Instructions Wash Cycle Table WASH CYCLE TABLE The table below shows which programs are best for the levels of food residue on The table below shows which programs are best for the levels of food residue them and how much detergent is needed. It also show various information about on them and how much detergent is needed. It also show various information about the programs. ...
- Page 15 Operation Instructions (Continued) STARTING A CYCLE WASH ADDING A DISH MID-CYCLE 1. Draw out the lower and upper basket, load the A forgotten dish can be added any time before the dishes and push them back. It is recommended to detergent dispenser opens. If this is the case, follow load the lower basket first, then the upper one. the instructions below: Forget To Add A Dish? 2. Pour in the detergent. 1. Press the Start/Pause button to pause the washing cycle.
-
Page 16: Basket Tips
Type 2: USING YOUR DISHWASHER User Manual Type 2: Before using your dishwasher : To raise the upper basket just lift To lower the upper basket, lift the Basket Tips the upper basket at the center of adjust handles on each side to Inside Outside each side until the basket locks into... - Page 17 Cleaning & Maintenance EXTERNAL CARE STEP 2: The fine filter can be pulled off the bottom of the filter The door and the door seal assembly. The coarse filter can be detached from the Clean the door seals regularly with a soft damp cloth main filter by gently squeezing the tabs at the top and to remove food deposits. When the dishwasher is pulling it away. being loaded, food and drink residues may drip onto Main filter Main filter the sides of the dishwasher door. These surfaces are Coarse filter Coarse filter outside the wash cabinet and are not accessed by Fine filter water from the spray arms. Any deposits should be ...
- Page 18 User Manual Cleaning & Maintenance (Continued) SPRAY ARMS CARING FOR THE DISHWASHER It is necessary to clean the spray arms regularly for Frost precaution hard water chemicals will clog the spray arm jets and bearings. Please take frost protection measures on the dishwasher in winter. Every time after washing cycles, To clean the spray arms, follow the instructions below: please operate as follows: Spray arms STEP 1: 1. Cut off the electrical power to the dishwasher at It is necessary to clean the spray arms regularly for hard water chemicals will clog the To remove the upper spray arm, hold the nut in the ...
-
Page 19: Troubleshooting
Troubleshooting OPERATION IN CASE OF EMERGENCY In the event of an emergency you should: • Switch off the appliance using the Power button • Switch the clothes dryer off at the power point and unplug the unit. If the power point isn’t accessible, switch the relevant circuit off at your fuse box/switch board. • Call our support team on 1300 334 357. ERROR CODES If there is a malfunction, the dishwasher will display error codes to identify these. Error Code Description Cause Faucets is not opened, or water intake is Longer inlet time restricted, or water pressure is too low. Not reaching required Malfunction of heating element. temperature. Overflow. Some element of dishwasher leaks. Failure of communication ... - Page 20 User Manual Troubleshooting (Continued) Issue Possible cause What to do Suds in the tub • Wrong detergent. • Use only the special dishwasher detergent to avoid • Spilled rinse-aid. suds. If this occurs, open the dishwasher and let suds evaporate. Add 1 gallon of cold water to the bottom of the dishwasher. Close the dishwasher door, then select any cycle. Initially, the dishwasher will drain out the water. Open the door after draining stage is complete and check if the suds have disappeared. Repeat if necessary. • Always wipe up rinse-aid spills immediately. Stained tub interior Detergent with colourant Make sure that the detergent has no colourant. may have been used. White film on Hard water minerals. To clean the interior, use a damp sponge with ...
- Page 21 Troubleshooting (Continued) FURTHER PROBLEM SOLVING CONTINUED Issue Possible cause What to do Detergent left in Dishes block detergent Re-loading the dishes properly. dispenser dispenser The dishes aren’t • Improper loading • Load the dishwasher as suggested in the directions. drying • Too little rinse-aid • Increase the amount of rinse-aid/refill the rinse-aid • Dishes are removed too dispenser. soon • Do not empty your dishwasher immediately after • Wrong program has been washing. Open the door slightly so that the steam ...
-
Page 22: Technical Information
845mm Width (W) 598mm Esatto Manufacturer Esatto Depth (D1) 600mm (with the door closed) EDW6012S & EDW6012W Type / Description EDW6012W,EDW6012S Depth (D2) 1175mm (with the door opened 90°) Standard place settings Energy efficiency class Water consumption class Standard cleaning cycle Energy consumption of the standard cleaning cycle 0.73 kWh... - Page 23 Purchase Details For your records, please record details of your purchase below and staple your receipt on the opposite page. Your serial number can be found on the rating plate of your Dishwasher. STORE DETAILS STORE NAME ADDRESS TELEPHONE...
-
Page 24: Warranty
User Manual Warranty WARRANTY TERMS AND CONDITIONS IN ThIS WARRANTY DIShWAShERS ‘acceptable quality’ as referred to in clause 10 of this warranty has the same meaning referred to in This document sets out the terms and conditions of the the ACL; product warranties for Residentia Group Appliances. - Page 25 You will bear the cost of transportation, travel and For Appliances and services provided by Residentia delivery of the Appliance to and from Residentia Group in Australia, the Appliances come with a Group or its ASR. If you reside outside of the service...
- Page 26 – that you can refer to at any g) a product not in possession of the original time. Simply visit the below website, or ask your retailer purchaser; for help: www.esatto.house/nz/registration h) damage caused by power outages or surges WARRANTY damage caused by pests (eg.
- Page 27 This page is intentionally blank. But if you want to draw something, make notes or even write a recipe, it’s all yours!
- Page 28 everything you need A RESIDENTIA GROUP INITIATIVE...
Need help?
Do you have a question about the EDW6012S and is the answer not in the manual?
Questions and answers
What does E4 mean?