
Related Manuals for Saeco Royal BLACK


Summary of Contents for Saeco Royal BLACK
- Page 1 Automatic machine for espresso coffee and hot beverages OPERATION AND MAINTENANCE ATTENTION: Read this user manual carefully before using the machine. EN-GB...
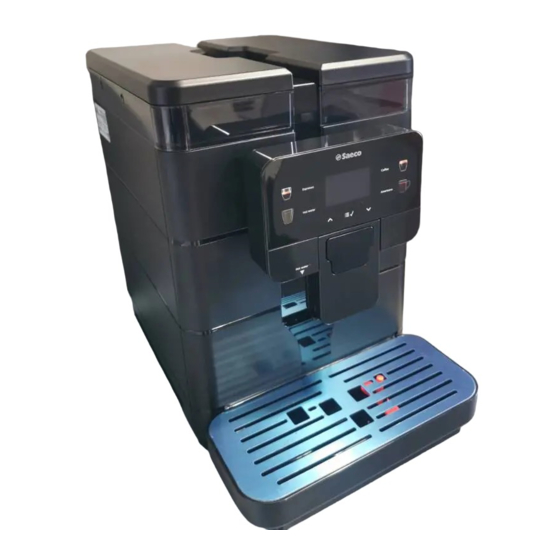
- Page 2 English MAIN PARTS Water tank lid Brew group Water tank Service door Touch control panel Hot water dispensing spout Coffee grounds drawer USB port Full drip tray float Power button Cup holder grill Chassis plug Drip tray Power cord Coffee bean hopper lid Display Coffee bean hopper Moving coffee dispensing spout...
- Page 3 English SAFETY INSTRUCTIONS Never allow water to The machine may be used come into contact by children older than 8 or with by persons with reduced electrical parts of the physical, mental or sensory machine: danger abilities or lacking sufficient short circuit! experience...
- Page 4 English Power cord Do not let the power cord hang freely from tables or Never use power defective shelves. cords. Report any defects in the Safety of Persons cord and/or plug to the service provider immediately. Ensure that children cannot Do not pass the power play with the machine cord around corners, over...
- Page 5 English Suitable Location Do not use the coffee Operation and Maintenance machine in an environment with temperature values The machine should be lower and/or equal to 2°C installed by the service or higher than 32°C; If the provider accordance machine has been exposed with the safety regulations to such conditions, alert in force at the time of...
- Page 6 English Servicing It is strictly forbidden to Maintenance tamper with the internal parts of the machine. In case of failures, defects or Do not clean the machine suspected faults resulting using jets of water. from a fall, immediately unplug the machine from power socket and alert the The appliance and its parts service...
-
Page 7: Table Of Contents
English CONTENTS INTRODUCTION TO THE MANUAL... CLEANING AND MAINTENANCE..Preamble..........10.1 General Notes for Correct Operation..Icons Used..........10.2 Cleaning and Scheduled Maintenance..INFORMATION ABOUT THE..... TROUBLESHOOTING....... APPLIANCE........11.1 Warning signals........Information for the Maintenance Technician. 11.2 Problems - Causes - Solutions..... Description and Intended Use.... -
Page 8: Introduction To The Manual
This article is marketed under the responsibility of performed. SaGa Coffee S.p.A. which guarantees the product. Saeco is a registered trademark of Koninklijke Philips Important N.V. and its use is licensed by Koninklijke Philips N.V. It is used to indicate operations that, if correctly... - Page 9 English Suggested solutions It is used to indicate alternative procedures which make programming and/or maintenance operations quicker. User It is used to indicate the user of the machine. Users are not allowed to perform any cleaning or maintenance operations. Supply operator It is used to indicate those operations that must be performed only by the person in charge of refilling and cleaning the machine.
-
Page 10: Information About The............. Appliance
English INFORMATION ABOUT THE APPLIANCE Information for the Description and Intended Use Maintenance Technician This machine is automatically used to brew: The appliance must be • coffee and espresso coffee using instantly ground coffee beans; installed well-lit, • hot beverages using hot water dispensed via the dispensing spout. -
Page 11: Appliance Identification
English Appliance Identification The appliance is identified by the model name and serial number shown on the special plate. The plate contains the following data: • name of the Manufacturer; • marks of conformity; • model; • serial number; • year and month of manufacture; •... -
Page 12: Technical Specifications
English Technical Specifications Size (w x h x d) 280 x 398 x 460 mm Weight approx. 10 kg Machine housing material Thermoplastic material Power Rating See the data plate Supply Voltage See the data plate Power cord length approx. 1,200 mm Capacity Water tank approx. -
Page 13: Safety
English SAFETY It is mandatory to: Preamble • check conformity of the power supply; In compliance with the regulations and directives in force, SaGa Coffee has established at its offices a • use original spare parts; technical pamphlet relative to the ROYAL appliance. •... -
Page 14: Operator Requirements
English case failure Maintenance technician malfunctioning, please The maintenance technician is the only person authorised service machine, start refer only to the qualified programming procedures and perform the adjustment, set up and maintenance operations. personnel of the technical Access to the internal area service. -
Page 15: Handling And Storage
English HANDLING AND STORAGE Storage operations The machine is packed in cardboard and expanded described in this chapter polystyrene packaging. must performed If the appliance is not immediately installed, it shall be exclusively by the service kept in a sheltered place according to the following instructions: provider or a specialised •... -
Page 16: Installation
English INSTALLATION Cautions operations described in this chapter The appliance cannot be must performed installed in external areas. exclusively by the service Avoid placing it in areas provider or a specialised where the temperature is technician, shall lower than 2°C or higher organise all the operating than 32°C... -
Page 17: Unpacking And Positioning
English supporting surface The presence of magnetic must be adequate to bear fields proximity the machine weight and electrical machines which clean. generate interference could cause the electronic Access to the machine and controls of the machine to the plug should be kept malfunction. -
Page 18: Connection To The Electric Network
English Power cord: to connect the machine to the mains. Group cleaning tablets: allow a correct cleaning of the brew group, increasing its durability. Water hardness test: quick test to determine the actual hardness of the water used to prepare beverages;... - Page 19 English In case of doubt, do not proceed with installation qualified authorised personnel accurately check the system. Do not use adapters or multi-sockets. Make sure that the power cord plug easily reachable after installation.
-
Page 20: Description Of Controls
English DESCRIPTION OF CONTROLS Power button "Espresso" button "Hot Water" button It is located in the lower left part in the rear of the "Up" button machine. If set to the "I" position the machine turns on "MENU/OK" button (electrical functions enabled). If set to the "O" position "Coffee"... -
Page 21: Supply And Start Up
English SUPPLY AND START UP Coffee Blends The coffee bean hopper may • We recommend using fresh, non-oily be provided with different medium-ground coffee. • Use an espresso coffee blend. safety features according to • Use the special blends for espresso machines to the regulations of the country obtain a strong and aromatic coffee. -
Page 22: Filling The Water Tank
English Remove the tank; lift it using the inside handles. If the water tank is not inserted, check that no coffee beans fall into the tank compartment. If this happens, remove them to avoid any malfunctions. Filling the Water Tank Before using the machine for the first time, wash the water tank carefully. -
Page 23: Measuring And Adjusting Water Hardness
English Measuring and Adjusting Tech Menu Water Hardness Settings Statistics Exit Measuring water hardness is very important in order to correctly manage the anti-scale filter and the frequency with which the machine must be descaled. Select the "SETTINGS" option and press the "OK" Immerse the water hardness test strip in water for 1 button. -
Page 24: Water Filter
English Hardness Remove the water filter from its packaging. Set the filter in the standard position on letter B. Use the water hardness test strip (not provided with the machine). Set the "Intenza Aroma System" as specified on the filter package (see section "Measuring and Adjusting Water Hardness"). - Page 25 English To select the "MACHINE MENU" option, press the Select "YES" and press the "OK" button. The following "DOWN" button. screen is displayed: Settings INSERT FILTER Credits Menu FILL WATER TANK BEVERAGE SETTINGS Exit Machine Menu Put the filter into the empty tank. Press it to its limit stop.
-
Page 26: Coffee Grind Adjustment
English Fill the water tank again up to the MAX level with fresh Coffee Grind Adjustment drinking water. The Filter 100% icon appears on the machine-ready screen to indicate that the filter has been installed. pour ground and/or instant coffee into the coffee bean hopper. -
Page 27: Coffee
English Remove the drip tray. Adjusting the "Aroma" - Amount of Ground Coffee The machine allows you to program the amount of coffee to be ground for preparing each cup of coffee. The Aroma adjusting lever must only be turned when coffee grinder stopped. -
Page 28: Adjusting The Coffee Dispensing Spout
English Open the service compartment door. Manually move the dispensing spout up or down to adjust its height. The recommended positions are: • When using small cups. The reference marks indicate the amount of ground coffee which has been set. You can set different amounts with the following •... -
Page 29: Turning On/Off The Machine
English Push the dispensing spout towards the machine interior to its limit stop, to allow the use of tall glasses or MUGS. In this case, you can just brew one product at a time. Otherwise, some product might leak out of the dispensing spout. -
Page 30: First Use - Use After A Long Period Of
English Upon first use, once If the machine fails its first warm-up been start-up (brewing) make 2 completed, the machine further attempts. At the primes circuit end of these 3 attempts, if performs a rinse cycle of the problem is not solved, the internal circuits. -
Page 31: Washing The Parts Coming Into Contact With Food
English Place a container under the hot water dispensing spout. 7.13 Using the Appliance Before using the machine, read this manual carefully and make sure users are familiar with the machine. After the machine has not been used for a certain time, it is recommended to read section "First Use - Use after a Long Period of... -
Page 32: Programming Menu
English PROGRAMMING MENU Button Description in This chapter contains Programming Mode instructions on how to set change Use the buttons described below to scroll the appliance menus. programming parameters of the appliance. Therefore it is necessary to carefully read it and to understand exact sequence... -
Page 33: User Programming
English User Programming The PASSWORD will not The structure of the user menu is indicated in section be requested if set on the "Structure of the User Menu". Section "Description of Messages in the User Menu" default value (0000). It describes all options in the user menu. - Page 34 English forget PASSWORD, recreate it by entering a PUK code. You have to request the PUK code to the Saeco (Evoca group) service centre, who will guide you through the procedure. 8.2.2 Structure of the User Menu The main options of the user menu are:...
-
Page 35: Technical Programming
English Technical Programming After this change, The structure of the programming menu is indicated in password must be entered section "Structure of the Programming Menu". section "Description Messages each time display Programming Menu" describes all the items in the programming menu. shows: 8.3.1 Access to the Technical Menu... - Page 36 180 minutes recreate it by entering a ALARMS PUK code. You have to Coffee grounds drawer full alarm request the PUK code to Descaling the Saeco (Evoca group) service centre, who will Exit PRE-GRINDING guide you through the procedure. Pre-brewing High 8.3.2...
- Page 37 English MENU ITEM Statistics products TOTAL Espresso Espresso x2 Coffee Coffee x2 AMERICAN COFFEE HOT WATER TOTAL COFFEE BEVS Exit RESETTABLE Espresso Espresso x2 Coffee Coffee x2 AMERICAN COFFEE HOT WATER COUNTERS RESET Exit Exit Errors Reset errors Exit Water Descaling SINCE LAST SINCE SECOND LAST...
- Page 38 English 8.3.3 Description of Messages in the Technical Menu MENU ITEM Description Settings This menu allows you to access all machine configuration parameters Credits Menu This menu allows you to activate the use of virtual credits, load them onto the machine, reset them and enable the display of the "Ready for use"...
- Page 39 This function allows you to set or disable the password to access the User menu. NOTE: Enter the value '0000' as password to disable the password. If you forget the PASSWORD, you must start a reset procedure. Please contact Saeco (Evoca group) customer service. TECH. PW This function allows you to set or disable the password to access the Tech.
- Page 40 This function allows you to overwrite the current machine configuration (settings and doses), by loading another one via the USB key. NOTE: The configuration file on the key must have been previously generated by a Royal Black and should have the .MEM extension. WRITE In this menu you can save the current machine configuration and the statistics on its use to the USB key.
- Page 41 (settings and doses) to the USB key. NOTE: The generated .MEM files can be used to overwrite the Royal Black machine configuration. Statistics This function allows you to save in .TXT format the machine use statistics to the USB key, i.e.:...
- Page 42 English MENU ITEM Description Exit This option allows the user to go back to the menu top level Errors This function allows you to manage and view the machine errors: - LOG - Reset Errors This function allows you to view the machine errors. Reset errors This function resets the error list Exit...
- Page 43 English 8.3.4 Password setting General Menu Temperature The PASSWORD must be set by the service provider USER PW in order to prevent access by unauthorised personnel TECH. PW who could change the machine settings and cause malfunctions. Press the "OK" button to enter. The following screen You can set two passwords to access the two different is displayed: machine menus.
-
Page 44: Operation And Use
English OPERATION AND USE Warm-up and Rinsing The use by children older Upon start-up, the machine activates the warm-up phase. Wait until it is completed. than 8 years or by persons with reduced physical, mental or sensory abilities or with lack of experience skills allowed, provided that they are... -
Page 45: Rinse/Self-Cleaning Cycle
English Eco-friendly: Stand-by The cycle can be stopped by pressing the lightened The machine is designed for energy saving. The button. machine will turn off automatically if it is not used for a set period of time after the last dispensing. This period of time is set by the service provider in the technical menu. -
Page 46: Dispensing Hot Water
English Brewing two cups of coffee The hot water dispensing requires grinding spout reach high cycles and two brewing temperatures: never touch cycles, which the machine it with bare hands. carries out automatically. Ensure the machine is ready for use before dispensing hot water. -
Page 47: Adjusting Brewed Products
English Adjusting Brewed Products Place a cup under the dispensing spout. The machine allows you to adjust the product length according to your needs and to the type of cup used. Adjusting the product length can be performed by the service provider via keypad in visual mode. -
Page 48: Using The Machine With Credits
English The "Espresso" button is now programmed. Each time Press the "OK" button to enter. it is pressed, the machine will brew the same amount that was just programmed. WATER QUANTITY LOW (30%) This adjustment method is correct for all products MEDIUM (50%) apart from the "AMERICANO". -
Page 49: Emptying The Coffee Grounds Drawer And
English Emptying the coffee grounds Raise the coffee grounds drawer. drawer and drip tray This operation must be performed with machine turned on and/or in stand-by mode. The machine will indicate when the coffee grounds drawer has reached its maximum capacity. The first warning alerts the user that the coffee grounds drawer Empty the coffee grounds drawer and the drip tray. -
Page 50: Bluetooth
- Select the dedicated manual. • Order and/or load the machine credits from the "Saeco Pro Up" app, if logged with registered and enabled user. • Make the adjustment of the technical setting directly from "Saeco Pro Up" app if logged with registered and enabled user. - Page 51 English CLEANING AND MAINTENANCE 10.1 General Notes for Correct Before performing Operation maintenance and/or cleaning operation, unplug N o n - r e m o v a b l e the power cord. components machine itself must be cleaned, when differently specified, only The Manufacturer is not by using cold or lukewarm...
- Page 52 English 10.2 Cleaning and Scheduled 10.2.1 Maintenance Schedule Maintenance Operation to be carried out yes - Drip tray All parts requiring cleaning Emptying and cleaning the coffee grounds drawer are easily accessible, so no yes - Water tank cleaning yes - Brew group cleaning tools are needed.
- Page 53 English 10.2.3 Cleaning the Water Tank 10.2.4 Brew Group Cleaning Remove the lid from the water tank. The brew group should be cleaned whenever the coffee bean hopper is filled, or at least once a week. Turn off the machine by switching the power button to the "O"...
- Page 54 The "Coffee Oil Remover" system has no descaling properties. For descaling, use the Saeco descaling solution and follow the procedure described Make sure that the hook which locks the brew group is the "Descaling" chapter.
- Page 55 English Open the service door. Do not drink the solution dispensed during this procedure. The solution must be disposed of. Access the user menu as described in the "Access to the User Menu" section. User menu BREW GROUP CLEAN Remove the brew group by pulling it by the handle and Exit pressing the «PRESS»...
- Page 56 Before lubricating the brew group, clean it under running water as described in the "Brew Group Cleaning" chapter. The machine completes the cycle automatically. Lubricate the brew group guides using Saeco grease only. At the end of the cycle, after performing the rinse cycle, the machine goes...
- Page 57 English Just follow the steps described below. This operation needs to be carried out before the appliance stops working properly, as in this case repair is not covered by warranty. The descaling and maintenance products can be purchased from your local dealer or the authorised support centres.
- Page 58 English POUR DESCALER INTO THE WATER TANK Exit Pour 250 ml of descaling product into the water tank. Select "OK" and press the "OK" button. The following screen is displayed: ADD WATER UP TO LEVEL CALC CLEAN Select "OK" and press the "OK" button. The following Exit screen is displayed: STEP 1/2...
- Page 59 English STEP 2/2 To select the "MACHINE MENU" option, press the "DOWN" button. RINSING Settings Credits Menu BEVERAGE SETTINGS Machine Menu Press the "OK" button to pause the operation. Press the "OK" button again to resume the operation. On Press the "OK" button to enter. completion, the following screens are displayed: Machine Menu General Menu...
- Page 60 English TROUBLESHOOTING 11.1 Warning signals This chapter describes all the warning messages that the machine may display to the user and the actions that can and/or must be performed by the user. Warning Signals How to reset the message The machine is starting up. Machine in Stand-by.
- Page 61 English Warning Signals How to reset the message The credits available to dispense products have run out. All coffee-based products are disabled, and the corresponding LED lights are off. Group repositioning attempt in progress. Automatic initialisation of the Bluetooth module. Wait for the machine to complete the operation.
- Page 62 English Warning Signals How to reset the message Fill the water tank. Insert the brew group into its seat. Turn off the machine. Turn it back on after 30 seconds. RESTART MACHINE Try this 2 or 3 times. If this signal appears again, contact the service provider and provide the code shown in the display.
- Page 63 English 11.2 Problems - Causes - Solutions The following table indicates the possible error or alarm causes which may lead to a partial or total shutdown of the appliance. Error code Description Error 01: GRINDER_FAIL GRINDER LOCKED It indicates that there is a grinder failure. Coffee grinder broken or not working properly.
- Page 64 English STORAGE - DISPOSAL 12.1 Location Change Should the machine be placed in a different location, it is necessary to: • disconnect the appliance from the supply network; • carry out the general cleaning of the appliance as indicated in chapter "Cleaning and Maintenance"; •...
- Page 65 English INSTRUCTIONS FOR END OF OPERATIONAL LIFE DISPOSAL INFORMATION TO THE USER pursuant to Art. 13 of Legislative Decree no. 151 of 25 July 2005 "And in compliance with the provisions of the RAEE Directive relative to the reduction of the use of hazardous substances in electric and electronic appliances, as well as the disposal of the waste".
Need help?
Do you have a question about the Royal BLACK and is the answer not in the manual?
Questions and answers