Table of Contents
Advertisement
Available languages
Available languages
Quick Links
Thank you for buying your new Mini Aqua Pump .
This manual provides complete instructions for the correct installation and maintenance of pump which should
be carefully followed. Please record following information for future reference:
Serial number:
Date installed:
Imported & Distributed in the USA by:
3 Kellogg Court, Unit 10, Edison, NJ 08817 Tel: 732-248-8066
Fax: 732-248-8068 email: info@eztrap.com web: www.eztrap.com
Product Warranty
The manufacturer disclaims all implied and express warranties, including the implied warranty of merchantability and the implied warranty of fitness for a particular purpose, except as follows:
This condensate product purchased by you concurrently is unconditionally warranteed to be free from defects in material and workmanship under normal use for a period of one year from date of
purchase, providing it is installed and operated strictly in accordance with the manufacturer's installation instructions. If the product is found to be defect or otherwise fails in normal use, you may return
it for replacement. All freight charges for the return of the product shall be borne by you. The manufacturer will pay outgoing freight charges for the replacement product. Defective product returned
to the factory prepaid will be repaired or replaced free of charge. Replacement product will, to the extent such product is then available in the manufacturer's inventory, be of a similar type of color and
kind. Manufacturer retains the right to substitute product if the replacement product does not conform in terms of color, type and specifications to the original product if no longer available. This
warranty does not cover replacement labor or any cost, claim or incident to any defect nor does it cover any consequential damages. The sole liability of the manufacturer under this warranty is
limited to the replacement of defective product. Product damaged by improper use, accident, neglect, alteration, abuse or improper installation is excluded from this warranty.
Manufactured by: Aspen Pumps Apex Way Hailsham East Sussex BN27 3WA United Kingdom website: www.aspenpumps.com
mini aqua pump
INSTALLATION & MAINTENANCE MANUAL
FOR MINI AQUA MODELS: ASP-MA115 & ASP-MA230
Operating Voltage:
Location of pump:
•
Designed for installation inside
casing of minisplit evaporator unit
•
Quick and easy to install
•
Quietly and reliably pumps
condensation water to a
maximum height of 26 feet
Imported & Distributed in Canada by:
PBL Comfort Sales Inc
107 Highland Blvd, Caledonia, Ontario Tel: 905 765 6999
Fax: 905 765 6112 email: pblcsinc@bellnet.ca
or inside lineset cover
Advertisement
Table of Contents

Subscribe to Our Youtube Channel
Related Manuals for Aspen Pumps mini aqua ASP-MA115


Summary of Contents for Aspen Pumps mini aqua ASP-MA115
- Page 1 The sole liability of the manufacturer under this warranty is limited to the replacement of defective product. Product damaged by improper use, accident, neglect, alteration, abuse or improper installation is excluded from this warranty. Manufactured by: Aspen Pumps Apex Way Hailsham East Sussex BN27 3WA United Kingdom website: www.aspenpumps.com...
-
Page 2: Technical Data
Technical Data: • • Power supply: ETL listed 115 V AC 0.18A 15W 60HZ • Capacity: 3.7GPH @ zero head, 0.8 GPH 230 V AC 0.11A 16W 60HZ @ 26 ft. head. • 3A volt-free alarm wires, • Maximum recommended head: 26 feet N.O., N.C. -
Page 3: Typical Performance
Typical Performance: WITH NO SUCTION LIFT WITH CONSTANT 4 FOOT SUCTION LIFT WE RECOMMEND USING THIS PUMP FOR NO GREATER THAN 26 ft. HEAD WE RECOMMEND USING THIS PUMP FOR NO GREATER THAN 26 ft. HEAD US GALLONS PER HOUR US GALLONS PER HOUR Product Safety: •... - Page 4 Checklist: ITEM DESCRIPTION ITEM DESCRIPTION Is voltage correct? Is intake hose watertight? Is fuse installed? Is discharge hose watertight? Is pump permanently energised Is breather tube installed? regardless of evaporator operation? Is reservoir level? Is overflow switch (purple wire) Is reservoir secure? correctly wired to cooling wire to Is float in position? ensure unit will not operate in case of...
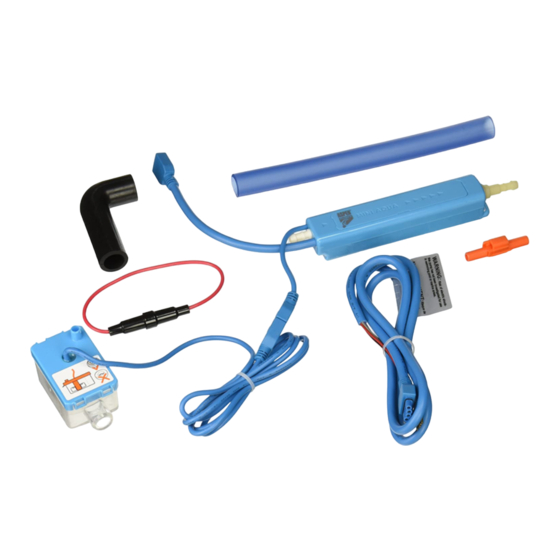
- Page 5 Installation: Reservoir & pump unit Check that float is in correct position on shaft, with magnet facing upwards and that filter is in place. DO NOT OPERATE THIS PUMP WITHOUT FILTER. Fit lid onto reservoir and clip firmly in place. Secure reservoir horizontally using self adhesive Velcro strips if necessary.
- Page 6 NOTE: Sound dampening material must be used between pump and any hard surfaces in evaporator or lineset cover to eliminate vibration and reduce noise. ANTI-VIBRATION HARD (INSULATION) SURFACE Note direction of water flow. FROM RESERVOIR TO DRAIN Installation - Drain Hose and wiring: Connect reservoir outlet to pump inlet with 1/4"...
- Page 7 WIRING: Check for correct voltage and wire power cable to incoming live, neutral and ground terminals inside evaporator to ensure pump is permanently energized regardless of evaporator operation. Install 1 amp inline fuse between evaporator and pump. Connect high level alarm in series into cooling signal wire from evaporator to ensure unit will not continue operating in case of blockage or pump failure.
-
Page 8: Troubleshooting
BEFORE SERVICING OR TROUBLESHOOTING ENSURE THE PUMP IS DISCONNECTED FROM MAINS SUPPLY. Servicing: • This Pump, like all mechanical equipment, requires periodic and regular maintenance. • Reservoir and filter should be removed and cleaned with anti-bacterial solution, and all tubing should be checked for leaks at maximum 3 month intervals during cooling season. •... - Page 9 La única responsabilidad del fabricante con esta garantía se limita al cambio del producto defectuoso. El producto dañado por uso indebido, accidente, negligencia, alteración, maltrato o instalación incorrecta queda excluido de esta garantía. Manufactured by: Aspen Pumps Apex Way Hailsham East Sussex BN27 3WA United Kingdom website: www.aspenpumps.com...
-
Page 10: Datos Técnicos
Datos técnicos: • • Fuente de alimentación: Temperatura del agua máxima: 104ºF 115 V AC 0.18A 15W 60HZ • Listada por ETL 230 V AC 0.11A 16W 60HZ • Capacidad: 3.7 GPH @ cero carga, 0.8 GPH • Cables de alarma de 3A sin voltios, contactos @ 26 pies cargo N/O N/C con capacidad nominal a 5A •... -
Page 11: Seguridad Del Producto
Rendimiento típico: CON EXTRACCIÓN DE SUCCIÓN SIN EXTRACCIÓN DE SUCCIÓN CONSTANTE DE 4 PIES NO RECOMENDAMOS EL FUNCIONAMIENTO SOBRE NO RECOMENDAMOS 26 PIES DE CARGA EL FUNCIONAMIENTO SOBRE 26 PIES DE CARGA GALONES ESTADOUNIDENSES POR HORA GALONES ESTADOUNIDENSES POR HORA Seguridad del producto: •... -
Page 12: Lista De Verificación
Lista de verificación: ARTÍCULO DESCRIPCIÓN ARTÍCULO DESCRIPCIÓN ¿Es correcto el voltaje? ¿Es hermética la manguera de entrada? ¿Esta el fusible instalado? ¿Es hermética la manguera de descarga? ¿Está la bomba energizada ¿Está instalado el tubo respirador? permanentemente independientemente del funcionamiento del evaporador? ¿Está... - Page 13 Instalación: tanque Compruebe que el flotador esté en posición correcta en el eje, con el imán apuntando hacia arriba. Encaje la tapa en el tanque y sujétela firmemente en su sitio con abrazaderas. FILTRO Asegure el tanque horizontalmente. Conecte la entrada firmemente a la tubería de drenaje desde el evaporador usando el tubo conector azul.
- Page 14 NOTA: El material que humedece se debe utilizar entre la bomba y cualquier superficie dura en la cubierta del evaporador o de la cubierta de tuberia de cobre para eliminar la vibracion y reducir ruido. CONTRA VIBRACIÓN SUPERFICIE (AISLAMIENTO) DURA Observe la dirección del flujo de agua.
- Page 15 CABLEADO: Compruebe el voltaje correcto y conecte el cable de alimentación a los terminales entrantes energizado, neutro y tierra (sólo Mini Orange) dentro del evaporador para asegurar que la bomba esté energizadapermanentemente sin importar el funcionamiento del evaporador. Instale el fusible en línea de 1 amperio entre el evaporador y la bomba. Conecte la alarma de alto nivel en serie con el cable de señal de enfriamiento desde el evaporador para asegurar que la unidad no siga funcionando en caso de bloqueo o falla de la bomba.
- Page 16 ANTES DE DAR SERVICIO O RESOLVER PROBLEMAS ASEGÚRESE DE QUE LA BOMBA ESTÉ DESCONECTADA DE LA RED PRINCIPAL DE SUMINISTRO. Servicio: • Esta bomba, al igual que todo equipo mecánico, requiere mantenimiento periódico y regular. • El tanque y el filtro deben quitarse y limpiarse con solución anti-bacteriana, además deben revisarse todos los tubos en busca de fugas a intervalos máximos de 3 meses durante la temporada de enfriamiento.
Need help?
Do you have a question about the mini aqua ASP-MA115 and is the answer not in the manual?
Questions and answers