Advertisement
Quick Links
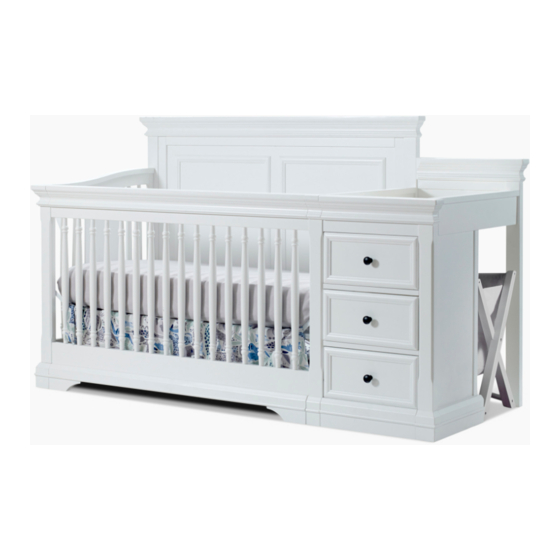
Portofino Crib and Changer
Assembly Instruction
Important Information:
Read all instructions BEFORE assembling crib.
KEEP INSTRUCTIONS FOR FUTURE USE.
IMPORTED BY C&T International, Inc. / IMPORTE` PAR de C&T International, Inc.
105 Stonehurst Ct Northvale, NJ 07647 U.S.A.
CANADA ADDRESS:
3453, DU PRESIDENT KENNEDY LAC MEGANTIC, QUEBEC, CANADA G6B 2Y4
Website: www.sorellefurniture.com / Site Internet : www.sorellefurniture.com
Tel, 201- 531-1919 Fax, 201- 531-1920
Made in China
Advertisement

Related Manuals for Sorelle Portofino


Summary of Contents for Sorelle Portofino
- Page 1 Tel, 201- 531-1919 Fax, 201- 531-1920 CANADA ADDRESS: 3453, DU PRESIDENT KENNEDY LAC MEGANTIC, QUEBEC, CANADA G6B 2Y4 Website: www.sorellefurniture.com / Site Internet : www.sorellefurniture.com Portofino Crib and Changer Assembly Instruction Important Information: Read all instructions BEFORE assembling crib. KEEP INSTRUCTIONS FOR FUTURE USE.
- Page 2 Securely tighten loose bolts and Do not use crib if any parts are missing, damaged or broken.Contact C&T other fasteners. International Inc./Sorelle for replacement parts and instructional literature if needed. Do not substitute parts. *Follow warnings on all products in a crib.
- Page 3 Do not leave a child unattended in or on this accessory. Child must be no more than 30 lbs. to use this changing table. Use only the pad provided by C&T International / Sorelle or Manufacturer’s Toddler Bed Warnings WARNING INFANTS HAVE DIED IN TODDLER BEDS FROM ENTRAPMENT.
-
Page 4: Parts List
SORELLE Parts list (A): Back Panel (x1) (B): Front Side Rail (x1) (C): Side Panel - L (x1) (C1):Side Panel - M (x1) (A1): Support Rail (x1) (C2):Side Panel - R (x1) (D): Mattress Support (x1) (E): Front Post - L (x1) - Page 5 SORELLE (H): Back Rail -Top (X1) (H1): Back Rail -Upper (X1) (H2): Back Panel -Middle (X1) (H3): Back Rail -Middle (X1) (H4): Back Rail -Bottom (X1) (J): Shelf -Top (X1) (K) Neutral board (x1) (L): Middle Support Rail-Bottom (x1) ( I ) Changing Pad (x1)
- Page 6 SORELLE Assembly Hardware Set a. Allen bolt M6 X 90mm ( x2) g. Nuts ( x2) h. Metal Pin (x2) b. Allen bolt M6 X 65mm ( x16) i. Wooden dowel (x13) c. Allen bolt M6 X 55mm ( x2 ) j.
- Page 7 SORELLE STEP 1 Drawers Assembly as Shown on Figure 1. Install Screws (e) into Drawer Sides ( M1&M2 )and align with pilot holes located in the Drawer Back ( M3).Tighten using Phillips screw driver(s) . Slide Drawer Bottom ( M4 ) into Grooves located in Drawer sides ( M1&M2 ) as well as Drawer Back ( M3 ).
- Page 8 SORELLE STEP 3 Right Frame Assembly as Shown on Figure 3. (1x) Figure 3 (3x) STEP 4 Front Rails Assembly as Shown on Figure4 Figure 4 page 8...
- Page 9 SORELLE STEP 5 Back Rails & Middle Support Rail Assembly as Shown on Figure 5&Figure 5A. Figure 5 : Figure 5A : STEP 6 MDF Boards Assembly as Shown on Figure 6. Figure 6: page 9...
- Page 10 SORELLE STEP 7 ASSEMBLY OF RIGHT FRAME AS SHOWN ON FIGURE 7. Figure 7 STEP 8 Back Panel & Back Post - L Assembly as shown on Figure 8. Figure 8 page 10...
- Page 11 SORELLE STEP 9 Assembly of Side Panel - L & Front Post - L as shown on Figure 9. Figure 9 STEP 10 Mattress Base Assembly as shown on Figure 10. Recommended mattress position: Top position for newborn. Middle position as your child starts to roll over.
- Page 12 SORELLE STEP 11 Attach the Front rail - B to Crib as shown on Figure 11. Figure 11 : page 12...
- Page 13 SORELLE STEP 12 Attach the Front rail - Top as shown on Figure 12. Figure 12 : STEP 13 Insert the Drawers as shown on Figure 13. Figure 13 page 13...
- Page 14 SORELLE Laundry Assembly Steps Page 14...
- Page 15 SORELLE STEP 15 INSERT DRAWER Changing Pad Assembly Important : If changing pad and safety belt are assembled, make sure warnings are facing up and visible. If not, reassemble by following the steps below. 1. Locate safety belt bolted to dresser top. Insert safety belt through slit in changing pad from back of pad.
- Page 16 Follow all instructions supplied with the 148# Toddler Rail System. NOTE:148# Toddler Rail System is not included. Please see your crib retailer, visit WWW.Sorellefurniture.com or contact C&T International / Sorelle for more information. Suivre toutes les instructions fournies avec le système de conversion no 148. NOTE : le système de conversion no 148 n’est pas inclus.
- Page 17 Follow all instructions supplied with the 234# Adult Rail System. NOTE: 234# Adult Rail System is not included. Please see your crib retailer, visit WWW.Sorellefurniture.com or contact C&T International / Sorelle for more information. Suivre toutes les instructions fournies avec le système de conversion no 234. NOTE : le système de conversion no 234 n’est pas inclus.
- Page 18 SORELLE BE A A THI Disassembling Crib for Storage To disassemble crib for storage, follow assembly steps in reverse. Store all parts and hardware together in a safe place. Store the instruction manual in the supplied envelope attached to mattress support base for future reference for reassembly.
Need help?
Do you have a question about the Portofino and is the answer not in the manual?
Questions and answers