Advertisement
Quick Links
Sorelle
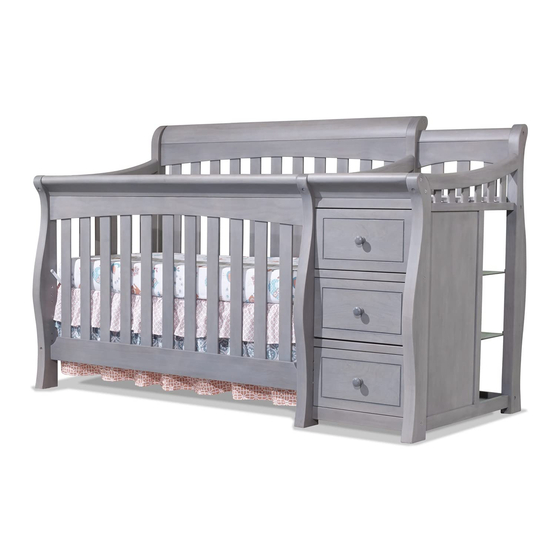
1050
CRIB AND MORE
Important Information:
Before assembly, read these instructions. Make sure
all preassembled parts are tight. Store this instruction
manual in envelope (attached to mattress support
tube) for future reference.
By Sorelle - A Division of C&T International, Inc.
46 Whelan Road East Rutherford N J. 07073 U S A
Tel, +1(201)531 1919 Fax,+1(201)531 1920
Made in China
Advertisement

Subscribe to Our Youtube Channel
Related Manuals for Sorelle 1050


Summary of Contents for Sorelle 1050
- Page 1 By Sorelle - A Division of C&T International, Inc. Sorelle 46 Whelan Road East Rutherford N J. 07073 U S A Tel, +1(201)531 1919 Fax,+1(201)531 1920 1050 CRIB AND MORE Important Information: Before assembly, read these instructions. Make sure all preassembled parts are tight. Store this instruction manual in envelope (attached to mattress support tube) for future reference.
-
Page 2: Fall Hazard
• Before each usage or assembly, inspect crib for damaged hardware, loose joints, missing parts or sharp edges. DO NOT use crib is any parts are missing or broken. Ask your dealer or write to C&T Internatinoal/Sorelle for replacement parts and instructional literature if needed. DO NOT substitute parts. -
Page 3: Cleaning And Maintenance
CHANGING TABLE WARNINGS WARNING - Failure to follow these warnings and assembly instructions could result in serious injury or death. • FALL HAZARD—to prevent death or serious injury, always keep child within arm’s reach. Never leave child unattended. • Read all instructions before use of the changing table. Keep instructions for future use. •... -
Page 4: Parts List
Parts List Crib Assembly (C1) Front Side Rail (x1) (A1) Left Side Rail (x1) (B1) Back Side Rail (x1) (E1) Front & Back Contoured Top (x2) (D1) (x14) (G1) Front Leg (x1) (F1) Rear Leg (x1) Allen Wrench (H1) (x2) (I1) (x2) (X1) Dowel Pin (x4) Allen Wrench... - Page 5 Parts List Dresser Assembly (C-1)Suppo (C-2)Suppo (C-3)Suppo (C-4)La (C-5)La zer T (C-6)La (C-7)D ec ra v rack PARTS LIST...
- Page 6 Parts List Additional Assemblies (A2) Drawer Bottom (x3) (A2) (G2) (B2) Drawer Back (x3) (C2) Drawer Left (x3) Phillips Screw Long (x24) (D2) Drawer Right (x3) (B2) (E2) Knob (x3) (H2) (F2) Drawer Front (x3) (E2) Screw for (D2) Knob (x3) (I2) Screwdriver Screws shown at actual size.
-
Page 7: Drawer Assembly
Drawer Assembly Parts Needed: Refer to pg. 6, “Drawer Parts” (B2) 1. Working on a padded fl at surface, attach Drawer Sides (C2 &D2) to Drawer (D2) Back (B2) with Philips Head Screw. Figure 1. (C2) Grooves 2. Slide Drawer Bottom (A2) into drawer assembly. - Page 8 Parts Needed: Refer to pg. 5, “Dresser Parts” (C-3) (C-5) 2. Insert two (2) wooden pegs on Support Bar (C-5) into openings on Middle Panel (A). Figure 2. 1. Insert Wooden Notch of Support Bar (C-3) into opening on front side of Middle Panel (A) and NOTE: Grooves face towards back of unit.
- Page 9 (C-3) (C-2) (C-4) 6. Lay Middle Panel (A) on its side. Insert Front Support Bar w/groove (C-2) into notch 5. Insert wooden peg on Small Front Support Bar on Middle Panel (A) and slide Dresser Top (E) (H) into opening and (C-4) on Middle Side Panel (A) and secure with Bolt (F).
- Page 10 9. Secure Right End (B) with six(6) Bolts (F) to supoort bars. Figure 9. (F) (x6) ASSEMBLY...
- Page 11 Crib Assembly (A1) (X1) (B1) (I1) (X1) (I1) (F1) (G1) (H1) (H1) 1. Using two (2) Bolts (H1) and two (2) Bolts 2. Dowel Pin Assembly (I1), assemble Front Leg (G1) and Rear Leg (F1) to Left Side Rail (A1). Make sure all mattress Slide one (1) Dowel Pin (X1) into each end of support holes are facing in.
- Page 12 Attaching Mattress Support 5. Attach completed Mattress Support Assem- bly to crib using four (4) Bolts with Loctite® Threadlocker Blue (Q). Figure 5 & Figure 6. NOTE: For infants, set mattress support assembly in an upper position for greater accessibility. As child grows and can stand, mattress support assembly must be lowered.
- Page 13 (D1) (E1) (E1) (C1) (C1) (D1) (A1) 9. Insert groove on bottom of Front (D1) Contoured Top (E1) to top of Front Side Rail (C1). Figure 9. NOTE: Loosen bolts on Left Side Rail (A1) to fit 10. Secure Front Contoured Top (E1) to top of Front Side Rail (C1) with two (2) Bolts (D1) and one Front Contoured Top (E1).
- Page 14 Changing Pad Assembly Important : If changing pad and safety belt are assembled, make sure warnings are facing up and visible. If not, reassemble by following the steps below. 1. Locate safety belt bolted to dresser top. Insert safety belt through slit in changing pad from back of pad.
- Page 15 Converting to a Toddler Bed . Toddler Rail(OPTIONAL PURCHASE) Assembly the Toddler Rail please refer to the instruction of Toddler rail. Converting to a Full Size Headboard IMPORTANT: You MUST use supplied Wall Strap Kit with stand-alone organizer. See instructions provided with Wall Strap Kit.
- Page 16 Attach rear leg that was removed from organizer and attach to headboard using bolts removed from organizer as shown in Figure 3. To use extra Front Leg (M) to convert to full Remove larger rear leg from organizer and replace size bed with footboard and headboard, with Rear Dresser Leg (L) as shown in Figure 2.
Need help?
Do you have a question about the 1050 and is the answer not in the manual?
Questions and answers
I have a Sorelle 1050 Princeton/Tuscany Crib. Do you know the size of the H1 bolts and the L1 Bolts?
The H1 bolts are 63mm (2 1/2”) and the L1 bolts are 50mm (2”).
This answer is automatically generated