
Related Manuals for Sorelle Paris


Summary of Contents for Sorelle Paris
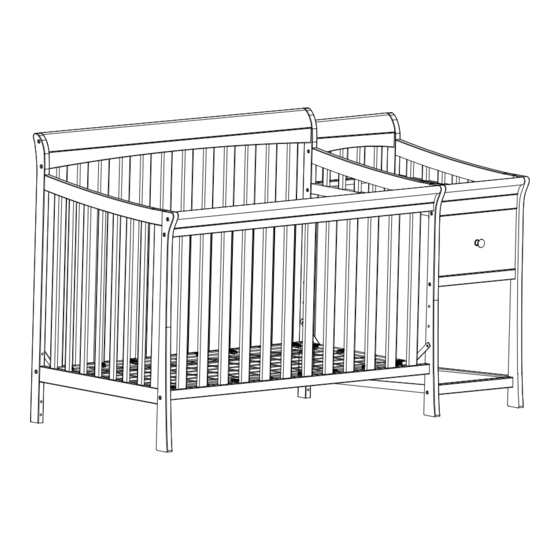
- Page 1 Paris Crib and Changer Assembly Instruction Important Information: Read all instructions BEFORE assembling crib. KEEP INSTRUTIONS FOR FUTURE USE. Made in China...
- Page 2 Securely tighten loose bolts and Do not use crib if any parts are missing, damaged or broken.Contact C&T other fasteners. International Inc./Sorelle for replacement parts and instructional literature if needed. Do not substitute parts. *Follow warnings on all products in a crib.
- Page 3 SORELLE Changing Table Warnings: WARNING FALL HAZARD - to prevent death or serious injury, always keep child within arm’s reach. Read all instructions before use of the changing table. KEEP THESE INSTRUCTIONS IN A SAFE PLACE FOR FUTURE USE. Inspect the changing table periodically. Do not use the changing table if it is damaged or broken.
-
Page 4: Parts List
SORELLE Parts list (A): Back Side Rail (x1) (B): Front Side Rail (x1) (C): Left Side Rail (x1) (D): Middle Panel (x1) (E): Right Panel (x1) (F): Mattress Support(x1) (G): Back Left Leg (x1) (H): Front Left Leg (x1) (K1): Changer Front... - Page 5 SORELLE Parts list (L): Back Middle Bar (x1) (M): Front and Back Bottom (N): Front Middle Bar (x1) (Side Groove) Support Bar (x2) (Side Groove) (O1): Top Shelf (x1) (O2): Bottom Shelf (x1) (P): Back Middle Shelf (x1) (S) Drawer Right (x1)
- Page 6 SORELLE Assembly Hardware Set a. General Allen head bolt M6 X 70mm ( 4 pcs) j. Knob Screw (1 pc) b. General Allen head bolt M6 X 55mm ( 10 pcs) k. Door Knob (1 pc) c. General Allen head bolt M6 X 35mm ( 25 pcs) i.
- Page 7 SORELLE STEP 1 LEFT PANEL ASSEMBLY Install Screws (e) into Drawer Sides (S &R) and align with pilot holes located in the Drawer Back (T).Tighten using Phillips screw driver(not included) . Slide Drawer Bottom (U) into Grooves located in Drawer sides (S &R) as well as Drawer Back (T). See Figure . 1 Install Screws (e) into Drawer Sides (S &R) and align with pilot holes located in the mounting blocks of Drawer Front (V).Tighten using...
- Page 8 SORELLE STEP 3 MIDDLE & RIGHT PANEL ASSEMBLY Using three 3 x bolt (b), assemble Back Middle Leg (Y) to Middle Panel (D). Figure 3A. Using three 3 x bolt (b), assemble Back Right Leg (Z) to Right Panel (E). Figure 3B.
- Page 9 SORELLE STEP 5 CHANGER ASSEMBLY (PART 2) Slide Top Shelf (O1) and Bottom Shelf (O2) veneered side up horizontally into the grooves.1 Slide Back Middle Shelf (P) veneered side facing outwards vertically into the grooves. Figure 5. Middle Panel (D)
- Page 10 SORELLE STEP 7 ASSEMBLY OF BACK SIDE RAIL Attach the Back Contoured Top (I) to the Back Side Rail (A). Secure with two 2 x bolt (a) from underneath. Figure 7A. Insert on 1 x wooden dowel (f) on either end of the Back Side Rail assembly (I) +(A). Figure 7A.
- Page 11 SORELLE STEP 9 ASSEMBLY OF FRONT SIDE RAIL Attach the Front Contoured Top (I) to the Front Side Rail (B). Secure with two 2 x bolt (i) from underneath. Figure 9A. Insert one 1 x wooden dowel (f) on either end of the Front Side Rail assembly (I) + (B). Figure 9A.
- Page 12 SORELLE STEP 11 INSERT DRAWER Insert drawer.Figure 11. Figure 11 : Changing Pad Assembly Important : If changing pad and safety belt are assembled, make sure warnings are facing up and visible. If not, reassemble by following the steps below.
Need help?
Do you have a question about the Paris and is the answer not in the manual?
Questions and answers