Advertisement
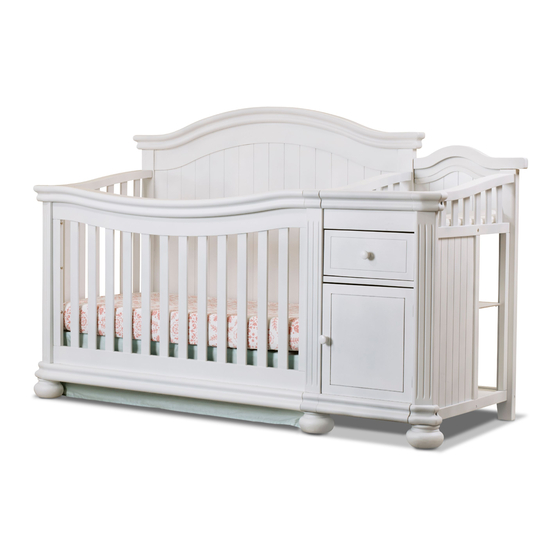
Finley Crib and Changer
Assembly Instruction / INSTRUCTIONS D'ASSEMBLAGE
Important Information:
Read all instructions BEFORE assembling crib / Lire attentivement toutes les instructions avant de procéder à l'assemblage du lit.
KEEP INSTRUTIONS FOR FUTURE USE / CONSERVER LES INSTRUCTIONS POUR RÉFÉRENCE ULTÉRIEURE.
By Sorelle - A Division of C&T International, Inc. / Par Sorelle, une division de C&T International, Inc.
46 Whelan Road, East Rutherford, NJ 07073 U.S.A./ 46 Whelan Road, East Rutherford, NJ 07073 É.-U.
Tel, 201/531 1919 Fax, 201/531 1920 / Téléphone : 1 201 531-1919 Télécopieur : 1 201 531-1920
Website : www.sorellefurniture.com / Site Internet : www.sorellefurniture.com
/ Lit de bébé & table à langer Finley
MADE IN CHINA / FABRIQUÉ EN CHINE
Advertisement
Table of Contents

Related Manuals for Sorelle Finley


Summary of Contents for Sorelle Finley
- Page 1 By Sorelle - A Division of C&T International, Inc. / Par Sorelle, une division de C&T International, Inc. 46 Whelan Road, East Rutherford, NJ 07073 U.S.A./ 46 Whelan Road, East Rutherford, NJ 07073 É.-U. Tel, 201/531 1919 Fax, 201/531 1920 / Téléphone : 1 201 531-1919 Télécopieur : 1 201 531-1920 Website : www.sorellefurniture.com / Site Internet : www.sorellefurniture.com...
- Page 2 Securely tighten loose bolts and other fasteners. Do not use crib if any parts are missing, damaged or broken.Contact C&T International Inc./Sorelle for replacement parts and instructional literature if needed. Do not substitute parts. *Follow warnings on all products in a crib.
- Page 3 SORELLE Toddler Bed Warnings: WARNING INFANTS HAVE DIED IN TODDLER BEDS FROM ENTRAPMENT. Openings in and between bed parts can entrap head and neck of a small child. NEVER use bed with children younger than 15 months. ALWAYS follow assembly instructions.
- Page 4 SORELLE NOTES ON ASSEMBLY: -During the assembly process whenever using screws or bolts, check each by placing the screw/bolt on the diagram of the item which is drawn actual size and design. Be sure to use the proper size and shape specified in the instructions.
- Page 5 N’UTILISEZ PAS le lit si des pièces sont endommagées ou manquantes. Demandez à Sorelle pour obtenir des pièces de remplacement ou le mode d’emploi, si nécessaire. Ne substituez pas de pièces de remplacement.
- Page 6 SORELLE MISES EN GARDE POUR LE LIT D’ENFANT MISE EN GARDE DES ENFANTS SONT DÉCÉDÉS DANS DES LITS D’ENFANTS PAR SUITE DE COINCEMENT. Des ouvertures dans le lit ou entre les différentes pièces du lit peuvent coincer la tête ou le cou d’un jeune enfant.
- Page 7 PRÉCISIONS SUR L’ENTRETIEN Ne pas rayer le fini. Inspectez le produit périodiquement. Contactez C&T International/Sorelle pour des pièces de rechange ou des questions. N’entreposez pas le produit ou une de ces pièces dans des conditions de température non contrôlées tel qu’un grenier chaud ou un sous-sol froid parce que ces conditions peuvent causer une perte d’intégrité...
- Page 8 SORELLE Crib Assembly Parts /PIÈCES D'ASSEMBLAGE DE LA COUCHETTE (C) Footboard (x1) (A1) Middle Panel (x1) Left End (x1) (B) Headboard (x1) (A2) Right End (x1) (C) Pied de lit (x1) (B) Tête de lit (x1) (A) Côté gauche (x1) (A1) Panneau du milieu (x1) (A2) Côté...
- Page 9 SORELLE Crib Assembly Parts /PIÈCES D'ASSEMBLAGE DE LA COUCHETTE ( Q ) Changer Middle MDF Panel (x1) (O) Back Shelf (x1) ( P ) Back-Bottom Shelf (x1) ( P1 ) Front-Bottom Shelf (x1) (O) Tablette arrière (x1) (P) Tablette arrière du bas (x1)
- Page 10 SORELLE Crib Assembly Parts /PIÈCES D'ASSEMBLAGE DE LA COUCHETTE (a) M6 x 80mm Allen bolt (7 pcs) (e) M6 x 35mm Allen bolt (9 pcs) (a) Boulon Allen M6 x 80mm (7 pièces) (e) Boulon Allen M6 x 35mm (9 pièces)
- Page 11 SORELLE Assembly / ASSEMBLAGE Attach Left End (A) and Middle End(A1) to Headboard (B) by using 5 Bolts ( d ) as Figure 1. 1. Attacher le côté gauche (A) et le panneau du milieu (A1) à la tête de lit (B) en utilisant 5 boulons (d) tel que l’illustration 1...
- Page 12 SORELLE Attach Rear Top (F) & Rear-Bottom Support Bar ( I ) to Head board ( B ) by using 1 Bolt (g) with 1 Plastic Stopper(l) and 1 bolt(a) and 2 wood dowels (m) as Figure 3. 3 . Attacher le dessus arrière (F) & la barre de support du bas arrière (I) à la tête de lit (B) en utilisant 1 boulon (g), un bouchon en plastique (l) et un boulon (a) et une cheville en bois (m) tel que l’illustration 3...
- Page 13 SORELLE Attach Rear Middle Panel(G)&Rear Middle Support Bar(H) to crib then insert Changer Top Shelf with Support Bar (N) & Changer Middle MDF Panel (Q) & Back - Bottom Shelves (P&P1) to Grooves as Figure 5. Fig.5 5 . Attacher le dessus arrière (F) & la barre de support du bas arrière (I) à...
- Page 14 SORELLE Attach Right End (A2) to Right- Front Leg( D2 ) & Right-Rear Post (E)& Middle-Bottom Support Bar (M) by using 3 Bolts( e ) & 3 Bolts (d) & 2 Bolts (f )& 1 Wooden Dowel( m) as Figure 7.
- Page 15 SORELLE Attach FootBoard (C) to Left-Front Post(D) & Middle-Front Post (D1) by using 6 Bolts( c ) as Figure 9. 9. Attacher le pied de lit (C) au poteau avant gauche (D) et au poteau avant du milieu (D1) en utilisant 6 boulons (c) tel que l’illustration 9.
- Page 16 SORELLE Drawer Assembly / ASSEMBLAGE DU TIROIR (R3) ( j ) 1. Se mettre sur une surface 1. Working on a padded ( j ) ( j ) rembourrée pour travailler. fl at surface, attach Drawer Attacher les panneaux de tiroirs...
- Page 17 SORELLE Attach the rest sides of the hinges on the door (S) to the Right End and secure with screws ( k ), see Fig 11. Fix 1 knob(o) on the door by using screw ( i ).then insert 1 drawer into changer and add changing pad to of organizer.
- Page 18 SORELLE CLICK! Important : If changing pad and safety belt are assembled, make sure warnings are facing up and visible. If not, reassemble by following the steps below. 1. Locate safety belt bolted to dresser top. Insert safety belt through slit in changing pad from back of pad.
- Page 19 Follow all instructions supplied with the 137# Toddler Rail System. NOTE:137# Toddler Rail System is not included. Please see your crib retailer, visit WWW.Sorellefurniture.com or contact C&T International / Sorelle for more information. Suivre toutes les instructions fournies avec le système de conversion no 137. NOTE : le système de conversion no 137 n’est pas inclus.
- Page 20 Follow all instructions supplied with the 226# Adult Rail System. NOTE: 226# Adult Rail System is not included. Please see your crib retailer, visit WWW.Sorellefurniture.com or contact C&T International / Sorelle for more information. Suivre toutes les instructions fournies avec le système de conversion no 226. NOTE : le système de conversion no 226 n’est pas inclus.
Need help?
Do you have a question about the Finley and is the answer not in the manual?
Questions and answers
What is the length and width of the changing table