Table of Contents
Advertisement
By Sorelle - A Division of C & T International, Inc.
46 Whelan Road, East Rutherford, N.J.07073 U.S.A.
Tel, +1(201) 531 1919 Fax, +1(201) 531 1920
Website:
www.sorellefurniture.com
Important Information:
Read all instructions BEFORE assembling crib.
KEEP INSTRUTIONS FOR FUTURE USE.
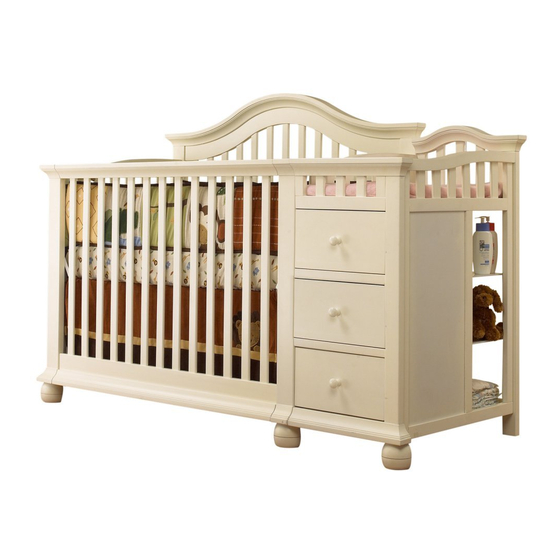
CAPE COD
Crib & Changer
Advertisement
Table of Contents

Related Manuals for Sorelle CAPE COD


Summary of Contents for Sorelle CAPE COD
- Page 1 By Sorelle - A Division of C & T International, Inc. 46 Whelan Road, East Rutherford, N.J.07073 U.S.A. Tel, +1(201) 531 1919 Fax, +1(201) 531 1920 Website: www.sorellefurniture.com CAPE COD Crib & Changer Important Information: Read all instructions BEFORE assembling crib.
- Page 2 C&T International / Sorelle for replacement parts and instructional literature if needed. Do not substitute parts. *Follow warnings on all products in a crib. *If refinishing, use a non-toxic finish specified for children's products.
- Page 3 The maximum recommended weight of the child is 30lbs for the changing table. Use only the pad provided by C&T International / Sorelle or Manufacturer’s Always secure the pad to the changing surface by inserting the strap through the hole in the middle of the pad.
- Page 4 - Do not scratch or chip the finish. - Inspect the product periodically, contact C&T International / Sorelle for replacement parts or questions. - Do not store the product or any parts in extreme temperatures and conditions such as a hot attic or a damp, cold basement.
- Page 5 (A1) Left Crib End (1 pc) (B1) Center Crib End (1 pc) (C1) Front Side Rail (1 pc) (D1) Back Side Rail (1 pc) (E1) Left Corner Post (1 pc) (F1) Middle Corner Post (1 pc) (G1) Mattress Support (1 pc) (a) M6 x 90mm Allen bolt (4 pcs) (c) M6 x 55mm Allen bolt (4 pcs) (c1) M6 x 45mm Allen bolt (4 pcs)
- Page 6 Changer Assembly Parts M6 x 90mm M6 x 22mm M6 x 70mm M6 x 83mm M6 x 54mm Page 6...
- Page 7 Crib Assembly Left Crib End with Left Corner Post Assembly Attach the Left Crib End(A1) to the Left Corner Post(E1) by using the 54mm bolt(c), As shown in the pictures. Center Crib End with Middle Corner Post Assembly Attach the Center Crib End(B1) to the Center Corner Post(F1) by using the 54mm bolt(c) 2pcs, As shown in the pictures.
- Page 8 Crib Assembly Headboard Assembly Attach the Headboard(D1) to the Left and Center Crib End by using the43mm bolt(c ) 4pcs and the 30mm wood dowel (d)2pcs, As shown in the pictures. Changer Assembly Right Frame with Right Corner post and Back Corner post Attach the Right Frame(A1) to the Right Corner Post(B1) and Back Corner Post(C1) by using...
- Page 9 Changer Assembly Back bottom insert (K) with Back shelf support (D) and Middle shelf support (E) Assembly Front bottom shelf support (F)and Front shelf support (G) Assembly Page 9...
- Page 10 Changer Assembly Back decorative panel (I)and Front decorative panel (J) Assembly Top shelf insert (M) with Safety belt(h)and Support bar (H) Assembly Page 10...
- Page 11 Changer Assembly Middle panel (N) Assembly Crib & Changer Assembly Shelf panels (L) Assembly Then attach the Changer to crib Page 11...
- Page 12 Crib & Changer Assembly Front Side Rail (C) Assembly Note: The front decorative panel must turn round 90 when the front side rail assembly Page 12...
- Page 13 Mattress Support Assembly Page 13...
- Page 14 Changer Pad Assembly FINALLY CHECK • PRIOR TO USING THE CRIB, ENSURE ALL BOLTS ARE TIGHTENED. DO NOT OVER TIGHTEN. • ENSURE THAT THE MATTRESS IS THE RECOMMENDED SIZE. • ENSURE THE MATTRESS BASE IS LOCATED AT THE CORRECT LEVEL TO SUIT THE CHILD. •...
- Page 15 SORELLE 132 Toddler Rail Instruction Sheet Toddler Rail Assembly Parts and Hardware (b) M6 x 50mm Allen bolt (4 pcs) (H) 132 Toddler Rail (1 pcs) (m) Allen Key (1 pcs) WARNING: PLEASE DO NOT TIGHTEN THE BOLTS IN ASSEMBLY PROCESS! 1.
- Page 16 Fullsize Bed Conversion (Optional) ( 216# Adult Rail System Not included, sold separately) (A) 216# Bed Rail (2 pcs) (B) 216# Mattress Support Bar (4 pcs) (b) Ø4 X 30mm Phillips Screw (16 pcs) (e) Allen Key (1 pcs) Tool required Follow all instructions supplied with the 216# Adult Rail System.
Need help?
Do you have a question about the CAPE COD and is the answer not in the manual?
Questions and answers