Table of Contents
Advertisement
Quick Links
Advertisement
Table of Contents

Related Manuals for Diamond PFE-102/S


Summary of Contents for Diamond PFE-102/S
- Page 1 09/2021 Mod: PFE-102/S Production code: EQ-SME910-HS/DI...
- Page 2 CONVECTION OVENS INSTRUCTIONS FOR THE INSTALLATION, USE AND MAINTENANCE...
-
Page 3: Declaration Of Conformity
FOREWORD The contents of this manual are generic and not all the functions described may be available on your product. The manufacturer declines all responsibility for possible inaccuracies contained in this pamphlet, due to printing or copy errors. We reserve the right to make on our own products those changes to be considered necessary or use- ful, without jeopardizing the essential characteristics. - Page 4 1.4 WARNINGS FOR THE INSTALLER Read carefully all the instructions in this manual, because they give important suggestions about the right instal- lation, use and maintenance of the appliance. 1.4B CONTROLS AT RECEPTION The appliance are shipped in appropriate protective packing. On arrival, check that the appliance has not incurred in transport damage and that it iscomplete according to the order.
-
Page 5: Technical Features
1.5C GAS TECHNICAL DATA PLATE □ □ p (mbar) □ □ □ I3B/P p (mbar) □ □ □ □ II2H3+ p (mbar) 28-30 □ □ □ □ II2H3+ p (mbar) 28-30 □ □ □ □ II2H3+ p (mbar) 28-30 □ □... -
Page 6: Gas Connection
When the appliance is operating, the power supply voltage must not diverge from the value of the nominal voltage, indicated on the data plate, by more than ± 10 %. Insert the plug in the socket only if you are sure that the socket is right for the plug. Three phases ovens are not supplied with electrical cable, therefore it is necessary to connect to the oven internal terminal board a cable of proportionate section. -
Page 7: Connecting To The Flue
2.0 CONNECTING TO THE FLUE The gas appliances are provided with a flue for eliminat- ing the residuals of combustion. This flue must be connected as illustrated in figure as established by the installation rules. Forced fumes evacuation type A1 The appliance is of the A1 type. - Page 8 3.1 REPLACING SPARE PARTS The replacement of damaged parts must be done only by qualified personnel. To request the manufacturer parts to be replaced must be provided the oven model and serial number. These data can be found on the rating plate attached to the oven. Before starting to replace spare parts make sure, for safety reasons, that the electricity main switch is off and that the water on-off valve are closed.
- Page 9 Unscrew the screws of the cover panel of the burner. Nozzle --------> Gasket -------> Remove the lower panel of the burner. Unscrew the screws of the left and right burner. Remove the left burner and the right one. After removing the burners, burner nozzles unscrew the two left and two right of burner nozzles.
-
Page 10: Water Filter
4.0 PROBLEMS AND SOLUTIONS THE OVEN DOES NOT SWITCH ON • Check that all pole disconnection switch is switched on and that there is power (green light on) • Set the timer • Check if the safety thermostat has to be reset •... -
Page 11: Use And Maintenance
USE AND MAINTENANCE INSTRUCTIONS FOR A SAFE USE OF THE OVEN • Ensure the oven is on a stable position and safety devices installed upstream are efficient. • Always use adequate protection gloves to introduce or pull out the trays. •... -
Page 12: Starting The Oven
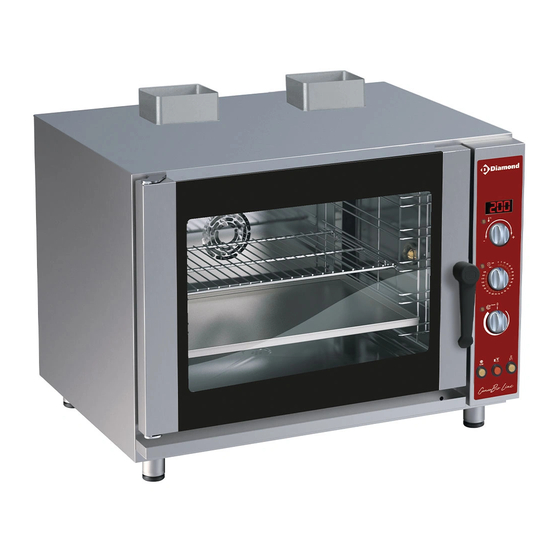
5.0 CONTROL PANNEL DESCRIPTION Thermostat Timer Humidity regulation Temperature display Low ventilation Reset gas Release valve 5.5 STARTING THE OVEN Ensure that water supply are turned on, eventually gas valve is open and that the electricity supply is switched on. Turn the oven on using the power switch located below the control panel. -
Page 13: Maintenance
5.7C HUMIDITY REGULATION In this oven it is possible to adjust the amount of humidity by turning knob C. The moisture added to the hot air helps keep food moist, preventing it from drying out during cooking. 5.7D VENTILATION SPEED This oven has 2 fan speeds. -
Page 14: Cooking Tips
10.0 COOKING TIPS To obtain the best results, we advise to use GAS- TRONORM trays, available in different models and ma- terials according to the type of cooking. It’s fundamental always to leave an interspace of 3 cm at least between the food to be cooked and the up- per tray for a good air circulation.
Need help?
Do you have a question about the PFE-102/S and is the answer not in the manual?
Questions and answers