
Related Manuals for Caravaggi Bio 190


Summary of Contents for Caravaggi Bio 190
- Page 1 USE AND MAINTENANCE INSTRUCTION MANUAL Bio 190 BEFORE USING MACHINE , READ INSTRUCTION MANUAL...
- Page 2 1. HOW TO USE AND KEEP THE INSTRUCTION MANUAL This instruction manual is aimed at the user of the machine , the owner , the maintenance cleaning operator and the repair technician and must always be avaiable for consultation . The instruction manual shows the user for which the machine was designed and the machine’s technical characteristics .
-
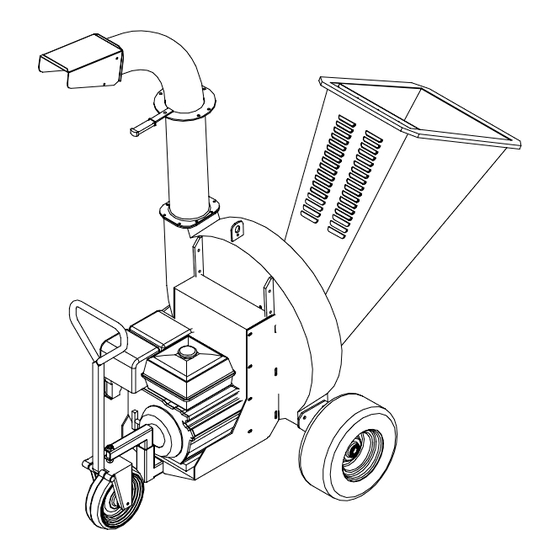
Page 3: Identification Of Main Parts
2. IDENTIFICATION OF MAIN PARTS 1. Hopper with guards 2. Drawbar 3. Petrol engine - electric motor 4. Power take-off for a tractor 5. Wheels 6. Shredder chamber 7. Outlet Fig. 1 Fig. 2... -
Page 4: Correct Use Of The Machine
The operator must be aware of all the instructions given in the instruction manual . 4. UNPACKING AND PREPARATION The Bio 190 bio-shredder is delivered partially dismantled. It ca be arranged on pallets to facilitate handling and transport before installation, depending on the versions. - Page 5 • Mount the unloading pipes and lock them in position using the screws provided (Fig. 4). Unloading pipes Front wheel assembly Rear wheel Fig. 4 Hopper Hinge Fig. 5...
-
Page 6: Technical Characteristics
5. TECHNICAL CHARACTERISTICS The EC identification plate is clearly visible on the Bio 190 bio- chopper ( fig. 6 ) . In all communications with the manufacturer state the serial number on the identification plate . MACCHINE INDUSTRIALI 25037 PONTOGLIO (BS) - VIA M. ADAMELLO, 20 TELEF. -
Page 7: Safety Norms
6. SAFETY NORMS Training • The machine must not be used by under 16’s and persons who have not learnt the user instructions . • The operator is responsible for third parties present in the work area . Keep children and domestic animals at distance when the bio-chopper is in operation . - Page 8 • If the blades undergo heavy shock and function in an anomalous manner , stop the engine , remove the spark plug hood and request expert advice . Caution ! The fuel is highly flammable : • Keep fuel only in the containers made avaiable for this purpose ; •...
- Page 9 7. START - UP Caution ! Before starting up the engine / motor check that the bio- chopper is on a stable surface and that there are no animals or unauthorised persons in the work zone . Read the engine / motor manufacturer’s instruction book carefully . Check that there is oil and fuel in the tank .
- Page 10 Functioning Having correctly prepared the bio-chopper you can now proceed to working the material to be chopped . Upper hopper Load trimming and foliage into the upper loading hopper , taking account of avaiable power in function of the model you possess ( fig. 10 ) .
-
Page 11: Maintenance
8. MAINTENANCE Caution ! Before proceeding with any maintenance operation swith off the engine / motor and in any case ensure that there is no possibility of the machine functioning . Suitable gloves are obligatory for all maintenance operations . 8.1 Blade replacement •... - Page 12 8.2 Counter-blade replacement • Unscrew the locking nuts and open the feed hopper. • Unscrew the 5 securing screws and remove the counter-blade. • Replace the counter-blade with a new one. • Tighten the securing screws. • Close the feed hopper and tighten the locking nuts. Counterblade Fig.
- Page 13 8.3 Knives inversion and replacement • Unscrew the locking nuts and open the feed hopper. • Unscrew the 5 securing screws and remove the counter-blade. • Unscrew the 6 screws and remove the front chipping disc. • Remove the shaft , taking care to note the position of the spacers separating the breaker bars .
- Page 14 8.4 Breaker bar removal , inversion and replacement • Unscrew the locking nuts and open the feed hopper. • Pull the sieve out of the grinding chamber. • Insert a new sieve in the grinding chamber. • Close the feed hopper and tighten the locking nuts. Sieve Fig.
- Page 15 8.5 Routine maintenance Beginning Before End of of season each job season ♦ Check engine oil level ♦ ♦ Check screws , tightness , casing , hopper , etc . ♦ ♦ Check belt tension and state of wear ♦ ♦...
-
Page 16: Troubleshooting - Remedies
9. TROUBLESHOOTING - REMEDIES Troubleshooting Remedies The bio-chopper does Check belt tension and condition , blocked not start pulleys , PTO or gears . Check cutters , blade , counter-blade presence of material in the milling chamber . Check state of engine / motor ( consult the instruction manual supplied ) . - Page 17 Seller authorised CARAVAGGI importer . 2. You are required to present the guarantee duly filled in or the bill , if this is not avaiable. 3. The claim will be completed by the Dealer , who will forward it to the Manufacturer .
-
Page 18: Declaration Of Conformity
11. DECLARATION OF CONFORMITY The company Caravaggi , hereby declares under its own responsability , that the machine BIO - SHREDDER Type Bio 190 electric , petrol and PTO versions , complies with the Basic Safety and Health Requirements prescribed in EC... - Page 19 BIO 190 SPARE PARTS...
- Page 20 BIO 190 SPARE PARTS Pos. Description Q.ty Code Driving shaft spacer B19001001 Driving shaft B19001002 Key 12x6x32 B19001003 Key 10x6x65 B19001004 Bearing 45x85x19 B19001005 Transmission flange B19001006 Housing B19001007 Straight outlet pipe B19001008 Hopper hinge angle B19001009 Cover B19001012 Cover adjusting bar...
- Page 21 BIO 190 B SPARE PARTS...
- Page 22 BIO 190 B SPARE PARTS Pos. Description Q.ty Code Motor Honda GX 620 B19002001 Safety plate B19002002 Guard B19002003 Centrifuge pulley 2A 138 B19002004 Drum wheel B19002005 Aluminium star B19002006 Rubber ring Ø 138 B19002007 Half-bearing with pulley B19002008 End screw M 14...
- Page 23 BIO 190 PTO SPARE PARTS Pos. Description Q.ty Code PTO cover B19003001 Comer reduction gear B19003002 Reduction gear fixing plate B19003003 B19003004 Bearing 6205 B19003005 Framework for PTO version B19003006 Wheel B19003007 Spring handle B19003008...
- Page 24 BIO 190 PTO SPARE PARTS...
- Page 25 BIO 190 SPARE PARTS – 3-WHEEL CARRIAGE Pos. Description Q.ty Code Hex. screw M 10 B19004001 Washer Ø 10 B19004002 Bearing 6304 B19004003 Front wheel spacer B19004004 Pin Wheel B19004005 Front wheel B19004006 Hex. screw M 12 B19004007 Washer Ø 12...
- Page 26 BIO 190 SPARE PARTS – 3-WHEEL CARRIAGE...
- Page 27 BIO 190 SPARE PARTS – 4-WHEEL CARRIAGE Pos. Description Q.ty Code Carriage framework B19005001 Rear axle B19005002 Hex. screw M 10x20 B19005003 Washer φ 10x30 B19005004 Wheel 3.50 - 8 B19005005 Guard B19005006 Fixed support B19005007 B19005008 Articulated support B19005009...
- Page 28 BIO 190 SPARE PARTS – 4-WHEEL CARRIAGE...
- Page 29 CARAVAGGI MACCHINE INDUSTRIALI Via Monte Adamello , 20 25037 Pontoglio ( BS ) - ITALY Tel. +39 030 7470464 - Fax +39 030 7470004 Internet http://www.caravaggi.com Email info@caravaggi.com 0106...
Need help?
Do you have a question about the Bio 190 and is the answer not in the manual?
Questions and answers
Hi please advise how to replace belts on 190 chipper