
Summary of Contents for Felston HD940
- Page 1 HD940 4-INPUT HDMI DIGITAL HDMI DIGITAL AUDIO DELAY AUDIO DELAY Owner’s Manual Owner’s Manual...
- Page 2 IMPORTANT INFORMATION PLEASE READ THIS BEFORE OPERATING THE UNIT To ensure the best performance, read this manual carefully. Keep it in a safe place for future reference. Install this unit in a well-ventilated, cool, dry, clean place. There should be a space of at least 4” (10cm) above, behind and to the sides of the unit.
- Page 3 Visit whom you purchased the product. Visit www.felston.com/weee www.felston.com/weee. This product is compliant with the European Union Restriction of...
-
Page 4: Table Of Contents
Auto Delay Modes ..............21 Auto Delay Mode ..............21 Extended Auto Delay Mode ..........22 Lock/Unlock ................24 Cascade Mode ............... 25 Using 2 HD940's in Cascade Mode ........25 Using More Than 2 HD940's in Cascade Mode ..... 27... - Page 5 Input Labels ................. 34 IntelliInput ................36 Audio Latencies ..............36 Extended Auto Delays ............37 Programmable Learning Remotes ........... 39 Controlling Multiple HD940's Independently ......39 Factory Reset ................41 Returns and Repairs ..............41 Troubleshooting..............42 Specifications ................43...
-
Page 6: Introduction
- which fundamentally undermines the home cinema experience by contradicting reality. The HD940 builds on the years of experience we have gained in lip-sync correction along with the invaluable input we have received from customers of our previous digital audio delays, the DD340, DD540 and DD740. -
Page 7: Features Of The Hd940
Using 3 or more HD940's in Cascade Mode requires the use of a third-party learning remote control handset, not supplied. Requires use of a third-party learning remote control, not supplied. -
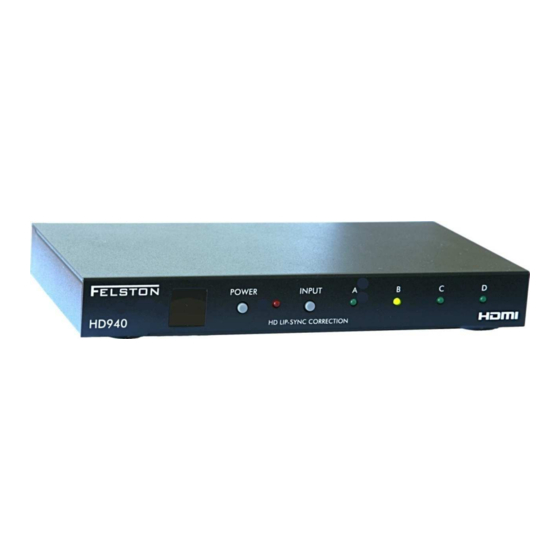
Page 8: Controls & Connections
Controls & Connections & Connections Front Panel Power Input Input LEDs button button button Infrared Standby sensor (behind panel) (behind panel) Rear Panel HDMI Input C HDMI Input C HDMI Input A Power socket HDMI Input B HDMI Input B HDMI Input D HDMI Output or Cascade Input... -
Page 9: Remote Control
Remote Control Remote Control Infrared transmitter Settings Lock/Unlock Power Power Numeric Keypad Numeric Keypad Show/Hide Move On-Screen Display (OSD) Screen Display (OSD) Delay +10 / Up Store Information Information Delay + Delay + / Right Delay / Left Auto Delay Mode Toggle Auto Delay Mode Toggle Cancel Confirm... -
Page 10: Getting Started
Do not use rechargeable batteries as they have lower voltage and may not work. Note: when using the remote control to operate the HD940, point it towards the front panel. Power Adaptor The power adaptor comes complete with a selection faceplates allowing it to be used in most countries. -
Page 11: Connecting The Hd940
Connecting the Connecting the HD940 Ensure the power cable to your HD940 is disconnected. Ensure Ensure the power cable to your HD940 is disconnected. Ensure Ensure the power cable to your HD940 is disconnected. Ensure all the equipment you all the equipment you wish to connect to is switched off. -
Page 12: Example Connections (With An Av Receiver)
In the examples above, none of the equipment or cables In the examples above, none of the equipment or cables shown attached to the HD940 shown attached to the HD940 are included. Connections shown Connections shown are suggestions only. are suggestions only. - Page 13 When all connections to the HDMI sockets of the HD940 have been completed, plug the power cable into the power socket on the rear of the HD940. Finally plug the power adaptor into a wall socket. When power is connected, the HD940 will enter standby mode, indicated by the Standby LED glowing red.
-
Page 14: Basic Operation
Input LEDs are lit in Standby mode. When in Standby mode, there is no output from the HDMI Output socket of the HD940. The HD940 must be put into Active mode in order to view any sources connected. All other functions of the HD940 (e.g. -
Page 15: On-Screen Display
Note: For fully manual input selection, turn IntelliInput off. See page 36 for more information. On-Screen Display When you change input or another setting of the HD940, it will show the relevant information in the bottom-left corner of the screen. - Page 16 HD940 and decide you wish to cancel the change. the HD940 and decide you wish to cancel the change.
-
Page 17: Setting The Audio Delay
Setting the Audio Audio Delay So you can achieve perfect lip So you can achieve perfect lip-sync correction, the HD940 allows sync correction, the HD940 allows you to set the audio delay in steps of just 1 millisecond (1 ms),... - Page 18 (e.g. 56 ms) you can enter e.g. as your delay. as your delay. This will reduce slightly the time taken for the HD940 to This will reduce slightly the time taken for the HD940 to This will reduce slightly the time taken for the HD940 to activate the delay after it is entered.
-
Page 19: Presets
HD940 is interrupted. the power to the HD940 is interrupted. Presets The HD940 allows storage of up to 3 40 allows storage of up to 32 delay settings for easy delay settings for easy recall, 8 for each input. - Page 20 Recalling a Delay from a Preset Recalling a Delay from a Preset Method 1: Press repeatedly repeatedly until the preset you require is shown until the preset you require is shown on screen. Preset 3 Preset 3 82 ms 82 ms Wait a couple seconds and the on Wait a couple seconds and the on-screen display will screen display will change to...
-
Page 21: Auto Delay Modes
If your HDMI equipment does not provide audio and video latencies then Auto Delay mode has no way to know what delay to set. In this case the HD940 will show an error in red: No Latency Info Note though that an advanced feature of the HD940 means, even if your HDMI equipment does not provide latencies, you can still use Auto Delay mode. -
Page 22: Extended Auto Delay Mode
(or "frequency") can also affect it. screen refresh rate (or "frequency") can also affect it. screen refresh rate (or "frequency") can also affect it. The HD940 includes an Extended Auto Delay mode that adds to the Auto... - Page 23 Delay stored for the current video format. Delay stored for the current video format. The HD940 will remain in the The HD940 will remain in the auto or manual delay mode auto or manual delay mode you have selected. This mode is selected independently for have selected.
-
Page 24: Lock/Unlock
Lock/Unlock Lock/Unlock To prevent preset values and Extended Auto Delay values being To prevent preset values and Extended Auto Delay values being To prevent preset values and Extended Auto Delay values being changed, the remote control handset has a Lock feature changed, the remote control handset has a Lock feature changed, the remote control handset has a Lock feature. -
Page 25: Cascade Mode
7 input sources to be controlled from the this way to allow up to 7 input sources to be controlled from the HD940's remote control. In addition, up to 7 HD940's can be HD940's remote control. In addition, up to 7 HD940's can be HD940's remote control. - Page 26 7 input how they may be connected to each other and to up to 7 input sources. Note that we call the HD940 connected to the first 4 sources. Note that we call the HD940 connected to the first 4 sources.
-
Page 27: Using More Than 2 Hd940'S In Cascade Mode
Other HD940's are unaffected. connected to the active source. Other HD940's are unaffected. Note: In Cascade Mode when power is first applied to a HD940 Note: In Cascade Mode when power is first applied to a HD940... - Page 28 Repeat the above steps for any further HD940's. Repeat the above steps for any further HD940's. With the final HD940, connect it's Output to your TV or AV With the final HD940, connect it's Output to your TV or AV With the final HD940, connect it's Output to your TV or AV receiver.
- Page 29 The remote control handset supplied with the Felston HD940 is only suitable for controlling up to 2 HD940's in Cascade Mode. If you want to use 3 of more HD940's then you will need to use a learning remote. See Programmable Learning Remotes on page 39 for more information.
- Page 30 LED you will see when a HD940 is put into Cascade Mode REMOTE CONTROL RECEPTION IN CASCADE MODE: So that the HD940's operate reliably and synchronized with each other, they should all be located close together and...
-
Page 31: Exiting Cascade Mode
Connect power to the HD940 you wish to leave Cascade Connect power to the HD940 you wish to leave Cascade Mode (you can do this to more than one HD940 at the Mode (you can do this to more than one HD940 at the... -
Page 32: Settings
Settings The unit includes some settings that advanced users may wish to The unit includes some settings that advanced users may wish to The unit includes some settings that advanced users may wish to change. They are accessed via the Settings menu. To e e. -
Page 33: Replacement Auto Latencies
Replacement Auto Latenci Replacement Auto Latencies The HDMI specification The HDMI specification provides for equipment to specify equipment to specify video latencies, the time taken to process the video signal, the time taken to process the video signal, the time taken to process the video signal, in order to allow a basic form of a basic form of automatic lip-sync correction. -
Page 34: Input Labels
Input Labels By default, the 4 input sources of the HD940 are displayed on By default, the 4 input sources of the HD940 are displayed on By default, the 4 input sources of the HD940 are displayed on-... - Page 35 Say we want to change the input label to "Cable TV". First we will delete all the existing characters in the input label. Press twice. The C will disappear and the cursor will move to the left: C: Input_ Press five more times.
-
Page 36: Intelliinput
HDMI's "EDID" information. known their audio latency via the HDMI's "EDID" information. Where a TV does this, the HD940 takes the audio latency into Where a TV does this, the HD940 takes the audio latency into... -
Page 37: Extended Auto Delays
Auto and Extended Auto Delay modes: The amount of audio Auto and Extended Auto Delay modes: The amount of audio delay applied by the HD940 is the video latency minus the audio delay applied by the HD940 is the video latency minus the audio delay applied by the HD940 is the video latency minus the audio latency. - Page 38 to scroll through the video format codes 1 to scroll through the video format codes 1 through 64. When you reach the extended auto delay you want through 64. When you reach the extended auto delay you want through 64. When you reach the extended auto delay you want to change, press .
-
Page 39: Programmable Learning Remotes
HD940, visit: http://www.felston.com/HD940/remotes Controlling Multiple HD940's Independently If you have more than one HD940 located near to each other in the same room, and you want different HD940's to respond individually to commands from your remote control handsets, then you can if you have a learning remote control. - Page 40 From now on you will be able to control the HD940 fro From now on you will be able to control the HD940 fro From now on you will be able to control the HD940 from your learning remote control.
-
Page 41: Factory Reset
Factory Reset Factory Reset To return all of the HD940's settings to their default values, To return all of the HD940's settings to their default values, To return all of the HD940's settings to their default values, follow this procedure:... -
Page 42: Troubleshooting
This is normal behavior when the HD940 is in Cascade Mode. behavior when the HD940 is in Cascade Mode. behavior when the HD940 is in Cascade Mode. - Page 43 HD940. Check the power adaptor is plugged into a working, powered wall socket. The HD940 is on. It responds to the buttons on its front panel, but there is no response from the remote control. Ensure you are pointing the remote control’s infrared transmitter squarely at the front of the HD940.
-
Page 44: Specifications
HD940 for AC power requirements. Power Consumption Less than ?? Watts for the HD940 from 5V DC AC power consumption will depend upon the country specific power adaptor supplied with the unit but will not exceed 5 watts in any case.
Need help?
Do you have a question about the HD940 and is the answer not in the manual?
Questions and answers