Table of Contents
Advertisement
Quick Links
Advertisement
Table of Contents

Related Manuals for Axis Camera Station S9301 Workstation


Summary of Contents for Axis Camera Station S9301 Workstation
- Page 1 AXIS Camera Station S9301 Workstation User Manual...
-
Page 2: Table Of Contents
Configure AXIS Camera Station ........ -
Page 3: About Your Device
About your device About your device AXIS Camera Station S9301 Workstation is a workstation for high-definition surveillance with support for two simultaneous 4K monitors. The workstation is preloaded with an AXIS Camera Station client and is preconfigured to minimize installation time. -
Page 4: Get Started
3. Initial Axis recorder setup: After the initial Windows setup, AXIS Recorder Toolbox is opened and you are guided through a few steps to set up basic and necessary settings, for example, computer name, date and time, and network. See . -
Page 5: Install Your Device
Prepare additional accessories used for installation: monitor, mouse, keyboard and network cable. • Understand the usage of different user accounts. The following table lists the user accounts that can be used for installation, configuration and operation of your Axis system. User account Description... -
Page 6: Initial Axis Recorder Setup
If your device is not connected to a network or there is no DHCP server available, enter the IP address, subnet mask, gateway, and preferred DNS manually depending on the network requirements. 6. Click Finish. If you have changed the computer name, AXIS Recorder Toolbox will prompt you to restart the device. Configure AXIS Camera Station This Get started tutorial will walk you through the basic steps to make your system up and running. - Page 7 AXIS Camera Station Service Control automatically starts after the installation is complete. Double-click the AXIS Camera Station client icon to start the AXIS Camera Station client. When starting the client for the first time, it automatically attempts to log in to the AXIS Camera Station server installed on the same computer as the client.
- Page 8 1. Go to the folder that you have specified for the exported recordings. In this example, the exported files include the recordings in the .asf format, the notes in the .txt format, and AXIS File Player. 2. Double-click AXIS File Player. The exported recordings will be automatically played.
- Page 9 When the client and the server are separated by a NAT, firewall or similar, configure the NAT or firewall to ensure that the HTTP port, TCP port, and streaming port specified in AXIS Camera Station Service Control are allowed to pass through the firewall and/or NAT.
-
Page 10: Manage Windows® User Accounts
AXIS Camera Station S9301 Workstation Manage Windows® user accounts Manage Windows® user accounts Create a user account To help keep your personal data and information more secure, we recommend that you add a password for each local account. Important Once you create a password for a local account, don't forget it. There’s no way to recover a lost password for local accounts. -
Page 11: Change A User Account's Password
AXIS Camera Station S9301 Workstation Manage Windows® user accounts 1. Go to Settings > Accounts > Other people. 2. Go to the account you want to remove and click Remove. Change a user account's password 1. Log in with an administrator account. -
Page 12: Manage Axis Camera Station User Accounts
Manage AXIS Camera Station user accounts Manage AXIS Camera Station user accounts Configure user permissions Go to Configuration > Security > User permissions to view a list of the users and groups that have been added to AXIS Camera Station. Note Administrators of the computer on which the AXIS Camera Station server is installed are automatically given administrator privileges to AXIS Camera Station. -
Page 13: User Or Group Privileges
4. Select Users or Groups to search for only users or groups. 5. The list of users or groups is displayed. Users and groups that have already been added to AXIS Camera Station are not listed. If there are too many users or groups, the search result is not displayed. Use the Type to search field to refine the search and find a specific user or group. - Page 14 The following access privileges are available for users or groups with the Operator or Viewer role. You can select multiple views and set the access privileges. • Access: Allow access to the views in AXIS Camera Station. • Edit: Allow to edit the views in AXIS Camera Station.
-
Page 15: Manage Your Device
AXIS Camera Station S9301 Workstation Manage your device Manage your device Update Windows® Windows® 10 periodically checks for updates. When an update is available, your device automatically downloads the update but you've to install it manually. Note Recording will be interrupted during a scheduled system restart. - Page 16 AXIS Camera Station S9301 Workstation Manage your device 3.1 Enabled 3.2 Click OK.
-
Page 17: Troubleshooting
5. Select Keep my files. Important It is strongly recommended that you do not select Remove everything as this will remove all Axis applications and configurations, including AXIS Camera Station. 6. If you are connected to internet, select Local reinstall, otherwise go direct to step 7. -
Page 18: Troubleshoot Axis Camera Station
4. After the ISO to USB tool is complete, take the USB drive and plug it into your device. 5. Start your device and before the AXIS splash screen appears press F12. We recommend that you tap the F12 key repeatedly as the device boots fast. -
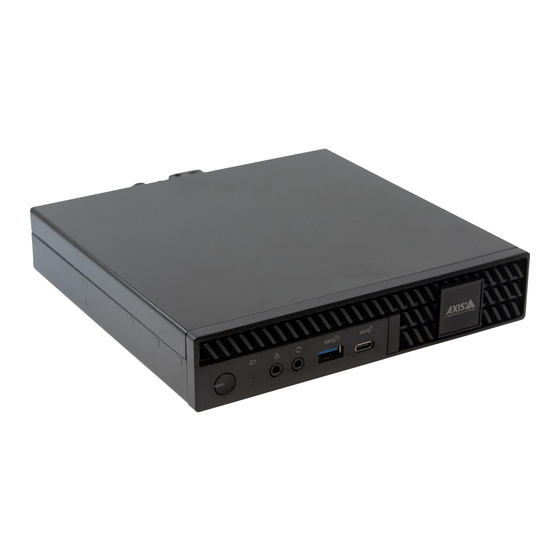
Page 19: Product Overview
AXIS Camera Station S9301 Workstation Product overview Product overview Power button/power LED Hard drive activity LED Line in/out Universal audio jack USB 3.2 port USB 3.2 gen 2 2x2 USB-C port 1 GbE Ethernet port USB 3.2 ports ™ DisplayPorts... -
Page 20: Need More Help
AXIS Camera Station S9301 Workstation Need more help? Need more help? Useful links • AXIS Camera Station user manual • Configure Axis Secure Remote Access • What to include in an Antivirus allowlist for AXIS Camera Station Contact support Contact support at axis.com/support. - Page 21 User Manual Ver. M1.16 AXIS Camera Station S9301 Workstation Date: January 2023 © Axis Communications AB, 2023 Part No. T10184764...
Need help?
Do you have a question about the Camera Station S9301 Workstation and is the answer not in the manual?
Questions and answers