
Related Manuals for Dimplex Casper CAS20N-AU


Summary of Contents for Dimplex Casper CAS20N-AU
- Page 1 INSTRUCTION MANUAL Casper 2kW Optiflame Portable Electric Fire Model: CAS20N-AU For domestic household use only. 08/53788/0 Issue 4 OCN 11905...
- Page 2 IMPORTANT THESE INSTRUCTIONS SHOULD BE READ CAREFULLY AND RETAINED FOR FUTURE REFERENCE. CAUTION: FAILURE TO FOLLOW THESE INSTRUCTIONS MAY CAUSE INJURY AND/ OR DAMAGE AND MAY INVALIDATE YOUR WARRANTY Please read the operating instructions carefully before using your product for the first time and keep them in a safe place.
- Page 3 its use on deep pile carpets or on long hair type of rugs • The appliance must be positioned so that the plug is accessible. • If the supply cord is damaged it must be replaced by the manufacturer or service agent or a similarly qualified person in order to avoid a hazard.
- Page 4 Exposed to the Near water If the power cable weather outdoors wires are frayed or cut Where small children No extension leads or Where the power may be left unattended power boards cable may be damaged On a slope or Where there is risk Where it may be uneven surface...
-
Page 5: Specifications
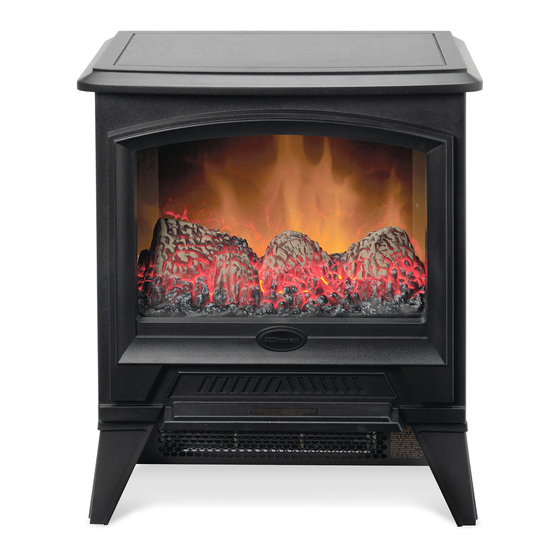
Specifications Model no. CAS20N-AU Colour/Finish Black Heat Output Heat Settings Thermostat Control Remote Control Warranty 2 years Dimensions (w x d x h) 440 x 305 x 571 For greater precision, please always refer to the rating label placed on the product. -
Page 6: Operation
Operation WARNING: FALLING OR TIPPING APPLIANCES CAN CAUSE INJURY OR DEATH OF YOUNG CHILDREN, PLEASE ENSURE CHILDREN DO NOT CLIMB, HANG OR STAND ON THIS PRODUCT. Thermal Safety Cut-out The built-in overheat cut-out switches off the appliance automatically in the event of a fault. -
Page 7: Warning! This Appliance Must Be Earthed
Setup & Product Dimensions General Unpack the heater carefully and retain the packaging for possible future use, in the event of moving or returning the fire to your supplier. These models are designed to be free standing and are normally positioned against a wall. - Page 8 Operation Controls The switches provide a choice of heat settings, The appliance is in standby mode when the mains lead is plugged in. This is indicated by the red neon behind the flame effect screen. The two selector switches are in the ON position when the side with the markings on (i.e.
-
Page 9: Warranty
Warranty Please refer to the warranty card in the box for warranty information. For any troubleshooting advice, please contact the relative Customer Care Centre below. Glen Dimplex Australia Pty Ltd Glen Dimplex New Zealand Ltd 8 Lakeview Drive, 38 Harris Road, East Tamaki,... - Page 12 Supplied by Glen Dimplex Australia 8 Lakeview Drive, Scoresby, Victoria, 3179 © Glen Dimplex Australia. All rights reserved. Material contained in this publication may not be reproduced in whole or in part, without prior permission in writing of Glen Dimplex Australia.
Need help?
Do you have a question about the Casper CAS20N-AU and is the answer not in the manual?
Questions and answers
I have a dimplex CAS20N-Au heater which I love but it has developed an annoying squeak. Sounds like something to do with the fan but it happens when the fan is not on and is getting more pronounced.