Table of Contents
Advertisement
Available languages
Available languages
Quick Links
OASIS 501R-1
(5 001 001 008)
OASIS 1601R-1
(5 001 001 010)
Technical changes, misprints and mistakes reserved! Newest information about our products can be found online.
Technische Änderungen, Druckfehler und Irrtümer vorbehalten! Aktuelle Informationen zu unseren Produkten finden Sie auf:
SOLAR POND PUMP
de
SOLAR TEICHPUMPEN
OPERATING INSTRUCTIONS
BEDIENUNGSANLEITUNG
OASIS 2002-1
(5 001 001 011-1)
http://www.profi-pumpe.de
Version 22.12
OASIS 801R-1
(5 001 001 009)
OSLO 300 LIGHT-2
(SP01122-2)
Advertisement
Chapters
Table of Contents

Related Manuals for Profi-pumpe OASIS 501R-1


Summary of Contents for Profi-pumpe OASIS 501R-1
- Page 1 SOLAR POND PUMP SOLAR TEICHPUMPEN Version 22.12 OPERATING INSTRUCTIONS BEDIENUNGSANLEITUNG OASIS 501R-1 OASIS 801R-1 (5 001 001 008) (5 001 001 009) OASIS 1601R-1 OASIS 2002-1 OSLO 300 LIGHT-2 (5 001 001 010) (5 001 001 011-1) (SP01122-2) Technical changes, misprints and mistakes reserved! Newest information about our products can be found online.
-
Page 2: Table Of Contents
2 English CONTENTS 1. Introduction ................................2 2. In general ................................2 3. Starting ................................2 4. Frost ..................................3 5. Assembly instruction ............................3 6. Operation and function ............................3 7. Performance of the pump ............................ 4 8. Battery information .............................. 4 9. -
Page 3: Frost
English 3 4. FROST Frost can cause damage to the pump. In freezing the pump, pipes and water tank must be emp- tied, rinsed with clean water and stored dry. 5. ASSEMBLY INSTRUCTION 5.1 Join the bracket, tubes and ground spike together 5.2 Place the pump in the pond or reservoir. -
Page 4: Performance Of The Pump
4 English 6.2 Operation from remote control IMPORTANT! You have to press the POWER button in battery box to switch on battery system first, then you can select function by pressing button on the remote control. l (ON): The Pump will be constantly on until battery runs out of all power. l (2): The pump will stay on for 2 hours an then switch off for 22 hours and will repeat this timing set every day at the same time. -
Page 5: Warnings On Battery
English 5 9. WARNINGS ON BATTERY Lithium Ion cells and battery may get hot, explode or ignite and cause serious injury if they are expo- sed to abusive conditions, Be sure to follow the safety warnings listed below: l Do not install the battery backwards, so the polarity is reversed l Do not connect the positive or/and negative terminal or/and the battery to each other with any meta object, such as wire l Do not disassemble or modify the battery. -
Page 6: Recognising And Repairing Of Mistakes
6 English 12. RECOGNISING AND REPAIRING OF MISTAKES Problem Possible cause Solution No sunlight The orientation of the solar panels up to the sun Low battery power See point 6.1. (Battery information) Connector from the pump is not connected See point 5.4 Pump will not turn on correctly Replace pump or solar panel. -
Page 7: Vorwort
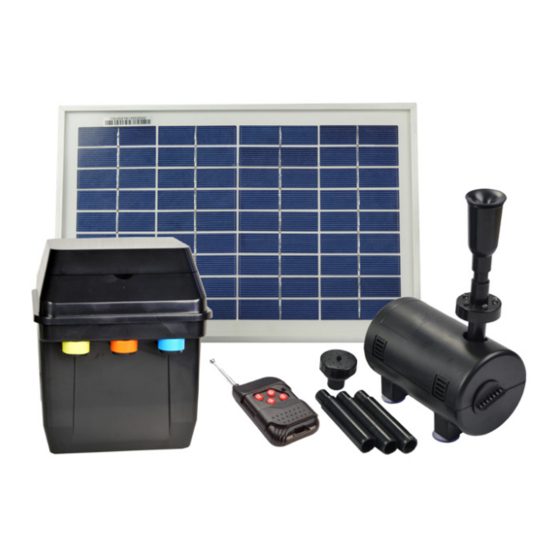
1x Pumpe mit 5m Kabel / 1x LED-Lichtring mit 5m Kabel / 1x Batteriegehäuse / 1x Fernbedienung (enthalten bei OASIS 501R-1, OASIS 801R-1, OASIS 1601R-1) / 1x Solarpanel mit 2m Kabel (2x Solarpanel bei Oasis 2002-1, Oasis 1601R-1) / 1x Solarpanel-Klammer / 2x Verlängerungsrohr / 1x Bodenspitze / 1 Set Fontänendüsen Um Schäden bei der Montage zu vermeiden, legen Sie alle Teile auf eine weiche Oberfläche. -
Page 8: Frost
8 Deutsch 4. FROST Frost kann zu Schäden an der Pumpe führen. Bei Frost sind die Pumpe, Leitungen und Wasserbehälter zu entleeren, mit klarem Wasser zu spülen und trocken zu lagern. 5. AUFBAUANLEITUNG 5.1 Verbinden Sie die Halterung, die Rohre und die Bodenspit- 5.2 Die Pumpe in den Teich oder das Reservoir stellen. -
Page 9: Leistung Der Pumpe
Deutsch 9 6.2 Nutzung mit der Fernbedienung WICHTIG! Sie müssen zuerst die POWER-Taste auf dem Bedienfeld der Batterie drücken, dann erst können die Funktionstasten auf der Fernbedienung genutzt werden. l (ON): Die Pumpe bleibt ständig eingeschaltet, bis die Batterie vollständig entladen ist. l (2): Die Pumpe bleibt für 2 Stunden eingeschaltet und schaltet dann für 22 Stunden ab. -
Page 10: Warnhinweise Zum Akku
10 Deutsch 9. WARNHINWEISE ZUM AKKU Lithium-Ionen-Zellen und Akkus können heiß werden, explodieren oder sich entzünden und schwe- re Verletzungen verursachen, wenn sie nicht bestimmungsgemäß eingesetzt werden. Bitte beachten Sie unbedingt die unten aufgeführten Sicherheitshinweise: l Achten Sie beim Einsetzen der Akkus unbedingt auf die richtige Polarität. l Vermeiden Sie, daß... -
Page 11: Erkennen Und Beheben Von Fehlern
Deutsch 11 12. ERKENNEN UND BEHEBEN VON FEHLERN Problem Mögliche Ursache Lösung Keine Sonneneinstrahlung Solarpanel ausrichten, dass es direktes Sonnenlicht erhält Niedriger Ladestand des Akku Siehe Punkt 6.1. (Informationen zum Akku) Pumpe schaltet Stecker von der Pumpe wurde Siehe Punkt 5.4 sich nicht ein nicht richtig angeschlossen Pumpe oder Solar- Panel austauschen. -
Page 12: Technical Data
12 Englisch / Deutsch 17. TECHNICAL DATA / TECHNISCHE DATEN OASIS 501R-1 OASIS 801R-1 OASIS 1601R-1 English Deutsch (5 001 001 008) (5 001 001 009) (5 001 001 010) Max. pump capacity Max. Fördermenge 500 l/h 800 l/h 1500 l/h Max pump height Max. -
Page 13: Spare Parts
Englisch / Deutsch 13 18. SPARE PARTS / ERSATZTEILE The spare parts will be available for purchase from AMUR S.à.r.l. at www.profi-pumpe.de from March 2023. Die Ersatzteile sind ab März 2023 bei AMUR S.à.r.l. unter www.profi-pumpe.de käuflich zu erwerben. Spare part, remark / Ersatzteil, Bemerkung No. - Page 14 Notes / Notizen...
- Page 15 Notes / Notizen...
- Page 16 Imprint / Impressum Amur S.à r.l. www.amur.lu Email: info@amur.lu Tel.: (+49) 0611-9 45 87 77-0 Fax: (+49) 0611-9 45 87 77-11...
Need help?
Do you have a question about the OASIS 501R-1 and is the answer not in the manual?
Questions and answers