Table of Contents
Advertisement
Available languages
Available languages
Montage- und Bedienungsanleitung SCHARTEC Tube FE
Rollladenmotor mit elektronischen Endschaltern
English begins on page 9
SCHARTEC
eine Marke der bau-shop-24 GmbH
Fritz-Müller-Straße 119
73730 Esslingen
Deutschland
WEEE Reg. Nr.: DE90317979
WARNUNG
Bitte lesen Sie die Bedienungsanleitung sorgfältig durch, bevor Sie mit der Installation und dem Gebrauch beginnen. Die Installation Ihres neuen
Rollladenmotors muss von einer kompetenten sachkundigen Person oder einem sachkundigen Betrieb durchgeführt werden. Eine sachkundige
Person ist eine Person, die über eine geeignete Ausbildung, qualifiziertes Wissen und praktische Erfahrung verfügt, um eine Rollladenanlage
richtig und sicher zu montieren, zu prüfen und zu warten. Die Installation oder Reparatur ohne geeignete technische Qualifikationen kann zu
schweren Verletzungen, Tod und / oder Sachschäden führen.
Advertisement
Table of Contents

Summary of Contents for Schartec Tube FE
- Page 1 Montage- und Bedienungsanleitung SCHARTEC Tube FE Rollladenmotor mit elektronischen Endschaltern English begins on page 9 SCHARTEC eine Marke der bau-shop-24 GmbH Fritz-Müller-Straße 119 73730 Esslingen Deutschland WEEE Reg. Nr.: DE90317979 WARNUNG Bitte lesen Sie die Bedienungsanleitung sorgfältig durch, bevor Sie mit der Installation und dem Gebrauch beginnen. Die Installation Ihres neuen Rollladenmotors muss von einer kompetenten sachkundigen Person oder einem sachkundigen Betrieb durchgeführt werden.
-
Page 2: Konformitätserklärung (Ce)
Dank, dass Sie sich für ein Qualitätsprodukt der Marke Schartec entschieden haben. Dank unseres einzigartigen Qualitäts-Manage- ment-Systems, sowie einer kontinuierlichen Weiterentwicklung der Produkte erfüllen die Schartec Rollladenmotor die höchsten Ansprüche an Qualität und Komfort. Wir bedanken uns für Ihr Vertrauen und wünschen Ihnen viel Freude mit Ihrem neuen Schartec Rollladenmotor. Konformitätserklärung (CE) Schartec Tube Rollladenmotoren erfüllen die Anforderungen der geltenden europäischen und nationalen Richtlinien. -
Page 3: Gewährleistung
er einsatzbereit ist. • Die Endlagen der Rollladenmotoren können ausschließlich im eingebauten Zustand eingestellt werden. • Bewahren Sie die Anleitung, sowie das Etikett des Rollladenmotors sicher auf. 9. Entsorgung Rollladenmotoren gelten als Sondermüll und dürfen nicht mit dem Hausmüll entsorgt werden. Lieferumfang •... -
Page 4: Installation
da elektrische Leitungen im Rollladenkasten nicht verlegt werden dürfen. 4. Stellen Sie stets sicher, dass der Motor komplett bis Anschlag in die Welle eingeschoben werden kann. Installation ACHTUNG Wichtig! Lesen Sie vor der Installation die Sicherheitshinweise! Lassen Sie den Motor niemals fallen, hämmern, bohren oder tauchen Sie ihn nicht in Wasser. - Page 5 die Einrichtung/Programmierung abgebrochen. Beim Einstellen der Endlagen: a. Die oberen und unteren Endlagen können nicht gleichzeitig eingestellt werden. b. Nach dem Einstellen der Endlagen bleiben diese Positionen auch bei Stromausfall und/oder Unterbrechung der Stromzufuhr zum Motor gespeichert. Dasselbe gilt für eine Fernbedienung: Wenn der Motor stromlos ist, bleibt die eingelernte(n) Fernbedienung(en) erhalten. c.
- Page 6 • Justieren Sie die obere Endlage so, dass ca. 2-3 cm des Rollladens aus dem Rollladenkasten schauen. Durch Temperaturunterschiede im Winter und Sommer kann es zu Materialausdehnungen kommen, was zu Toleranzen führen kann. • Prüfen Sie beide Endlagen nochmals bevor Sie den Rollladenkasten wieder verschließen. •...
- Page 7 1. Einstellen der oberen Endlage (Nicht möglich, wenn die Endlagen nicht bereits festgelegt sind!) → → → → → The upper The new upper limit position limit position DOWN DOWN STOP Lassen Sie den Motor bis zur oberen Endlage laufen. Halten Sie die AUF- und AB-Tasten gleichzeitig 5 Sekunden gedrückt (3 Pieptöne und 1 Rollbewegung), drücken Sie dann die AUF- oder AB-Taste, um den Motor in die neue obere Endposition zu fahren, und halten Sie dann die STOP-Taste 5 Sekunden gedrückt (3 Pieptöne und 1 Rollbewegung);...
-
Page 8: Häufige Fehler
Drücken Sie mit einer gekoppelten Fernbedienung zweimal P2 (Motor 1 Piepton und 1 Rollbewegung pro Tastendruck), → → dann drücken Sie P2 am Wind-/Sonnensensor (3 Pieptöne und 1 Rollbewegung). Der Wind-/Sonnensensor ist nun mit dem P2(a) P2(a) Motor gekoppelt. (wind-sun sensor) Aktivieren/Deaktivieren der Sonnenerkennung 1. -
Page 9: Important Safety Instructions
Thank you for choosing a quality product from Schartec. Thanks to our unique quality management system, as well as continuous development of products, Schartec roller shutter motors meet the highest standards of quality and comfort. We thank you for your trust and wish you much pleasure with your new Schartec roller shutter motor. -
Page 10: Scope Of Delivery
5. Safety instructions for use WARNING! Risk of injury in the event of unintentional or accidental roller shutter movement! Pressing the button on the roller shutter switch or hand-held transmitter can cause unintentional roller shutter movements and injure persons. Ensure that the roller shutter switch and hand-held transmitter are not operated by children and are only used by persons who have been instructed in the op- eration of the remote-controlled roller shutter systems! You must generally operate the hand-held transmitter with visual contact to the roller shutter. -
Page 11: Before The Installation
Requirements The warranty claim is only valid for the country in which the device was purchased. The goods must have been purchased through the sales channel specified by us. The warranty claim is only valid for damage to the subject matter of the contract itself. Reimbursement of expenses for removal and installation, inspection of corresponding parts, as well as claims for lost profit and damages are excluded from the warranty. -
Page 12: Start-Up And Settings
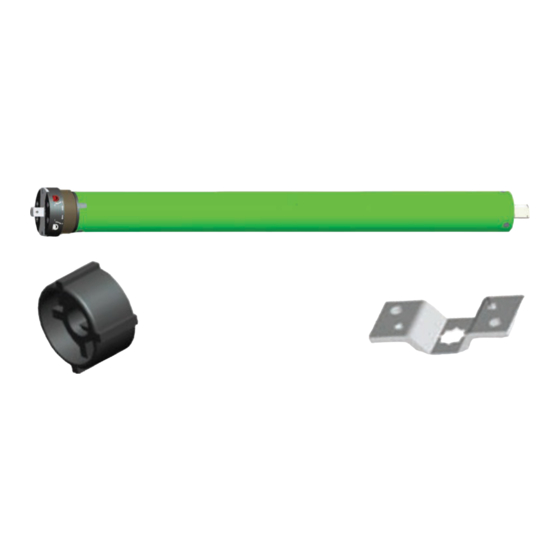
Motor End Cap Motor crown Bracket clip Motor bracket Step 3: Mount the crown and motor end cap on Step 4: Align the notches on the crown and the motor the motor. Ensure that the end cap fits firmly and end cap with the shutter tube, slide and fit the motor that the crown rotates freely. - Page 13 Remote Control Pairing To open the remote control, pull down the rear cover. Press the P1 button once (or simply just power on the motor), the motor will beep 3 times. Within 10 seconds, press the left P2 button on the remote, the motor will have 1 beep and 1 jog. Press the P2 button again after the beep/jog, the motor will again have 1 beep and 1 jog.
-
Page 14: Adjusting Limits
2. Set preferred position (outside the limits) → → → → → → DOWN DOWN DOWN STOP STOP Assure that the upper and lower limits are set. Press P2 (1 beep and 1 jog), press DOWN (1 beep and 1 jog), press DOWN again (3 beeps and 1 jog), then press UP or DOWN to run the motor to the desired preferred position OUTSIDE the limits, press P2 (1 beep and 1 jog), press STOP (1 beep and 1 jog), press STOP again (3 beeps and 3 jogs), the preferred position outside the travel limits is set. -
Page 15: Troubleshooting
Press P2 (1 beep and 1 jog), press P2 again (1 beep and 1 → → jog), on the remote to delete, press P2 again (3 beeps and 1 jog). The remote has been deleted. P2(a) P2(a) P2(b) * Both (a) and (b) are programmed in, this action only remotes remote (b). Deleting ALL Saved Remotes Press P2 (1 beep and 1 jog), press STOP (1 beep and 1 jog),... - Page 16 Try to use mutli-channel remotes to con- The remote is controlling more than 1 Multiple motors are paired to the same trol multi-motor configurations. motor. channel. Ensure each channel to each remote is properly programmed. Check connections. The motor won’t run, starts too slowly, or Connections are incorrect.
Need help?
Do you have a question about the Tube FE and is the answer not in the manual?
Questions and answers