Table of Contents

Related Manuals for KERN&SOHN PWS


Summary of Contents for KERN&SOHN PWS
- Page 1 KERN & Sohn GmbH Ziegelei 1 Phone: +49-[0]7433- 9933-0 D-72336 Balingen Fax: +49-[0]7433-9933-149 E-Mail: info@kern-sohn.com Internet: www.kern-sohn.com Operating instructions Precision balance KERN PWS Version 1.0 2022-08 TPWS-BA-e-2210...
-
Page 2: Table Of Contents
KERN PWS Version 1.0 2022-08 Operating instructions Precision balance Contents Technical data ....................4 Declaration of conformity ................5 Appliance overview ..................6 Components ..........................6 Keyboard ........................... 8 Display ............................9 Basic Information (General) ................ 10 Proper use ..........................10 Improper Use .......................... - Page 3 Balance identification number ....................57 18.2 Readability ..........................58 18.2.1 Readabilities for PWS 800-2 ....................59 18.2.2 Readabilities for PWS 3000-1 and PWS 8000-1 ..............59 18.3 Restore last tare value ......................60 18.4 Restore factory settings ......................60 Adjustment ....................61 19.1...
- Page 4 20.4.1 A00/Exx Format ........................69 20.4.2 ACK/NAK Format ......................... 70 20.5 Communication settings......................70 20.5.1 Enable / disable interface and data format ................70 20.5.2 Change communication settings ..................70 20.6 Printer functions ........................72 20.6.1 Output of the adjustment test result ..................73 20.6.2 Output of measurements obtained ..................
-
Page 5: Technical Data
1 Technical data KERN PWS 3000-1 PWS 8000-1 PWS 800-2 Item no./ Type TPWS 3200-1-A TPWS 8200-1-A TPWS 820-2-A Readability (d) 0.1 g 0.1 g 0.01 g Weighing range 3.2 kg 8.2 kg 820 g (max) Reproducibility 0.1 g 0.1 g 0.01 g... -
Page 6: Declaration Of Conformity
* Smallest component weight for part counting - under lab conditions: ➢ There are ideal ambient conditions for high-resolution counting ➢ The parts to be counted are not scattered ** Smallest component part for part counting – under normal conditions: ➢... -
Page 7: Appliance Overview
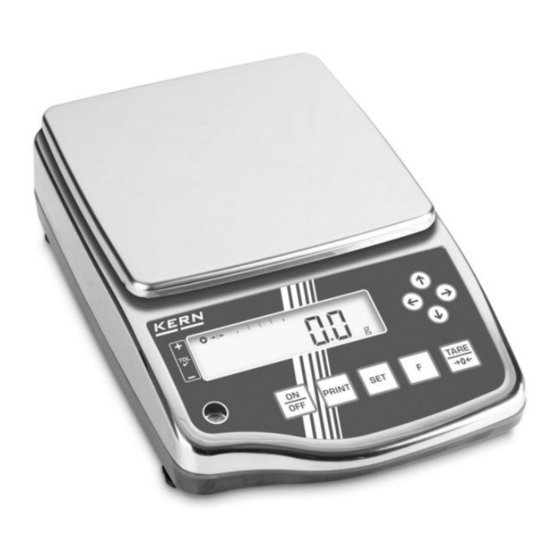
3 Appliance overview 3.1 Components PWS 3000-1 and PWS 8000-1: PWS 800-2: Pos. Designation 1 Weighing plate 2 Keyboard 3 Footscrews 4 Display 5 Bubble level TPWS-BA-e-2210... - Page 8 Rear view (weighing plate on the picture: PWS 3000-1 and PWS 8000-1): Pos. Designation 6 Attachment eyelet for anti-theft device 7 Power plug with protective cap 8 RS-232C interface with protective cap Battery compartment (rechargeable battery is available as an optional...
-
Page 9: Keyboard
3.2 Keyboard Button Designation Description Switch-on [ON/OFF] Switching Off Data export to external device [PRINT] Cancel setting [SET] Accept setting Open menu (keep key pressed for about 2 seconds) Change display Confirm entry [TARE/ZERO] Taring and zeroing Setting selection upwards [] Increase numerical input by 1 Select setting downwards... -
Page 10: Display
3.3 Display Display Designation Description Is displayed when the weight Stability display value is stable Indicates the tolerance range "Tolerance range weighing" within which the weighing result indicator lies. Indicates the reaction speed of "Animal weighing" indicator the balance when weighing animals. -
Page 11: Basic Information (General)
4 Basic Information (General) 4.1 Proper use The balance you purchased is intended to determine the weighing value of material to be weighed. It is intended to be used as a “non-automatic balance”, i.e. the material to be weighed is manually and carefully placed in the center of the weighing pan. -
Page 12: Basic Safety Precautions
5 Basic Safety Precautions 5.1 Pay attention to the instructions in the Operation Manual Carefully read this operation manual before setup and commissioning, even if you are already familiar with KERN balances. 5.2 Personnel training The appliance may only be operated and maintained by trained staff. 6 Transport and storage 6.1 Testing upon acceptance When receiving the appliance, please check packaging immediately, and the... -
Page 13: Unpacking, Installation And Commissioning
7 Unpacking, Installation and Commissioning 7.1 Installation Site, Location of Use The balances are designed in a way that reliable weighing results are achieved in common conditions of use. You will work accurately and fast, if you select the right location for your balance. On the installation site observe the following: •... - Page 14 Scope of delivery: 1. Balance 2. Weighing plate (for PWS 3000-1 and PWS 8000-1) 3. Weighing plate (for PWS 800-2) 4. Weighing plate support (for PWS 3000-1 and PWS 8000-1) 5. Weighing plate support (for PWS 800-2) 6. Screw for weighing plate support 7.
-
Page 15: Placing
2. Fix the weighing plate with the screw Pins 2. Place the weighing plate on the weighing plate carrier PWS 3000-1 and PWS 8000-1: PWS 800-2: 3. Connect the power supply unit (Installation of the power supply unit: see chap.7.5) -
Page 16: Levelling
7.4 Levelling 1. Level balance with foot screws until the air bubble of the water balance is in the prescribed circle Bubble level Footscrews Check levelling regularly 7.5 Mains connection Select a country-specific power plug and insert it in the mains adapter. Check, whether the voltage acceptance on the balance is set correctly. -
Page 17: Turning On The Power
Side view of the power plug (simplified): Spring Groove Inserting the power plug into the power supply unit Locking arrow Lock 7.5.1 Turning On the Power Connect the balance to the power supply Turn on the balance by pressing the [ON/OFF] key. 7.6 Initial Commissioning The balances must have reached their operating temperature for accurate weighing results to be obtained from the electronic balances (see Warm-up Time, Chapter 1). -
Page 18: Menu
8 Menu Settings on the balance can be changed from the menu by pressing the [F] key. • To open the menu, the balance must be in the gram display (switch- over the display: Press [F] key). • For navigation in the menu see chapter 8.2 8.1 Menu overview The balance's menu consists of several levels. -
Page 19: Navigation In The Menu
8.2 Navigation in the menu Button Designation Description Open menu (press and hold for about 2 seconds) Following menu level (press briefly) Close menu [PRINT] Cancel input [] Forward to next menu level [] Menu level back [] Setting selection upwards [] Select setting downwards [TARE/ZERO]... -
Page 20: Basic Operation
9 Basic Operation 9.1 Turn on/off After switching on, the balance always starts with the last weighing application that was used before switching off. Start-up: Press [ON/OFF] key The display lights up Wait until the weight display appears ... -
Page 21: Zeroing
9.2 Zeroing If <Net> is shown on the display after pressing the [TARE/ZERO] key, taring has been performed instead of zeroing. For more information on taring, see chapter 9.3. Unload weighing plate Press [TARE/ZERO] key Balance performs zeroing ... -
Page 22: Selection Of A Weighing Application
Fill the weighing container with the material being weighed Read off the net weight of the material to be weighed • When the balance is unloaded the saved taring value is displayed with negative sign. • To clear the stored tare value, unload the weighing plate and press the [TARE/ZERO] key. -
Page 23: Simple Weighing
9.5 Simple weighing If you use a weighing container, tare before weighing (see chapter 9.3). Select weighing application <1. SEt 1> (for selection see chapter 9.4) Place the weighed material on the weighing plate or in the weighing container. ... - Page 24 Button Function Cancel input Save input and exit Enter next character Increase character by 1 Increase character by 1 Decrease character by 1 Enter next character Select / delete last character TPWS-BA-e-2210...
-
Page 25: Piece Counting
10 Piece counting The piece counting application allows you to count several pieces placed on the weighing plate. Before the balance can count parts, it must know the average part weight (i.e. reference). Proceed by putting on a certain number of the parts to be counted. The balance determines the total weight and divides it by the number of parts, the so- called reference quantity. - Page 26 Place the number of pieces according to the entered reference quantity on the weighing plate or in the weighing hopper. Press the [F] key to store the weight value of the reference piece quantity. Simple SCS (optional; press [F]key to reach to the measuring mode): ...
- Page 27 Further displays: Press the [F] key to switch the display on the balance. The display depends on the active weighing application and the additional functions that have been enabled. Display Display Display on balance sequence Quantity of pieces (Pcs) Σ Total quantity of pieces (Pcs) Average piece weight (unit A) Net weight value (unit A)
-
Page 28: Percent Weighing
0.01 Minimum load x 100 <= Reference weight Model Minimum load for percentage weighing PWS 800-2 PWS 3000-1 and 10 g PWS 8000-1: The reference weight can be recorded in two ways: • Actual value setting method: Weighing the reference weight •... - Page 29 Actual value setting method: Place the reference weight on the weighing plate or in the weighing hopper. Press [F] key Remove reference weight Place the samples on the weighing plate or in the weighing container and read off the percentage value.
- Page 30 Further displays: Press the [F] key to switch the display on the balance. The display depends on the active weighing application and the additional functions that have been enabled. Display Display Display on balance sequence Percentage (%) Σ Total percentage (%) Net weight value (unit A) TPWS-BA-e-2210...
-
Page 31: Coefficient Multiplication
12 Coefficient multiplication The Coefficient multiplication application allows you to multiply the weight of a sample by a preset value. The result is shown on the display. The readability of the balance depends on the coefficient entered Select weighing mode <1.SEt 4> (for selection see chapter 9.4) ... - Page 32 Weight value is multiplied by the coefficient and result is shown on the display Further displays: Press the [F] key to switch the display on the balance. In addition, a number of other functions can be activated depending on the weighing application. Display Display Display on balance...
-
Page 33: Density Determination
13 Density determination When measuring the density of solids, the solid is first weighed in air and then in an auxiliary liquid whose density is known. From the weight difference results the buoyancy from where software calculates density. Distilled water or ethanol are usually used as auxiliary liquids, density tables (for selection see chapter 13.1. - Page 34 2. Select weighing application for measuring density Select weighing application <1. SEt 5> (to select see chapter 9.4) 3. Select medium Navigate <11. Md.> select medium (Navigation in menu: see chapter8.2) Water No water (Other medium) Press the [SET] key to save the settings ...
- Page 35 Press the [SET] key to save the entry. When selecting 1 (No water): Display changes to <d> and flashes Release the [TARE/ZERO] key. Press the [TARE/ZERO] key to set the specific density. Enter specific density (Numeric entry: chapter9.6)
- Page 36 Press the [SET] key when the stable weight value is displayed. Balance stores weight value and displays < >. 6. Correction of residual errors due to immersion basket Place container with water or other liquid under the balance ...
-
Page 37: Density Table For Liquids
13.1 Density Table for Liquids Density ρ [g/cm3] Temperatur e [°C] Water Ethanol Methanol 0.9997 0.7978 0.8009 0.9996 0.7969 0.8000 0.9995 0.7961 0.7991 0.9994 0.7953 0.7982 0.9993 0.7944 0.7972 0.9991 0.7935 0.7963 0.9990 0.7927 0.7954 0.9988 0.7918 0.7945 0.9986 0.7909 0.7935 0.9984 0.7901... -
Page 38: Data Output Of The Specific Density To A Printer
13.2 Data output of the specific density to a printer • Further settings can only be made after the weighing application Density measurement has been activated (see chap. 13). • You need a compatible printer to access these functions. Information on this can be found on our homepage: www.kern-sohn.com Selecting the data for output:... -
Page 39: Animal Weighing
14 Animal weighing The Animal Weighing application allows you to measure animals or samples that move whilst being measured. If the weight fluctuations are within a set weight range, the weight value is "frozen" and shown on the display. • If you use a weighing container, tare before weighing (see chapter 9.3). -
Page 40: Auto Tare
14.1.1 Auto Tare If Auto Tare has been activated, a tare range is automatically set after the animal has been removed from the weighing plate and the weight fluctuations are within a set range. If Auto Tare has been deactivated, the value will be "frozen" until the [TARE/ZERO] key is pressed. -
Page 41: Weighing With Tolerance Range
15 Weighing with tolerance range Setting a tolerance range allows you to quickly check whether a weight value is within certain limits. This is where you can either set a single tolerance value (minimum value as lower limit) or a tolerance range (minimum and maximum value as lower and upper limit). •... -
Page 42: Selection Of Weighing Function With Tolerance Range
If the entire range is set, the balance starts at 0 g. If 5 is set, the adjustment for the weighing systems is based on the table below: Model Minimum weight for assessment PWS 3000-1, PWS 8000-1 0.5 g PWS 800-2 0.05 g ... -
Page 43: Set Discrimination Method
15.5 Set discrimination method In the menu navigate to <24. tP.> and select the discrimination method (navigation in the menu: see chapter8.2) Assessment with absolute values (Setting the absolute values: see chapter 15.7.1) Assessment with difference values (Setting the difference values: see chapter 15.7.2) 15.6 Set acoustic signal ... - Page 44 Last stored value for the lower tolerance limit flashes on the display (in this example: Weight value) Place the reference sample for the lower tolerance limit on the weighing plate. Press the [F] key to save the reference value. ...
- Page 45 Evaluation of the value is shown on the display Numeric input: When the balance is in the measuring mode, hold down the [SET] key for about 2 seconds. When <L. SEt> is displayed, release [SET] key Last value stored for the lower tolerance limit flashes on the display ...
-
Page 46: Differential Values
<0> flashes on the display Enter upper tolerance limit (Numeric entry: see chapter 9.6) Press the [SET] key to save the entry. Weighing the samples: Place goods onto weighing plate Evaluation of the value is shown on the display 15.7.2 Differential values Actual value setting method: ... - Page 47 Value of reference sample is displayed briefly <L. SEt> is displayed Last difference to reference sample flashes on the display Place the reference sample for the lower tolerance limit on the weighing plate. Press the [F] key to save the reference value. ...
- Page 48 Weighing the samples: Remove reference sample Place weighing goods onto weighing plate Evaluation of the value is shown on the display Numeric input: When the balance is in the measuring mode, hold down the [SET] key for about 2 seconds. ...
- Page 49 The last difference (lower tolerance limit) to the reference value flashes on the display Press [TARE/ZERO] key Enter difference as lower tolerance limit (Numeric entry: see chapter 9.6) Press the [SET] key to save the entry. If the number of tolerance limits is 2: ...
-
Page 50: Setting The Display To Present Results
Evaluation of the value is shown on the display 15.8 Setting the display to present results Whether a measured weight value is within certain limits is indicated on the display by an arrow on the left (see table below). Evaluation of the Set tolerance ranges weight value... -
Page 51: Totalization
16 Totalization The Totalizing application allows you to weigh different samples and totalize the weight values. This function can be used for various applications, such as weighing individual batches to determine total stock. • Totalizing is available for the following applications: Weighing, percentage weighing, piece counting and coefficient multiplication. -
Page 52: Using The Totalizing Function
16.2 Using the totalizing function • The error message <t-Err> appears if you have not placed the samples correctly (More information: see chapter 22.1) • You can use the stabilisation waiting time (see chapter 17.5.2) to set whether the balance should wait for a stable weight value before the total is calculated 16.2.1 TOTAL-Adding ... -
Page 53: Show Or Clear The Total Sum
Press [SET] key Weight value is stored <Σ> is displayed briefly together with the weight total Wait until the balance shows <0>. Place another sample on the weighing plate and repeat steps 16.3 Show or clear the total sum Show the total sum: ... -
Page 54: Settings For Operation And Operating Behaviour
17 Settings for operation and operating behaviour Settings on the balance can be changed from the menu by pressing the [F] key. For navigation in the menu see chapter 8.2 17.1 Setting the weighing units Two weighing units (A and B) can be set on the balance. During weighing, the display can be switched between these two units by pressing the [F] key. -
Page 55: Bar Graph Display
17.2 Bar graph display The balance's bar graph display shows how much the weighing plate is loaded with respect to its weighing range. Navigate to <8. b.G.> in the menu and select display setting Disabled Enabled 17.3 Acoustic signal The acoustic signal supplements the display on the balance and can support you in your work. -
Page 56: Turn Off Of The Background Lighting Automatically
• In the following cases, the backlight is not switched off: o when the menu of the balance is open o when there is a load on the weighing plate and the value is unstable. • The background lighting is automatically switched on again when the balance is used. -
Page 57: Reaction Settings
17.6 Reaction settings The reaction settings allow you to adapt the balance to the environmental conditions. The reaction setting affects the stability display of the balance. The following applies: The higher the value set, the less sensitive the balance is to environmental influences (e.g. -
Page 58: System Settings
18 System Settings Settings on the balance can be changed from the menu by pressing the [F] key. For navigation in the menu see chapter 8.2 18.1 Balance identification number Your balance can be distinguished from other balances by assigning a balance identification number. -
Page 59: Readability
Press [TARE/ZERO] key The first input digit flashes Press the [TARE/ZERO] key to select characters (0-9, A-F, -, space). Alternative: The direction keys ([] and []) can also be used to select characters. Press the [F] key to enter the next character. Alternative: The direction keys ([] and []) can also be used to select the position of the characters. -
Page 60: Readabilities For Pws 800-2
0.0005 0.001 0.002 0.005 0.01 Momme 0.005 0.01 0.02 0.05 Indian tola 0.001 0.002 0.005 0.01 0.02 18.2.2 Readabilities for PWS 3000-1 and PWS 8000-1 Setting Gram Kilogram 0.0001 0.0002 0.0005 0.001 0.002 Carat Ounce 0.005 0.01 0.02 0.05 Pound 0.0005... -
Page 61: Restore Last Tare Value
18.3 Restore last tare value The balance provides the option to restore the last tare value used before the balance was switched off when it is switched on again. If this function is activated, users do not need to tare again in the event of a power failure, for example, if the same tare weight is used. -
Page 62: Adjustment
19 Adjustment As the acceleration value due to gravity is not the same at every location on earth, each balance must be coordinated - in compliance with the underlying physical weighing principle - to the existing acceleration due to gravity at its place of location (only if the balance has not already been adjusted to the location in the factory). -
Page 63: Adjustment Test
The message <on F.S.> is displayed when zeroing is complete Place the adjustment weight centrally on the weighing plate. Message <on F.S.> starts flashing on the display Adjustment starts The adjustment has been completed once <End> is displayed on the balance ... - Page 64 Place the adjustment weight on the weighing plate once the balance shows <on F.S.>. The adjustment test starts automatically The display first shows <d IFF> and then the difference value between the adjustment weight and the actual weight value ...
-
Page 65: Interfaces
20 Interfaces The balance can communicate with external peripherals using the interface. Data can be sent to a printer, PC or control displays. In the same way, control commands and data inputs may occur via the connected devices (such as PC, keyboard, barcode reader). -
Page 66: Interface Cable
20.1.2 Interface cable 20.2 Data output formats 20.2.1 Data composition • 6-digit data format Consisting of 14 characters, including the end characters (CR= 0DH, LF= 0AH)*. • 7-digit data format Consisting of 15 characters, including the end characters (CR= 0DH, LF= 0AH) •... - Page 67 Numeric data: D1-D7/D8 Code Significance 0 – 9 30H – 39H Numbers 0 to 9 Decimal point (position not fixed) Space before numeric data If numeric data does not contain a decimal point, a space is output at the least significant digit and no decimal point is output *Sp = space Units:...
-
Page 68: Data Input
Result evaluation for weighing with tolerance range: S1 = 1 character Code Significance Below lower tolerance limit (LOW) Within tolerance range (OK) Upper tolerance limit exceeded (HIGH) Total Piece weight No evaluation result or data type specified Gross *Sp = space Status of data: S2 = 1 character Code... - Page 69 Zeroing / taring, data output: Code (C1) Code (C2) Significance Set to zero/taring End output Permanent output Continuous output only for stable values (interruption of output for unstable values). Press [PRINT] key for one-time output Automatic output when weighing plate is loaded again and value is stable One-time output whenever value is stable (no output for unstable values)
-
Page 70: Response Formats
Code (C1) Code (C2) Significance Set mode 1 Set mode 2 Set mode 3 Set mode 4 Mode table Mode Simple weighing Piece Percent Density Animal counting weighing determinatio weighing Weigh weight Weigh weight Weigh weight Error Error Piece Percent Gross weight Error Error... -
Page 71: Ack/Nak Format
Code (A1) Code (A2) Code (A3) Significance Normal answer Incorrect answer 20.4.2 ACK/NAK Format Consists of one character (without end characters). Commands: Code (A1) Significance ACK 06H Normal answer NAK 15H Incorrect answer 20.5 Communication settings Settings on the balance can be changed from the menu by pressing the [F] key. For navigation in the menu see chapter 8.2 20.5.1 Enable / disable interface and data format ... - Page 72 Set output condition: Navigate to <61.oc.> in the menu and select the desired setting. End output Permanent output Continuous output only for stable values (interruption of output for unstable values). One-time output when [PRINT] key is pressed Automatic output (One-time output when the value is stable.
-
Page 73: Printer Functions
Set the data length: The data length can only be set if the interface has been set to 3 (see chapter 20.5.1). In the menu navigate to <64.dL.> and select the desired setting. 7 Bit 8 Bit Set stop bit: ... -
Page 74: Output Of The Adjustment Test Result
Activate output to peripheral devices: Navigate to <E.GLP> in the menu and select the setting. Disabled Enabled 20.6.1 Output of the adjustment test result The balance provides the option to automatically show the result on the interface after adjustment or after the adjustment test. ... -
Page 75: Servicing, Maintenance, Disposal
21 Servicing, maintenance, disposal Before any maintenance, cleaning and repair work disconnect the appliance from the operating voltage. 21.1 Cleaning Comply with IP protection Do not use aggressive cleaning agents (solvents or similar) only a cloth moistened with mild soapy water should be used. ... -
Page 76: Instant Help For Troubleshooting
22 Instant help for troubleshooting In the event of a fault in the programme sequence, the balance should be briefly switched off and disconnected from the mains. The weighing process must then be restarted. Fault Possible cause • The balance is not switched on The weight display does not glow •... -
Page 77: Error Messages
Possible cause Fault • Draught/air movement The display does not change when the M symbol flashes • Table/floor vibrations • Weighing plate has contact with other objects • Electromagnetic fields / static charging (choose different location/switch off interfering device if possible) •... - Page 78 Error message Description Possible causes / repair • Use correct adjustment weight and make sure that • Error > 1.0 % in adjustment or the there are no other objects balance is faulty on the weighing plate. Carry out adjustment again.
Need help?
Do you have a question about the PWS and is the answer not in the manual?
Questions and answers