Advertisement
Advertisement

Related Manuals for Gio Electric Tron


Summary of Contents for Gio Electric Tron
- Page 2 PLEASE INSPECT YOUR GIO ELECTRIC TRON MOBILITY SCOOTER UPON ARRIVAL AND REPORT ANY DAMAGES THAT MAY HAVE OCCURRED DURING SHIPPING...
- Page 3 ⚠ SAFETY INFORMATION ⚠ Please note the following information to ensure your safety and get better use out of your GIO TRON Mobility Scooter. Keep this manual safe for future reference. Please read the manual prior to first use and do not permit anyone who has not, operate the vehicle.
-
Page 4: Table Of Contents
Table of Contents Riding Safety Overview Scooter Assembly Scooter & Control Diagrams Operating & Adjusting Your Scooter Maintenance & Care Specifications & Troubleshooting Warranty Information Riding Safety ALWAYS practice riding your scooter in an open area prior to driving amongst vehicle/pedestrian traffic ALWAYS wear an approved helmet when riding your scooter ALWAYS accelerate slowly and steer with both hands ALWAYS drive with caution at appropriate speeds... -
Page 5: Overview
NEVER use a charger not included or approved of by GIO Electric Overview Thank you for your purchase of the GIO Electric Tron Mobility Scooter. It is an easy to operate mobility scooter designed for indoor and outdoor use. This stylish recreational mobility scooter doesn’t require any licensing, registration or insurance.* (*unless required locally) -
Page 6: Scooter Assembly
Double check that your Tron includes the following components: Shopping Basket Keys (x2) Headrest Headrest Hardware Charger Mirrors (Due to a packing error your Tron may include a spare headrest mounting arm. This extra piece is not used in assembly.) - Page 7 Step 2 - Front Basket Loosen the large plastic knobs on the steering column, adjust the steering column into a fully upright position, and retighten the knobs. Your basket lowers into place on the front basket bracket and is easily removed to use while shopping away from your scooter.
- Page 8 Step 3 - Seat Locate the 2 metal mounting knobs located on the back of the seat back and remove. Carefully align the bolts on the seat back with the holes in the back of the seat bucket, replace the mounting knobs and tighten into place. Please note the holes are located just under the outside lip of the seat bucket.
- Page 9 Step 4 - Headrest Insert the headrest into the mounting bracket on the rear of the seat. Install the quick adjust button by inserting the plastic push button, with spring slid over it, into the rear hole at the base of the mounting bracket and the bolt, with washer added, into the corresponding hole on the front of the bracket.
- Page 10 Step 5 - Mirrors Twist each mirror into place until snug and tighten with a wrench if necessary. Step 6 - Breaker The breaker on the scooter ships in the off position. It must be turned on before charging or using your scooter. Open the under seat compartment from the rear lock and locate the breaker at the front right side.
-
Page 11: Scooter & Control Diagrams
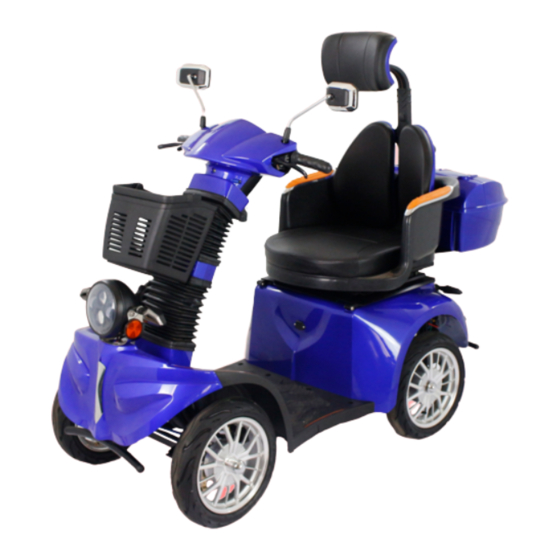
Scooter Diagram Adjustable headrest Tip protection wheels Headrest quick adjust button Rearview mirrors Adjustable seat back Handlebars, controls, display Swivel seat bucket w/ cushion n Ignition Rear storage container w/lock o Removable shopping basket Seat distance adjustment Steering column adjustment handle knobs Charging port... - Page 12 Control Diagrams High/low beam switch Speed (km/hr) Turn signal switch Speed setting Horn buttons Battery level Lights switch Battery voltage Speed switch Traveled dictance Reverse button...
-
Page 13: Operating & Adjusting Your Scooter
The LCD display should activate indicating the scooter is on. Driving your Scooter The Tron features a variable twist throttle on the right handlebar. Gently twist the throttle grip inwards to slowly accelerate to the desired speed. Avoid twisting too hard or too quickly as this may result in jumps in accelerations making steering less controllable. - Page 14 Driving your Scooter continued… The brake handle also features a parking brake option. Once stopped you can apply the parking brake by squeezing the brake normally and then pressing in the small parking brake lever on the brake handle. To release the parking brake simply squeeze the brake handle again.
- Page 15 Your scooter will only charge and operate with the breaker in the ON position! Adjusting your scooter The “smart” seat on the Tron has several possible adjustments. Headrest To adjust the height of the headrest, press the quick adjust button and shift the headrest to the desired position.
- Page 16 Seat The seat of the Tron swivels to allow the rider easy access, as well as shift forward backwards. To adjust either, locate the seat adjustment handle located on the right side of the base of the seat. Engage the handle, adjust the seat to your liking and release the handle.
-
Page 17: Maintenance & Care
⚠ To ensure the safety and reliability of your scooter, do not modify your scooter, and always use parts, i.e. charger, specifically designed for the GIO Tron. Alway make sure your scooter is turned off before performing any maintenance! ⚠... - Page 18 Safety Inspection List Continued… Lights: ● Do the turn signals function properly? ● Does the headlight function properly? Steering Handle: ● Does it turn freely? General: ● Are there any loose parts, nuts, bolts etc? Any issues found should be addressed before riding the scooter! Battery ⚠...
- Page 19 Lower speeds will provide the best performance. Tires The Tron is equipped with tubeless tires, these require less maintenance, and are less prone to flats compared to traditional tube tires. However, damage and flats are still possible. The condition of your tires not only directly affects the ability to drive your scooter but also its general performance.
-
Page 20: Specifications & Troubleshooting
Specifications & Troubleshooting Specifications Motor: Differential 60V 600W Ground Clearance: 2.5" (6cm) Battery: 60v 20ah lead acid Seat Height: 25” (74cm) from ground Brakes: Front/Rear Drum Wheel Base: 36” (120cm) Tires: 10 x 3.00 Tubeless Tires Wheel Track: 24” (67cm) Top Speed: 15mph(25km/h) Turning Radius:... - Page 21 Issue Possible Cause Solution Trip distance per charge Low tire pressure Adjust tire pressure (40PSI) reduced Low battery Charge battery Defective battery Replace battery Over weight limit Reduce scooter load Driving conditions (headwind, Avoid these conditions for best slopes) performance Uneven tire wear Tire pressure low Adjust tire pressure (40PSI)
-
Page 22: Warranty Information
There are no warranties that extend beyond the description in this limited warranty. GIO Electric guarantees this product, including charger, motor, controller, to be free of manufacturing defects for a period of 12 months. All warranty periods commence from the date of shipment.
Need help?
Do you have a question about the Tron and is the answer not in the manual?
Questions and answers