Advertisement
Quick Links
Operation Manual
Touc h S c re en Wi red C on trol l e r ( Mo d e l: H C WA 10 N E G Q )
Safety Precautions:
● Do not operate the wired controller by wet hands to avoid electric shock.
● Do not wash the wired controller by water to avoid electric shock or fire.
● Do not mount the wired controller in a humid environment to avoid damage to the internal elements of the controller
due to moisture penetration.
● Do not install the wired control device in the damp environment, avoid to damage the components.
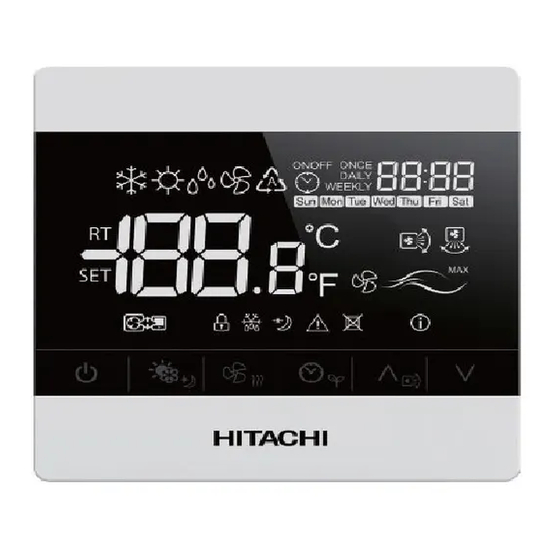
1. Product Information
Figure 1 shows all the indications for reference. The actual display during operation is different(All figures in this manual
are only for reference, please refer to the product for the actual display).
Display Area
Key Area
Figure 1
1) Key area icons illustration
Key No.
Icons
Illustration
①
ON/OFF
②
Mode
③
Fan speed
④
Timer
⑤
Up
⑥
Down
2) Display area icons illustration
Icons
Illustration
Automatic
Cooling
Heating
Ventilation
Dry
Room temperature
Setting temperature
Centigrade degree
Fahrenheit degree
Timer
2. Operations of Basic Functions
In general circumstances, the wired controller's panel is under screen protection state with dim backlight if there is
no operation. To enable any operation to the wired controller, it's required to first quit the screen protection state
(press any key to light up the backlight) and then enter the operation state.
2.1 ON/OFF
Operation Steps
1)
Press any key to light up the backlight.
If unit operation is stopped,wired controller displays mode, communication, fan speed, weekday, time, operating
2)
mark as shown in figure 2.
Press key ① to start the operation, wired controller displays temperature, wind etc. as shown in figure 3.
3)
If unit operation is start,press key ① to stop the operation as shown in figure 2.
Figure 2
Function
This key is used to start/stop the equipment
Promptly press this key to switch mode
Promptly press this key to switch fan speed
Promptly press this key to set schedule timer
Press this key to increase temperature, time,
swing louver angle, etc.
Press this key to decrease temperature, time, etc.
Icons
Illustration
Horizontal louver
Lock
Fan speed
Communication
Alarm
Defrosting
Remote control Lock
Operating mark
Time, address and
parameters display
Figure 3
2.2 Regulation of Operation Mode, Fan Speed and Temperature
Operation Steps
1)
Press any key to light up the backlight
If unit operation is start,press key ② to switch the mode,as shown in
2)
figure 4.
The switching sequence of operating mode: cooling-heating - dry -
ventilation - cooling
Press key ③ to adjust the fan speed. The switching sequence of fan speed:
3)
low - medium - high - ultrahigh - auto - low
4)
Press key ⑤, the temperature increases by 0.5ºC. The range of cooling
temperature regulation is 19ºC to 30ºC and the range of heating
temperature regulation is 17ºC to 30ºC
Press key ⑥, the temperature decreases by 0.5ºC. The range of cooling
5)
temperature regulation is 19ºC to 30ºC and the range of heating
temperature regulation is 17ºC to 30ºC
(See key serial numbers in the panel key description on the home page, for
key ① to key ⑥ from left to right.)
Figure 4
TIPS:
● The minimal step to setting temperature is 0.5ºC or 1ºC and the default value is 0.5ºC.
● By changing the function selection "P1""P2" to select the temperature step and unit(℃ /℉ ) , refer to the chapter:
"function selection" in Installation&Maintenance Manual for the details
● The mode and fan speed identifiable by the wired controller is dependent on the indoor unit model. Different models of
indoor units have a varied control of mode and fan speed. Please consult the local distributor for more details
2.3 Louver Direction
Operation Steps
1)
Press any key to light up the backlight.
2)
Under operation started status, press and hold key ⑤ for 5s to activate the
swing louver function and enter the automatic swing louver mode, as
shown in figure 5 . The default regulating sequence of cooling angle:
auto
auto
auto
stage 6
3)
Press key ⑤ shortly to select the desired angle and press key ① shortly or
press and hold key ⑤ to return to the operation interface.
(See key serial numbers in the panel key description on the home page, for
key ① to key ⑥ from left to right.)
Figure 5
TIPS:
● Activating the swing louver can orientate the wind direction to improve the level of comfort.
● Louver function is only support the indoor unit which has this function.
2.4 Individual Louver Setting
Indoor Unit
System
Indoor Unit
Index
number
Address no.
Figure 6
When the wired controller controls multiple indoor units, the steps to adjusting the individual
1.
swing Louver angle are as follows:
Operation Steps
1) Press any key to light up the backlight.
2) If unit operation is start, press key ⑤ for 5s to enter the automatic louver mode.
3) And press key ⑤ and key ⑥ for 5s to enter the individual louver adjustment interface, as shown in figure 6.
4) Press key ⑤ or key ⑥ to select the specific indoor unit.
5) Press key ③ for confirmation.
6) Press key ⑥ to select the louver number, as shown in figure 7.
7) Press key ⑤ to select the louver angle.
8) Press key ③ to confirm and return to the normal operation interface .
When the wired controller controls one indoor unit, the steps to adjusting the individual swing
2.
louver angle are as follows:
Operation Steps
Louver NO.
1) Press any key to light up the backlight.
2) If unit operation is start, press and hold key ⑤ for 5 s to enter the
louver angle adjustment interface,as shown in figure5.
3) Press and hold key ⑤ and key ⑥ for 5 s to enter the individual angle
setting interface, as shown in Figure 8, and the temperature zone
displays the louver NO.
4) Press key ⑥ to select the louver number.
5) Press key ⑤ to select the louver angle.
6) Press key ③ to confirm and return to the normal operation interface.
(See key serial numbers in the panel key description on the home page, for
key ① to key ⑥ from left to right.)
Figure 8
2.5 Time Setting
Figure 9
Operation Steps
1)
Press any key to light up the backlight.
Press and hold key ④ and ⑤ 5s to enter the time setting interface, as shown in Figure 9.
2)
Promptly press key ⑤ or ⑥ to set the year, and for example, 2017 is shown in the figure.
Promptly press key ③ to confirm the setting and enter the month setting interface, as shown in Figure 10.
3)
Promptly press key ⑤ or ⑥ to set the month and for example, July is shown in the figure.
Promptly press key ③ to confirm the setting and enter the day setting interface, as shown in Figure 11.
4)
Promptly press key ⑤ or ⑥ to set the day, and for example, 17 is shown in the figure.
5)
Promptly press key ③ for confirm and enter the hour setting interface, as shown in Figure 12.
Promptly press key ⑤ or ⑥ to set the hour, and for example, 17:00 is shown in the figure.
, stage 1
, stage 2
, stage 3
, stage 4
, stage 5
. The default regulating sequence of heating angle:
, stage 1
, stage 2
, stage 3
, stage 4
, stage 5
, stage 7
and auto
Louver NO.
Figure 7
Figure 10
and
,
Advertisement

Related Manuals for Hitachi HCWA10NEGQ


Summary of Contents for Hitachi HCWA10NEGQ
- Page 1 Operation Manual 2.2 Regulation of Operation Mode, Fan Speed and Temperature Operation Steps Press any key to light up the backlight Touc h S c re en Wi red C on trol l e r ( Mo d e l: H C WA 10 N E G Q ) If unit operation is start,press key ②...
- Page 2 2.8 Lock Operation Steps On the wired controller's operation interface, simultaneously press key ② ④ ⑥ for 5 s to activate the wired controller's lock. Then, the operation interface will display the lock sign, while all function keys will become invalid, as shown in figure 19 Simultaneously press key ②...
Need help?
Do you have a question about the HCWA10NEGQ and is the answer not in the manual?
Questions and answers