Table of Contents
Advertisement
Available languages
Available languages
Quick Links
Return to previous page
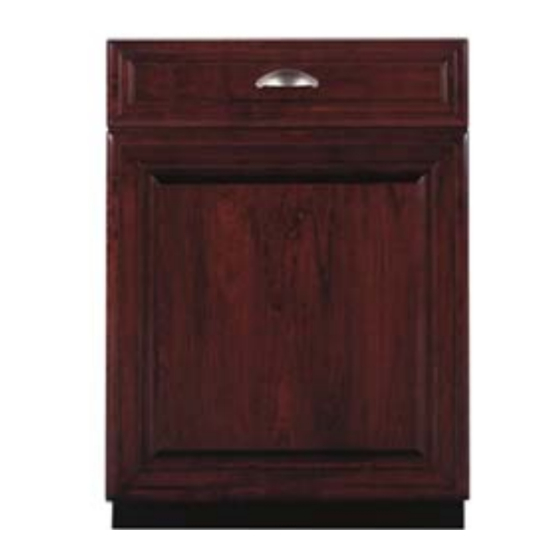
GE Monogram® Fully Integrated Dishwasher
Model #: ZBD6890KII
Pricing provided by your local dealer.
FEATURES
Door Appearance
Exterior Style
Door Style
Energy Star®-Qualified
Stainless Steel Tub and Door
Liner
Type/Style
Control Type
Sensor
Automatic Temperature Control
Automatic Temperature Sensing
CircuClean Pump
Food Disposer
Last Cycle Memory
Turbidity CleanSensor
Technology
Wash Arm - Lower Level
Wash Arm - Mid-Level
Wash Arm - Upper Level
Wash Arms
Wash Levels
Wash System
Water Filtration System
Home
Products
What's New
Where to Buy
Fully integrated door for custom panels
Traditional
Long door/Tall tub
Yes
Yes
Built-In
Fully Integrated Inlaid Electronic Light Touch
ExtraClean™
Yes
Yes
Yes
Piranha™ Hard Food Disposer
Yes
Yes
Yes
Yes
Yes
3-Direct Feed
5
ExtraClean™
100%
Monogram Living
Literature
Print this page...
Advertisement
Chapters
Table of Contents

Related Manuals for GE Monogram ZBD6890KII

Summary of Contents for GE Monogram ZBD6890KII
- Page 1 Home Products What's New Where to Buy Monogram Living Literature Return to previous page GE Monogram® Fully Integrated Dishwasher Model #: ZBD6890KII Pricing provided by your local dealer. Print this page... FEATURES Door Appearance Fully integrated door for custom panels...
- Page 2 Anti-Bacteria (NSF Certified) with scroll pad China / Crystal with scroll pad Cookware with scroll pad Cycles / Options Variable Normal Wash with scroll pad Rinse Only with scroll pad SaniWash II - with scroll pad Convection Dry with fan assist Delay Start 2/4/8-Hr.
- Page 3 NSF Certified to Sanitize Rinse Aid Dispenser With Indicator and Adjustment Steel Door ECONOMICAL / QUIET 304 Grade Stainless Steel Interior Active Vent System Motor Type QuietPower™ Motor Outer Wrap Thinstall™ Quiet Detergent Cup Quiet Electronic Cycle Manager Quiet Water Valve QuietPower™...
- Page 4 For models produced on or after January 1, 2006; See written Warranty Notes warranty for full details Service & Support Register Your Appliance Monogram in the News e-Newsletter Contact Us Recall Information Site Map Terms of Use Privacy Policy GE.com © 2006 General Electric Company and its licensors.
- Page 5 ZBD6890KII – GE Monogram Fully Integrated Built-In Dishwasher Dimensions and Specifications (in inches) Custom Panel for Model ZBD6890KII These dishwashers require a field installed 3/4” thick custom panel • The dishwasher must be installed so that the drain hose is and custom handle.
- Page 6 Drill 3/32" Drill 3/32" Pilot Hole Pilot Hole 3/32" Deep 3/32" Deep Trim Around Dotted Line Trim Around Dotted Line Order GE Pub. No. 31-30569-1 CALL 1-800-444-1845 For a full-size panel template with complete panel installation instructions. Specification Revised 9/05 150042...
- Page 7 ZBD6890KII – GE Monogram Fully Integrated Built-In Dishwasher Features and Benefits • Stainless steel interior • Hidden, integrated top controls • Long door design • Powerful forced-air drying system • CleanSensor technology • Nylon upper and lower racks • NSF certified to sanitize •...
- Page 8 Installation Instructions If you have questions, call 800.626.2000 or visit our website at: www.monogram.com Built-In Dishwashers ZBD6800 ZBD6880 ZBD6890* ZBD0700* ZBD0710 Design Guide with Installation Instructions *For ZBD6890 and ZBD0700 also refer to the instructions provided on the template packed with that model. Monogram.
-
Page 9: Table Of Contents
Product failure due While performing installations described in this booklet, to improper installation is not covered under the GE gloves, safety glasses or goggles should be worn. Appliance Warranty. For Monogram local service in your area, 1.800.444.1845. -
Page 10: Installation Preparation
Installation Preparation PARTS SUPPLIED: Two #8-18 x 5/8" Phillips special head screws, to secure dishwasher to underside of countertop or sides of #8 Phillips Special Head cabinets. (Taped to top side of dishwasher.) Screws 5/8" Long Side and top trim pieces (on some models) Trim Pieces Template with mounting hardware (not shown) (on some models) -
Page 11: Advance Planning
Installation Preparation ADVANCE PLANNING DISHWASHER MODELS • These dishwashers are designed for versatility, ZBD0710 SS, Stainless Steel adaptable to virtually any installation. ZBD6880 SS, Stainless Steel ZBD6800 BB, Black • All models have a full length door without the ZBD6800 WW, White traditional access panel. -
Page 12: Drain Requirements
Installation Preparation Method 1—Air Gap with Waste Tee or Disposer DRAIN REQUIREMENTS An air gap must be used when required by local codes and • Follow local codes and ordinances. ordinances. The air gap must be installed according to • Do not exceed 10 feet distance to drain. manufacturers instructions. -
Page 13: Prepare Electrical Wiring
Installation Preparation PREPARE ELECTRICAL WIRING WARNING Alternate Receptacle FOR PERSONAL SAFETY: Remove house Location fuse or open circuit breaker before 18" beginning installation. Do not use an 1-1/2" Dia. extension cord or adapter plug with this Hole (Max.) 18" appliance. 3"... -
Page 14: Prepare Hot Water Line
Installation Instructions BEFORE YOU BEGIN PREPARE HOT WATER LINE Locate and set aside (for use in Step 12) the • The line may enter from either side, rear or floor 2 Phillips special head screws wrapped with within the shaded area shown in Figure F. yellow tape and stuck to the top or side of the •... -
Page 15: Step 2 Remove Wood Base, Install Leveling Legs
REMOVE WOOD BASE, INSTALL POWER CORD INSTALL LEVELING LEGS Use Power Cord Kit WX09X70910 available for purchase from an authorized GE Appliances dealer. IMPORTANT Do not kick off wood base! Damage — Skip this step if dishwasher will be direct wired or has a will occur. -
Page 16: Step 6, Position Water Line And House Wiring
Installation Instructions STEP 6 STEP 8 POSITION WATER LINE SLIDE DISHWASHER AND HOUSING WIRING PARTIALLY INTO CABINET • Position water supply line and house wiring on the DO NOT PUSH AGAINST FRONT PANEL WITH KNEES. floor of the opening to avoid interference with base DAMAGE WILL OCCUR. - Page 17 Installation Instructions STEP 10 POSITION DISHWASHER UNDER COUNTERTOP • Push the dishwasher into the cabinet. • Push at the sides with your hands. Do not use your knee against the door since door damage will occur. • Check that the tub insulation blanket does not get “bunched-up”...
-
Page 18: Step 11 Level Dishwasher
Installation Instructions STEP 11 LEVEL DISHWASHER • Level the Access Hole dishwasher by IMPORTANT Dishwasher must be level adjusting the — for proper dish rack operation and wash performance. four leveling legs individually. • Place level on door • Make sure 1/2" and rack track inside minimum gap is the tub as shown to... -
Page 19: Step 12, Secure Dishwasher To Cabinet
Installation Instructions STEP 12 SECURE DISHWASHER TO CABINET The dishwasher must be secured to the countertop or Method 1—Secure dishwasher to wood countertop the cabinet sides. When countertops are made of wood, use Method 1. When countertops are granite or other •... -
Page 20: Step 13 Connect Water Supply
Installation Instructions STEP 13 CONNECT WATER SUPPLY Compression Nut Ferrule Connect water supply line to 90° elbow. • Slide compression nut, then ferrule over end of water line. Hot Water • Insert water line into 90° elbow. 90° Elbow Supply Line •... -
Page 21: Step 15 Connect Power Supply
Installation Instructions STEP 15 STEP 16 CONNECT POWER SUPPLY PRE-TEST CHECK LIST Skip this step if equipped with power cord. Review this list after installing your dishwasher to Go to step 16. avoid charges for a service call that is not covered by your warranty. -
Page 22: Step 17 Dishwasher Wet Test
Installation Instructions/Custom Panel Dimensions STEP 17 STEP 19 DISHWASHER WET TEST LITERATURE Turn on power supply (or plug power cord into outlet, if • Be sure to leave complete literature package and installation equipped). instructions with the consumer. Start the unit to check for leaks. –... - Page 23 NOTE: While performing installations described in this book, safety glasses or goggles should be worn. For Monogram ® local service in your area, call 1.800.444.1845. NOTE: Product improvement is a continuing endeavor at General Electric. Therefore, materials, appearance and specifications are subject to change without notice. Pub.
- Page 24 Instructions d’installation En cas de question, appeler 800.626.2000 ou rendre visite à notre site web : www.monogram.com Lave-vaisselle encastré ZBD6800 ZBD6880 ZBD6890* ZBD0700* ZBD0710 Guide de conception Instructions d’installation *Pour ZBD6890 et ZBD0700, consulter aussi les instructions imprimées sur le gabarit fourni avec ce modèle. Monogram.
- Page 25 électriques de base. L’installateur est responsable de et ATTENTION) montrés dans ces instructions. l’installation appropriée. La garantie des appareils ménagers de GE ne couvre pas les défaillances du Pendant l’installation décrite dans ce livret, il faut porter produit causées par une mauvaise installation.
-
Page 26: Préparation Pour L'installation
Préparation pour l’installation PIÈCES FOURNIES : Deux vis cruciformes spéciales #8-18 x 5/8 po (enveloppées Vis cruciformes dans du ruban adhésif sur le côté supérieur du lave-vaisselle) pour fixer le lave-vaisselle au dessous du plan de travail ou spéciales #8 de 5/8 aux côtés des armoires po de long Pièces de finition... -
Page 27: Planification Préalable
Préparation pour l’installation PLANIFICATION PRÉALABLE MODÈLES DE LAVE-VAISSELLE • Ces lave-vaisselle sont conçus afin d’être polyvalents ZBD0710 SS, Acier inoxydable et de pouvoir s’adapter à pour ainsi dire n’importe ZBD6880 SS, Acier inoxydable quelle installation. ZBD6800 BB, Noir ZBD6800 WW, Blanc •... -
Page 28: Égout
Préparation pour l’installation ÉGOUT Méthode 1—Dispositif anti-siphon avec raccord en té d’égout ou de broyeur à déchets • Respecter les codes et règlements locaux. • Ne pas dépasser 3 m (10 pi) jusqu’à l’égout. Il faut utiliser un dispositif anti-siphon quand exigé par les •... -
Page 29: Préparation Pour Le Branchement Électrique
Préparation pour l’installation PRÉPARATION POUR LE BRANCHEMENT ÉLECTRIQUE Autre position possible de la prise ATTENTION de courant SÉCURITÉ : Enlever le fusible du circuit 46 cm Trou de 38 mm ou déclencher le disjoncteur avant de (1-1/2 po) commencer l’installation. Avec cet de diamètre, max. -
Page 30: Préparation Du Tuyau D'eau Chaude
Instructions d’installation AVANT DE PRÉPARATION DU TUYAU D’EAU CHAUDE COMMENCER • Le tuyau peut entrer d’un côté ou de l’autre, de Repérer et mettre de côté (pour l’étape 12) les 2 vis l’arrière ou du sol, dans la zone hachurée montrée spéciales cruciformes enveloppées dans du ruban à... -
Page 31: Étape 2, Dépose De La Base En Bois, Installation
Utilisez la trousse de cordon d’alimentation No WX09X70910 disponibles pour l’achat chez votre revendeur d’appareil IMPORTANT ll ne faut pas frapper la électroménagers GE autorisé. — base en bois pour l’enlever ! Ceci endommage le Ignorer cette étape si le lave-vaisselle est branché... -
Page 32: Étape 7, Installation Du Tuyau De Vidange
Instructions d’installation MISE EN PLACE DU TUYAU GLISSER LE LAVE- ÉTAPE 6 ÉTAPE 8 D’EAU ET DES FILS DE LA MAISON VAISSELLE PARTIELLEMENT DANS L’OUVERTURE DE L’ARMOIRE • Mettre en place le tuyau d’eau et les fils de la maison sur le sol de l’ouverture, afin d’éviter toute interférence NE PAS POUSSER CONTRE LE PANNEAU AVANT AVEC avec la base du lave-vaisselle et des divers éléments... - Page 33 Instructions d’installation MISE EN POSITION DU LAVE-VAISSELLE SOUS LE PLAN DE TRAVAIL ÉTAPE 10 • Pousser le lave-vaisselle dans l’armoire. • Pousser sur les bords, avec les mains. Ne pas utiliser un genou contre la porte, car ceci endommage la porte.
-
Page 34: Étape 11 Mise À Niveau Du Lave-Vaisselle
Instructions d’installation MISE À NIVEAU DU LAVE-VAISSELLE ÉTAPE 11 Trou d’accès IMPORTANT • Pour mettre le Le lave-vaisselle doit être de — lave-vaisselle de niveau pour obtenir un bon déplacement de l’égouttoir niveau, régler et du lave-vaisselle. individuellement • Mettre un niveau les pieds de mise sur la porte et sur la Tourner les... - Page 35 Instructions d’installation FIXATION DU LAVE-VAISSELLE À L’ARMOIRE ÉTAPE 12 Le lave-vaisselle doit être fixé au plan de travail ou aux Méthode 1—Fixation du lave-vaisselle au plan de travail en bois côtés de l’armoire. Utiliser la méthode nº 1 quand le plan de travail est en bois.
- Page 36 Instructions d’installation BRANCHEMENT DE L’ALIMENTATION D’EAU ÉTAPE 13 Ecrou de compression Brancher le tuyau d’alimentation d’eau au coude à Bague angle droit. • Glisser l’écrou de compression et ensuite la bague sur l’extrémité du tuyau d’eau. Figure CC Tuyau d’alimentation •...
-
Page 37: Étape 15 Branchement De L'alimentation Électrique
Instructions d’installation BRANCHEMENT DE LISTE DE VÉRIFICATION ÉTAPE 15 ÉTAPE 16 L’ALIMENTATION ÉLECTRIQUE AVANT DE FAIRE LES ESSAIS Ignorer cette étape si le lave-vaisselle est équipé d’un Examiner cette liste après l’installation du lave- cordon d’alimentation. Aller à l’étape 16. vaisselle pour éviter les frais d’intervention qui ne sont pas couverts par la garantie. -
Page 38: Étape 17, Essai Du Lave-Vaisselle Avec De L'eau
Instructions d’installation/Dimensions du panneau sur commande ESSAI DU LAVE- DOCUMENTATION ÉTAPE 17 ÉTAPE 19 VAISSELLE AVEC DE L’EAU • Prendre soin de laisser au consommateur l’enveloppe complète de documentation et d’instructions d’installation. Mettre le circuit sous tension (ou brancher le cordon d’alimentation dans la prise de courant, si installée). - Page 39 NOTE : En exécutant les installations décrites dans ce livret, il faut porter des lunettes de sécurité. Pour un service local Monogram ® dans votre région, appeler le 1.800.444.1845. NOTE : Chez General Electric, nous nous efforçons continuellement d’améliorer les produits. Par conséquent, les matériaux, l’aspect et les caractéristiques sont assujettis à...
Need help?
Do you have a question about the Monogram ZBD6890KII and is the answer not in the manual?
Questions and answers