
Subscribe to Our Youtube Channel
Related Manuals for LEGRAND CHIEF RMF3


Summary of Contents for LEGRAND CHIEF RMF3
- Page 1 I N S T A L L A T I O N I N S T R U C T I O N S RMT3 RMF3 RLT3 RLF3 FIT MEDIUM/LARGE FLAT PANEL MOUNTS Spanish Product Description German Product Description RMF3/RMT3/RLF3/RLT3...
-
Page 2: Important Safety Instructions
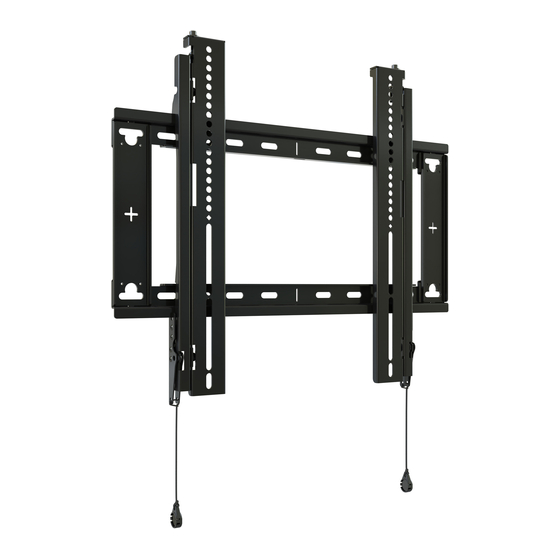
RLF3/RLT3. contingency in connection with the installation or use of this product. The information contained in this document is subject to change without notice or obligation of any kind. Legrand WARNING: Use this mounting system only for its intended makes no representation of warranty, expressed or implied, use as described in these instructions. - Page 3 Installation Instructions RMF3/RMT3/RLF3/RLT3 DIMENSIONS RMF3 LEVEL ADJUST CORD LENGTH TYP. TYP. DIMENSIONS: INCHES [MILLIMETERS]...
- Page 4 RMF3/RMT3/RLF3/RLT3 Installation Instructions DIMENSIONS--continued RMT3 LEVEL ADJUST CORD LENGTH DIMENSIONS: INCHES [MILLIMETERS]...
-
Page 5: Dimensions: Inches
Installation Instructions RMF3/RMT3/RLF3/RLT3 DIMENSIONS--continued RMT3 continued TYP. TYP. DIMENSIONS: INCHES [MILLIMETERS] RLF3 DIMENSIONS: INCHES [MILLIMETERS]... - Page 6 RMF3/RMT3/RLF3/RLT3 Installation Instructions DIMENSIONS--continued RLF3 continued TYP. TYP. DIMENSIONS: INCHES [MILLIMETERS] RLT3 LEVEL ADJUST CORD LENGTH DIMENSIONS: INCHES [MILLIMETERS]...
- Page 7 Installation Instructions RMF3/RMT3/RLF3/RLT3 DIMENSIONS--continued RLT3 continued TYP. TYP. DIMENSIONS: INCHES [MILLIMETERS]...
- Page 8 RMF3/RMT3/RLF3/RLT3 Installation Instructions LEGEND Tighten Fastener Pencil Mark Apretar elemento de fijación Marcar con lápiz Befestigungsteil festziehen Stiftmarkierung Apertar fixador Marcar com lápis Serrare il fissaggio Segno a matita Bevestiging vastdraaien Potloodmerkteken Serrez les fixations Marquage au crayon Loosen Fastener Drill Hole Aflojar elemento de fijación Perforar...
-
Page 9: Tools Required For Installation
Installation Instructions RMF3/RMT3/RLF3/RLT3 TOOLS REQUIRED FOR INSTALLATION Hardware Required - not included (for installation into steel stud walls) 1. Chief brand Toggler Kit; OR 2. Hardware for installation to steel stud wall: • 1/4-20 Toggler Snaptoggle BB (Qty 4) • 1/4-20 x 2-1/2"... -
Page 10: Installation
RMF3/RMT3/RLF3/RLT3 Installation Instructions INSTALLATION Using a level, mark the wall on each stud to attach the mount through the upper mounting slots. (See Figure 2) The RMF3/RMT3/RLF3/RLT3 mounts are designed to be Drill one 7/32" (5.5mm) pilot hole in each stud. mounted to a bare 8"... - Page 11 Installation Instructions RMF3/RMT3/RLF3/RLT3 Steel Stud Wall WARNING: IMPROPER INSTALLATION CAN LEAD TO EQUIPMENT FALLING CAUSING SERIOUS PERSONAL INJURY OR DAMAGE TO EQUIPMENT! The figure below identifies the minimum requirements for installation of display mounts onto a steel stud structure. If the structure or its components do not meet these requirements contact the mount manufacturer for specific instructions before attempting installation.
- Page 12 RMF3/RMT3/RLF3/RLT3 Installation Instructions Identify desired mounting location on wall. Align mounting holes in mount with studs making sure Steel Stud mounting holes are centered on studs. Drywall Mark location of four mounting holes on wall.(See Figure 2) Plastic Cap Drill four 1/2" holes. Hold metal channel on anchor flat alongside plastic straps and slide channel through hole.
- Page 13 Installation Instructions RMF3/RMT3/RLF3/RLT3 Installing to a Concrete Wall Install an anchor (P) into each pilot hole using a hammer, making sure that the anchor is flush with the wall. Determine the center of the TV screen, and where it should be located on the wall.
- Page 14 RMF3/RMT3/RLF3/RLT3 Installation Instructions Select correct screws, nesting spacers (if necessary) and a. Remove display from mount. universal washers (if required) from the hardware bag (A-L) b. Remove interface brackets from display. and attach brackets to back of screen. (See Figure 9) c.
- Page 15 Installation Instructions RMF3/RMT3/RLF3/RLT3 Attaching Screen to Wall Mount NOTE: NEVER place both interface brackets (S and T or U and [Brackets U and V shown] V) to one side of the wall mount center line! (See Figure NOTE: Do NOT allow both interface brackets (S and T or U and V) to be located on same side of wall bracket.
- Page 16 RMF3/RMT3/RLF3/RLT3 Installation Instructions Tilt (RMT3/RLT3 Only) The interface brackets (U and V) allow from -2° to 12° tilt, and (RLT3 shown) can be locked at 0°, 6° and 12°. Loosen the interface bracket knob. Adjust tilt as required. (See Figure 16) The tilt may be locked at 0°, 6°...
- Page 17 Installation Instructions RMF3/RMT3/RLF3/RLT3...
- Page 18 RMF3/RMT3/RLF3/RLT3 Installation Instructions...
- Page 19 RMF3/RMT3/RLF3/RLT3 Installation Instructions...
- Page 20 F +31 (0) 495 580 845 Asia Pacific A Office No. 918 on 9/F, Shatin Galleria 8800-003331 Rev00 18-24 Shan Mei Street 2021 Legrand | AV Fotan, Shatin, Hong Kong www.legrandav.com P 852 2145 4099 12/2021 F 852 2145 4477...
Need help?
Do you have a question about the CHIEF RMF3 and is the answer not in the manual?
Questions and answers