
Related Manuals for Wiznet WizFi360-EVB-Pico


Summary of Contents for Wiznet WizFi360-EVB-Pico
- Page 1 WizFi360-EVB-Pico Getting Started Guide for AWS IoT Core Version 1.0.0 http://www.wiznet.io/ Copyright 2022 WIZnet Co., Ltd. All rights reserved.
-
Page 2: Table Of Contents
Create Resources in AWS IoT ..................... 18 Provision the Device with credentials ................. 19 Build the demo ........................20 10 Run the demo ........................20 11 Debugging ..........................25 12 Troubleshooting ........................29 Copyright 2022 WIZnet Co., Ltd. All rights reserved. -
Page 3: Document Information
1 Document Information 1.1 Revision History (Version, Date, Description of change) Version Date Description of change V1.0.0 2022-06-24 Initial Release Copyright 2022 WIZnet Co., Ltd. All rights reserved. -
Page 4: Overview
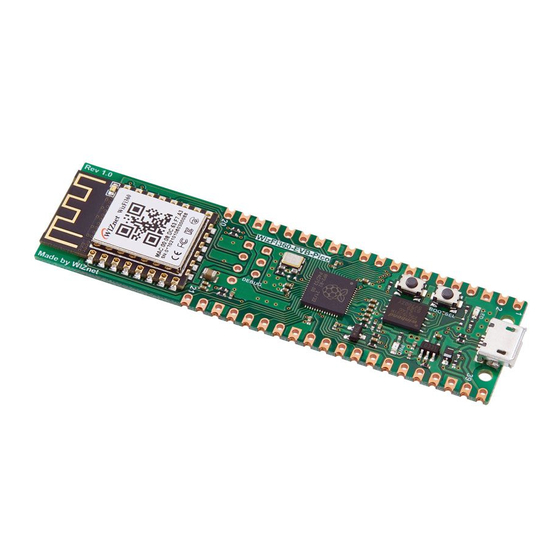
2 Overview The WizFi360-EVB-Pico is a microcontroller evaluation board based on the Raspberry Pi RP2040 microcontroller chip and adds Wi-Fi connectivity using WizFi360. The WizFi360-EVB- Pico has the same role as the Raspberry Pi Pico platform and includes WizFi360, so the Wi-Fi function is basically included. - Page 5 Figure 2. WizFi360-EVB-Pico schematic 3.2 Standard Kit Contents ∙ WizFi360-EVB-Pico : 1EA ∙ 1 x 20 2.54mm pitch pin header : 2EA Figure 3. WizFi360-EVB-Pico package Copyright 2022 WIZnet Co., Ltd. All rights reserved.
-
Page 6: Set Up Your Development Environment
Please refer to the guide in section 4.4 to find instructions for installing toolchain on Linux and MacOS. 1) Install the Toolchain To build you will need to install extra tools below. ∙ ARM GCC compiler Copyright 2022 WIZnet Co., Ltd. All rights reserved. - Page 7 Figure 5. Install ARM GCC compiler During installation you should check the box to register the path to the ARM compiler as an environment variable in the Windows shell when prompted to do so. ② Install CMake Copyright 2022 WIZnet Co., Ltd. All rights reserved.
- Page 8 ③ Install Build Tools for Visual Studio Figure 7. Install Build Tools for Visual Studio When prompted by the Build Tools for Visual Studio installer you need to install the C++ build tools only. ④ Install Python 3.9 Copyright 2022 WIZnet Co., Ltd. All rights reserved.
- Page 9 MAX_PATH length limit when prompted at the end of the Python installation. Figure 8. Install Python ⑤ Install Git When installing Git you should ensure that you change the default editor away from vim. Copyright 2022 WIZnet Co., Ltd. All rights reserved.
- Page 10 Figure 9. Install Git ⑥ Install Visual Studio Code During the installation add Visual Studio Code to the system PATH. Copyright 2022 WIZnet Co., Ltd. All rights reserved.
- Page 11 Figure 10. Install Visual Studio Code 2) Clone the Raspberry Pi Pico SDK and WIZnet example repository using below commands ∙ SDK : https://github.com/raspberrypi/pico-sdk ∙ Example : https://github.com/Wiznet/WizFi360-EVB-Pico-AWS-C // create a project directory D:\>mkdir RP2040 D:\>cd RP2040 // get the SDK D:\RP2040>...
- Page 12 ① Open a new Visual Studio 2019 Developer Command Prompt ② Run the below command to open Visual Studio Code D:> code ③ Opening Visual Studio Code from Developer Command Prompt ④ Open Extensions Copyright 2022 WIZnet Co., Ltd. All rights reserved.
- Page 13 ⑥ Open CMake Tools Extension Settings ⑦ Scroll down and set up some items Add Cmake: Configure Environment Item as PICO_SDK_PATH Add Cmake: Configure Environment Value as D:\RP2040\pico-sdk Add Cmake: Generator as NMake Makefiles Copyright 2022 WIZnet Co., Ltd. All rights reserved.
- Page 14 Figure 13. CMake Tools Extension Settings in Visual Studio Code Figure 14. Add CMake Configure Environment path Copyright 2022 WIZnet Co., Ltd. All rights reserved.
- Page 15 ⑧ Add folder WizFi360-EVB-Pico-AWS-C to Visual Studio Code ⑨ Visual Studio Code will scan for kits ⑩ Select 'Yes' when asked: Would you like to configure project WizFi360-EVB-Pico- AWS-C? ⑪ Select 'Yes' if you like to configure the project upon opening ⑫...
-
Page 16: Set Up Your Hardware
And refer to the links below for instructions how to setup environment and proceed with tests. ∙ Getting Started with AWS IoT SDK Examples ∙ Connect AWS IoT through MQTT 5 Set up your hardware Figure 16. WizFi360-EVB-Pico front Copyright 2022 WIZnet Co., Ltd. All rights reserved. - Page 17 Figure 17. WizFi360-EVB-Pico back Figure 18. WizFi360-EVB-Pico pin-out WizFi360-EVB-Pico pin-out is directly connected to the GPIO of RP2040 as shown in the picture above. It has the same pinout as the Raspberry Pi Pico board. However, GPIO4, GPIO5, GPIO6, GPIO7, GPIO20 are connected to WizFi360 inside the board. These pins enable UART...
-
Page 18: Setup Your Aws Account And Permissions
WizFi360 to use Wi-Fi function. If you are using the Wi-Fi function, these pins cannot be used for any other purpose. The RP2040 GPIO used inside WizFi360-EVB-Pico is as follows. Pin name Description GPIO4 Connected to RXD1 on WizFi360... -
Page 19: Provision The Device With Credentials
You need to enter the root certificate, client certificate and private key that were downloaded earlier. Root certificate uses the RSA 2048 bit key, Amazon Root CA 1, and does not use the public key. Device certificate and key can be set in 'mqtt_certificate.h' in 'WizFi360-EVB-Pico-AWS- C/examples/aws_mqtt_demo/' directory. uint8_t mqtt_root_ca[] = "-----BEGIN CERTIFICATE-----\r\n"... -
Page 20: Build The Demo
② When the build is completed, 'aws_mqtt_demo.uf2' is generated in 'WizFi360-EVB- Pico-AWS-C/build/examples/aws_mqtt_demo/' directory. 10 Run the demo ① While pressing the BOOTSEL button of WizFi360-EVB-Pico power on the board, the USB mass storage 'RPI-RP2' is automatically mounted. Copyright 2022 WIZnet Co., Ltd. All rights reserved. - Page 21 Figure 20. Automatically mounted USB mass storage 'RPI-RP2' ② Drag and drop 'aws_iot_mqtt.uf2' onto the USB mass storage device 'RPI-RP2'. ③ Connect to the serial COM port of WizFi360-EVB-Pico with Tera Term. Figure 21. Connect to the serial COM port of WizFi360-EVB-Pico...
- Page 22 ④ When connecting to the serial COM port of WizFi360-EVB-Pico, use following settings to set up the serial port. Baud rate : 115,200 Data bit : 8 Parity bit : none Stop bit : 1 Flow control : none Figure 22. Set up serial port ⑤...
- Page 23 Figure 23. Publish the message from WizFi360-EVB-Pico Figure 24. Receive the message about subscribed topic from IoT Core Copyright 2022 WIZnet Co., Ltd. All rights reserved.
- Page 24 ⑦ If you publish the message through the test function in AWS IoT Core to the subscribe topic, you can see that the WizFi360-EVB-Pico receive the message about the subscribe topic. Figure 25. Publish the message from IoT Core Copyright 2022 WIZnet Co., Ltd. All rights reserved.
-
Page 25: Debugging
Figure 26. Receive the message about subscribed topic from WizFi360-EVB-Pico 11 Debugging ① Connect to the serial COM port of WizFi360-EVB-Pico with Tera Term to view logs and debugging. Copyright 2022 WIZnet Co., Ltd. All rights reserved. - Page 26 Figure 27. Connect to the serial COM port of WizFi360-EVB-Pico ② When connecting to the serial COM port of WizFi360-EVB-Pico, use following settings to set up the serial port. Baud rate : 115,200 Data bit : 8 Parity bit : none...
- Page 27 Figure 28. Set up serial port ③ If everything works normally, you can see the Wi-Fi- connection log, publishing the message at intervals of 10 seconds and receiving the message about the subscribe topic through logs. Copyright 2022 WIZnet Co., Ltd. All rights reserved.
- Page 28 Figure 29. works normally ④ If there occurs any problem, the error log is printed showing function what the problem has occurred. Copyright 2022 WIZnet Co., Ltd. All rights reserved.
-
Page 29: Troubleshooting
Figure 30. Failed to connect to IoT Core 12 Troubleshooting If you have any questions or problems while using the WizFi360-EVB-Pico examples, please leave them at the link below. ∙ WIZnet Developer Forum ∙ WizFi360-EVB-Pico-C Issues ∙ WizFi360-EVB-Pico-AWS-C Issues Copyright 2022 WIZnet Co., Ltd. All rights reserved.
Need help?
Do you have a question about the WizFi360-EVB-Pico and is the answer not in the manual?
Questions and answers