Viper AS1050R Instructions For Use Manual
Hide thumbs
Also See for AS1050R:
- Quick start manual (356 pages) ,
- Use and maintenance (2 pages) ,
- Quick start manual (358 pages)

Related Manuals for Viper AS1050R


Summary of Contents for Viper AS1050R
- Page 1 AS1050R INSTRUCTION FOR USE Model No.: 50000594 VR41009 Rev. 03 JUNE 2021 Original instructions...
- Page 2 Tillverkaren / Výrobca / Proizvajalec/ Üretici firma: Product / Produkt / Producto, Toode, Produit, Tuote/ Πродукт / Προϊόν / Termék / Proizvod / Prodotto / AS1050R, AS1050R+ Produktas / Produkts / Artikel / Produtos / Produs / Izdelek / Ürün Description / Popis / Beschreibung / Beskrivelse / Descripción / Kirjeldus / La description / Kuvaus / Oписание...
- Page 3 My, Nilfisk Niniejszym oświadczamy z Meie, Nilfisk Käesolevaga kinnitame ja pełną odpowiedzialnością, że wyżej kanname ainuisikulist vastutust, et eespool nimetatud toode on kooskõlas järgmiste wymieniony produkt jest zgodny z następującymi dyrektywami i normami.. direktiivide ja Noi, Nilfisk Prin prezenta declarăm pe Nilfisk déclare sous notre seule responsabilité...
- Page 4 Penrith Cumbria CA11 9BQ UK Hereby declare under our sole responsibility that the Product: FC - Floor Scrubber/Sweeper - Battery Description: 36V DC, IP24 Type: AS1050R, AS1050R+ Is in compliance with the following standards: EN 60335-1:2012+A11:2014+A13:2017 EN 60335-2-72:2012 EN 55014-1:2017...
-
Page 5: Table Of Contents
INSTRUCTION FOR USE ENGLISH TABLE OF CONTENTS INTRODUCTION ..........................2 GUIDE PURPOSE AND CONTENTS ........................3 HOW TO KEEP THIS INSTRUCTION FOR USE .....................3 DECLARATION OF CONFORMITY ........................3 ACCESSORIES AND MAINTENANCE ........................3 CHANGE AND IMPROVEMENT ..........................3 SCOPE OF APPLICATION............................3 MACHINE IDENTIFICATION DATA ........................3 TRANSPORT AND UNPACKING ..........................4 SAFETY .............................. -
Page 6: Guide Purpose And Contents
INSTRUCTION FOR USE ENGLISH NOTE The numbers in brackets refer to the components shown in Machine Description chapter. GUIDE PURPOSE AND CONTENTS The purpose of this instruction for use is to provide the operator with all basic information and technical characteris- tics, operation, machine inactivity, spare parts and safety conditions etc. -
Page 7: Transport And Unpacking
INSTRUCTION FOR USE ENGLISH TRANSPORT AND UNPACKING When the carrier delivers the machine, make sure the packaging and machine are both whole and undamaged. If any damage is observed, inform the carrier of the damage before accepting the goods, to reserve the right to compensation for the damage. -
Page 8: General Safety Instruction
INSTRUCTION FOR USE ENGLISH GENERAL SAFETY INSTRUCTION Specific warnings and cautions to inform about potential damages to people and machine are shown below. DANGER! This machine must be operated by trained and authorized personnel according to guidance of the manual. - Page 9 INSTRUCTION FOR USE ENGLISH Do not bump into shelves or scaffoldings, especially where there is a risk of falling objects. Do not lean liquid containers on the machine, use the relevant can holder. To avoid damaging the floor, do not allow the brush/pad to operate while the machine is stationary. ...
-
Page 10: Machine Description
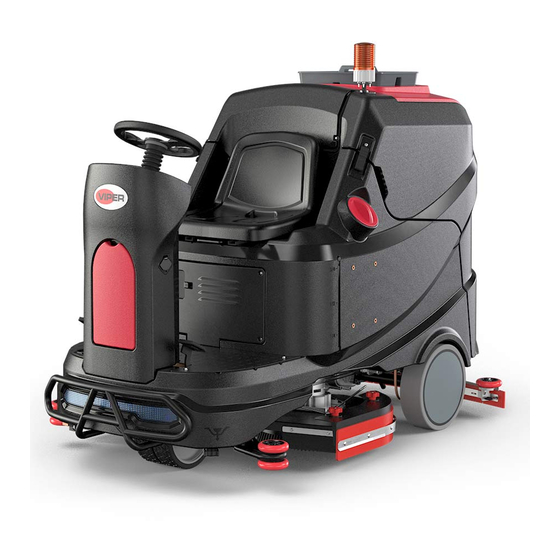
INSTRUCTION FOR USE ENGLISH MACHINE DESCRIPTION MACHINE STRUCTURE *--optional 1. Steering wheel 2. Seat, adjustable (with safety switch) 3. Warning light 4. Utility caddy (*) 5. Recovery tank lid 6. Hook 7. Latch(x2) 8. Recovery tank 9. Filter cover 10. -
Page 11: Control Panel (As Shown)
INSTRUCTION FOR USE ENGLISH CONTROL PANEL (as shown) 47. Multifunction display Items displayed: A) Battery type B) Battery charge level C) Hours worked D) ECO mode E) Vacuum normal mode F) Vacuum silence mode G) Reverse mode H) Extra pressure active I) Detergent solution flow quantity J) Brush work mode K) Vacuum mode... - Page 12 INSTRUCTION FOR USE ENGLISH WORKING MODE DESCRIPTION HOW TO OPERATE DISPLAY DESCRIPTION Normal mode - Key (53) on 1. Hour meter point does not flash. - One button start (51) on 2. The brush arrow does not rotate. - Seat safety switch (2) on 3.
- Page 13 INSTRUCTION FOR USE ENGLISH HOW TO OPERATE DISPLAY DESCRIPTION ECO mode - Key (53) on 1. Water flow at minimum (level 1). - One button start (51) on 2. Pressure at minimum (level 1). - ECO button (55) on 3.
-
Page 14: Technical Parameters
INSTRUCTION FOR USE ENGLISH TECHNICAL PARAMETERS Parameter Type AS1050R Voltage 36 V Rated power 125A/4500W IP protection class IP24 Solution tank capacity 200L / 53 Gal. Recovery tank capacity 200L / 53 Gal. Scrubbing width 980mm / 35.58 Inches... -
Page 15: Wiring Diagram
INSTRUCTION FOR USE ENGLISH WIRING DIAGRAM ... -
Page 16: Operating Guide
INSTRUCTION FOR USE ENGLISH OPERATING GUIDE WARNING! On some points of the machine there are some adhesive plates indicating: - DANGER - WARNING - CAUTION - CONSULTATION While reading this Manual, the operator must pay attention to the symbols shown on the plates. Do not cover these plates for any reason and immediately replace them if damaged. -
Page 17: Brush/Pad-Holder Installation And Removal
INSTRUCTION FOR USE ENGLISH 9. Place the protective cap on each terminal, then connect the battery connector to machine. 10. Assemble the whole recovery tank assembly in the reverse order of disassembly. 11. Carefully lower the recovery tank. Battery type setting (WET/GEL/AGM/DIS/ENE) Access to select battery mode WET/GEL/AGM/DIS/ENE According to the type of batteries (... -
Page 18: Adjusting The Balance Of Side Splashguards
INSTRUCTION FOR USE ENGLISH Proceed as following: INSTALLATION: Insert the Ignition key (53, Figure 3) and turn it to "I". Lift the deck. Place brushes (A, Figure 8) or pad-holders (B, Figure8) under the deck. Use the brush installation stop (D, Figure8) to help find the proper brush/pad holder position. -
Page 19: Filling Solution Tank
INSTRUCTION FOR USE ENGLISH FILLING SOLUTION TANK Open the water inlet cover (A, Figure 11). Fill with water or solution suitable for work performance through the water inlet with filter. The solution temperature must not exceed +104F (+40°C). Do not overfill the tank, refer to water level indicator (D) for the water volume. -
Page 20: Machine Operation (Scrubbing And Drying)
INSTRUCTION FOR USE ENGLISH Sit on the seat (K Figure13), insert the Ignition key (J Figure13) and turn it to “I”. Check batteries status from display screen. If necessary to charge the batteries (see the procedure in Maintenance chapter). Drive the machine to the working area. -
Page 21: Tank Emptying
INSTRUCTION FOR USE ENGLISH Figure 14 TANK EMPTYING Recovery water tank emptying When the Multifunction display (47, Figure 3) show ERROR24 and the recovery tank full indicator (48, Figure3) is turned on. It indicates the recovery tank (C, Figure15) is full, the vacuum motor cannot longer dry the floor. -
Page 22: First Period Of Use
INSTRUCTION FOR USE ENGLISH FIRST PERIOD OF USE After the first 8 hours, check the machine fastening and connecting parts for proper tightening and check the visible parts for wear and leakage. MAINTENANCE WARNING! Maintenance procedures must be performed after the machine is turned off and the battery charger cable is disconnected. -
Page 23: Battery Charging
INSTRUCTION FOR USE ENGLISH BATTERY CHARGING NOTE Charge the batteries when the battery is low. CAUTION! Keeping the batteries charged make their life last longer. CAUTION! When the batteries are discharged, charge them as soon as possible, as that condition makes their life shorter. -
Page 24: Solution Filter Cleaning
INSTRUCTION FOR USE ENGLISH SOLUTION FILTER CLEANING Drive the machine a level section of floor. Ensure that the machine is off and the Ignition key (53, Figure 3) has been removed. Empty the solution tank or turn off the tap (24, Figure 1). Remove the filter cover (22, Figure 1), then remove the filter strainer. -
Page 25: Tank And Debris Collection Box Cleaning, And Cover Gasket Check
INSTRUCTION FOR USE ENGLISH Remove the tie rod (G), disengage the fasteners (M) and remove the retaining strip (K), then replace the rear blade (D). Assemble the blade in the reverse order of disassembly. Unscrew the knobs (I) and remove the retaining strip (L), then replace the front blade (C). Assemble the blade in the reverse order of disassembly. -
Page 26: Troubleshooting
INSTRUCTION FOR USE ENGLISH TROUBLESHOOTING Trouble Probable causes Remedy The battery connector is disconnected. Connect the battery connector. The motors do not work, error The batteries are completely discharged. Charge the batteries. code on display Error code see the table. Restart the machine. -
Page 27: Scrapping
INSTRUCTION FOR USE ENGLISH Error 26 Brake Err Brake short circuit or overload Error 27 Water Pump Err Water pump short circuit or overload Error 28 SQU Overload Squeegee actuator motor short circuit or overload Error 29 Beeper Overload Beeper short circuit or overload Error 30 E-CONT Overload... - Page 28 Company information: www.vipercleaning.eu info-eu@vipercleaning.com ...
Need help?
Do you have a question about the AS1050R and is the answer not in the manual?
Questions and answers