Table of Contents
Advertisement
Quick Links
Assembly Instructions & User's Manual
for
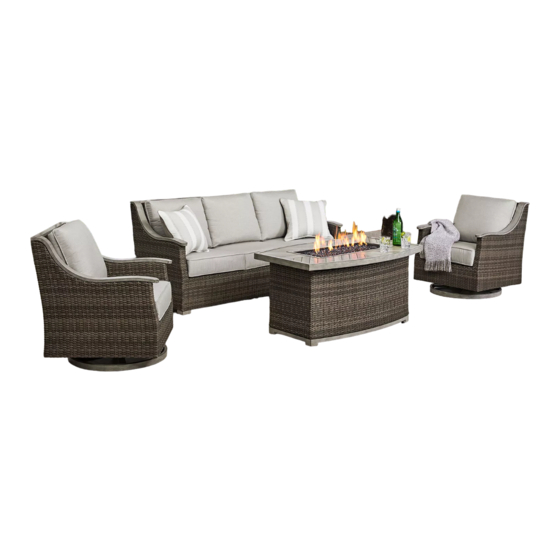
Member's Mark Oakwood 4pc Fire Pit Set
Item Number:
Model Number: FRM10390SST
Customer Assistance
: 1-888-690-9800
(spare/replacement parts)
or Email: cs@sunvillahome.com
THIS ASSEMBLY MANUAL CONTAINS INPORTANT SAFETY INFORMATION.
PLEASE READ AND KEEP FOR FUTURE REFERENCE.
1 |
P a g e
Advertisement
Table of Contents

Related Manuals for Member's Mark FRM10390SST


Summary of Contents for Member's Mark FRM10390SST
- Page 1 Assembly Instructions & User’s Manual Member’s Mark Oakwood 4pc Fire Pit Set Item Number: Model Number: FRM10390SST Customer Assistance : 1-888-690-9800 (spare/replacement parts) or Email: cs@sunvillahome.com THIS ASSEMBLY MANUAL CONTAINS INPORTANT SAFETY INFORMATION. PLEASE READ AND KEEP FOR FUTURE REFERENCE.
-
Page 2: Table Of Contents
Table of Contents Warning & Danger ........................3 ..................................4 Quality Statement ............................. 7 Important Safety Information ........................ 7 Before Assembly ............................7 Care & Use ..............................7 Package Contents ............................ 8 Product Information ..........................9 Components .............................. 9 Hardware ..............................9 Step 1 –... -
Page 3: Warning & Danger
Warning & Danger Model# FWM10247 Fire Pit Installer: Leave this manual with appliance. Consumer: Retain this manual for future reference. This appliance is a Decorative Gas DANGER Appliance for OUTDOOR USE ONLY and MUST NOT be used for cooking. FIRE OR EXPLOSION HAZARD If you smell gas: WARNING If the information in... - Page 4 WARNING WARNING Improper installation, adjustment, HOT! DO NOT TOUCH SEVERE alteration, service, or maintenance BURNS MAY RESULT. CLOTHING can cause injury or property IGNITION MAY RESULT. damage. Read the installation and Glass and other surfaces are hot maintenance instructions during operation and cool-down thoroughly before installing or ●...
- Page 5 A. Design and Installation Considerations WARNING Place the Fire Pit on a flat and stable surface in an Do NOT use this appliance if any part of it has outdoor location adjacent to the gas supply line or been under water. LP gas supply cylinder.
- Page 6 WARNINGS Installation and repair should be done by a qualified service person. The appliance should be inspected before use and at least annually by a qualified service person. More frequent cleaning may be required as necessary. It is imperative that the control compartment, burners and circulating air passageways of the appliance are kept clean. *Do not use this fire pit for cooking.
-
Page 7: Quality Statement
Quality Statement Important Safety Information • Please read all instructions carefully before assembling this product. • Where applicable, and for your safety, assembly by an adult is strongly recommended. • Use only vendor-supplied hardware to assemble this item. Using unauthorized hardware could jeopardize the structural integrity of the item. -
Page 8: Package Contents
Package Contents Component Description Quantity Component Description Quantity Fire Pit Top Chair & Sofa Back Cushion Fire Pit Base Sofa Frame Furniture Cover for Fire Pit Glass Beads Furniture Cover for Chair Chair Frame Furniture Cover for Sofa Chair & Sofa Seat Cushion WARNING: Failure to position the parts in accordance with these diagrams or failure to use only parts specifically approved with this appliance may result in property... -
Page 9: Product Information
Product Information Dimensions: Fire Pit: 33.07”x51.96”x 25” (84cm x 132cm x 63.5cm) Chair: 39.33”x33.26”x35.23” (74.5cm x 84.5cm x 89.5cm) Sofa: 77.55”x33.26”x35.23” (197cm x 84.5cm x 89.5cm) Weight Capacity: Chair: Supports up to 250 lbs. (113.4kg.) Sofa: 250lbs (113.4kg.) per each seat Components Fire Pit Top Fire Pit Base... -
Page 10: Step 1 - Step 11
Step 1 – Step 11 Step 1 Step 2 Step 3 Step 4 Warning: Do not block Pilot Housing Screen with glass Do not cover the unit with lid or furniture cover while beads. it's hot. If necessary, you can adjust the feet to level the table. Need Assistance? Visit us at: samsclub.com/membersmarkhelp 10 | P a g e... - Page 11 Step 5 Note: Clamp the hose when not in use. Step 6 Step 7 Please recycle old battery properly as hazardous waste. Step 8 Turn the tank valve to release gas. Push and hold ignition button to ignite flame. Adjust control knob to desired flame once flame is lit. Need Assistance? Visit us at: samsclub.com/membersmarkhelp 11 | P a g e...
- Page 12 Step 9 Shut the tank valve and adjust control knob to extinguish flame when not in use. Step 10 Place lid when unit cools down completely. Step 11 When furniture is not in use, put covers on them to prevent dust. Need Assistance? Visit us at: samsclub.com/membersmarkhelp 12 | P a g e...
-
Page 13: Gas Hookup And Information
Gas Hookup and Information A. Fuel Note: A listed (and Common wealth of Massachusetts approved) 3/8 in. T-handle manual shut-off valve and Before making gas connections, ensure the appliance flexible gas connector are connected to the 3/8 in. being installed is compatible with the available gas type. Control valve inlet. - Page 14 FOR LIQUID PROPANE GAS UNITS *Do not attempt to disconnect the gas regulator or any gas fitting while your fire pit is in operation. *A dented or rusty liquid propane cylinder may be hazardous and should be checked by your gas supplier prior to use.
- Page 15 Note: Checking for leaks ● Illustrations reflect typical installations and are FOR DESIGN PURPOSES ONLY. 1. Make 2-3oz of leak detection solution by mixing one part liquid ● Illustrations / diagrams are not drawn to scale. dishwashing soap with three parts water. Actual installation may vary due to Make sure control knobs are in the “...
-
Page 16: Troubleshooting
Troubleshooting Problem Possible Cause Prevention / Solution No LP in tank. Check the LP (propane) tank. You may be out of gas. Or check Natural Gas valve at main. Fire won’t light Plugged burner orifice. Check the burner orifice for stoppage. Remove stoppage. -
Page 17: Storage Instructions
Storage Instructions 1. Carefully place all components into shipping box and/or provided container tape it shut. 2. When not in use, please store your item in a cool, dry place away from sunlight. 3. Exposing your item to excessive heat or humidity may damage your item. 4. -
Page 18: Warranty Information
Warranty Information This product component has a 3 years guarantee against defects in material and/or workmanship. If you have any questions regarding the warranty or spare / replacement parts, please call our toll-free number 1-888-690-9800 or email us at cs@sunvillahome.com NOTE: Please consider recycling all applicable packaging material.
Need help?
Do you have a question about the FRM10390SST and is the answer not in the manual?
Questions and answers