HighPoint RocketRAID 600L User Manual
Sata 6gb/s pci-express 2.0 raid host adapters
Hide thumbs
Also See for RocketRAID 600L:
- User manual (38 pages) ,
- Quick installation manual (9 pages) ,
- Quick installation manual (8 pages)

Related Manuals for HighPoint RocketRAID 600L


Summary of Contents for HighPoint RocketRAID 600L
- Page 1 RocketRAID 600L/600LS SATA 6Gb/s PCI-Express 2.0 RAID Host Adapters User’s Guide Revision: 1.20 Dec. 20, 2015 HighPoint Technologies, Inc.
-
Page 2: Table Of Contents
2 Physical Specifications ..................5 3 Kit Contents ......................6 4 Hardware Description and Installation ............... 6 4.1 RocketRAID 600L/600LS Host Adapter board layout ......6 4.2 Connector and Jumper Description ............7 4.3 Installing the RocketRAID 600L/600LS Host Adapter ......7 4.4 Verifying Installation ................ -
Page 3: Highpoint Rocketraid 600L/600Ls Series
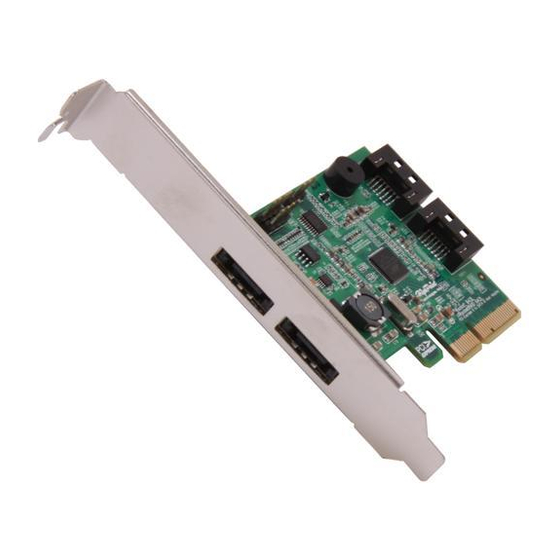
SATA 3Gb/s devices, PCI-Express 1.0 and 2.0 motherboards, and are compliant with major PC operating systems including Windows 8, and 7. Each RocketRAID 600L/600LS Series HBA’s directly supports up to 4 SATA devices, and up to 20 when used in conjunction with port multiplier storage devices. -
Page 4: Features And Specifications
⚫ Directly supports 4 SATA devices / Up to 20 with port multiplier capable enclosure ⚫ Backwards compatible with HighPoint SATA RAID HBA’s ⚫ Low Profile (RocketRAID 640L, RocketRAID 642L and RocketRAID 644LS) / Full Height (RocketRAID 644L) Monitor, Alerts and LED Indicators ⚫... -
Page 5: Physical Specifications
Operating System Support ⚫ Windows Server 2012, 2008, 2003 ⚫ Windows 8, 7, Vista ⚫ Major Linux Distributions ⚫ FreeBSD ⚫ Mac OS X 2 Physical Specifications Dimensions: RocketRAID 640L: 79mm x 65mm x 1.5mm (3.12” x 2.56” x 0.06”) RocketRAID 642L: 79mm x 67mm x 1.5mm (3.12”... -
Page 6: Kit Contents
⚫ Quick Installation Guide ⚫ Low Profile Bracket (RocketRAID 644LS, 642L and 640L) ⚫ Two SATA 6Gb/s cables (RocketRAID 642L only), four SATA 6Gb/s cables (RocketRAID 640L only) 4 Hardware Description and Installation 4.1 RocketRAID 600L/600LS Host Adapter board layout... -
Page 7: Connector And Jumper Description
(or 3.0, x16) slot. Remove the PCI-E slot cover. Gently insert the RocketRAID 600L/600LS HBA into the PCI-E slot, and secure the bracket to the system chassis. After installing the adapter, attach the hard disks or backplane enclosure to the host adapter using the appropriate cables. -
Page 8: Verifying Installation
600L/600LS adapter’s BIOS Utility. 5. Using the RocketRAID 600L Series HBA 5.1 RocketRAID 600L HBA BIOS mode The RocketRAID 600L HBA has two BIOS modes: ⚫ Bootable BIOS: This is the default BIOS mode, and is required in order to boot from a drive or array hosted by the HBA. - Page 9 BIOS, please submit a support inquiry using our Online Web Support Portal. Support representatives will provide other methods to update the BIOS: http://www.highpoint-tech.com/websupport To get the Quick BIOS file associated with your card, please visit the product download page: http://www.highpoint-tech.com/USA_new/series_rr600-do wnload.htm...
-
Page 10: Rocketraid 600L/600Ls Bios Setting Utility
Press “Ctrl+H” key combination to access the RocketRAID 600L/600LS adapter’s BIOS Utility. 5.3.1 BIOS Settings Overview The RocketRAID 600L/600LS controller BIOS utility is an interface that provides management commands and controller related settings. Note: The following screenshots depict the RocketRAID 642L BIOS utility. -
Page 11: Using The Bios Utility
5.3.2 Using the BIOS Utility The following keys are utilized by the RocketRAID 600L/600LS BIOS utility: Arrow keys – Use these to move between different menu items. Enter – Open the selected toolbar command/execute the selected command. Esc – Move back to the previous menu, cancel the selected operation, or exit the BIOS Utility. -
Page 12: Creating Raid Arrays
Settings: This command opens the settings menu (To selecting the boot disk/array, staggered drive spin up etc.) View: This command is used to view hard disk and RAID information. Initialize: This command is used to prepare disks for use with RAID arrays. - Page 13 Create Arrays: Select Create from the toolbar and press Enter key. Use the arrow keys to select the RAID level and press Enter key. Use the arrow keys to highlight the Array Name option and press Enter key. The array name dialogue box will appear. Use the keyboard to input a new Array Name, and press the Enter key.
- Page 14 Highlight the target disks that you want to use, and press Enter key to select them. A numeral will be displayed before each selected disk. This number designates disk order. After all of the disks have been selected and press the ESC key to return to the Create Menu.
- Page 15 Sector Size – Also known as “Variable Sector Size”. Use this option if you are using an older 32-bit Windows operating system. This allows older operating systems to support volumes over 2TB in size. Do not use if the operating system already supports large volumes (such as GPT).
-
Page 16: Delete Arrays
5.3.5 Delete Arrays Highlight the Delete command from the toolbar, and press Enter key. The BIOS utility will display a list of available RAID arrays. Select the array you wish to delete, and press the Enter key. The utility will display a warning message. Press Y (yes) to delete the array, or select N (no) to cancel. -
Page 17: Settings
5.3.7 Settings To access the Settings menu, highlight the Settings command from the toolbar, and press Enter key. There are Select Boot Device and Parameter Setting options in the menu. Select Boot Device: Select which disk or array will act as the boot disk, if the motherboard BIOS instructs the card to act as the boot device. -
Page 18: Rocketraid 600L/600Ls Driver Installation
6 RocketRAID 600L/600LS Driver Installation 6.1 Driver installation - Microsoft Windows Installing the driver for an existing Windows operating system Install the RocketRAID 600L/600LS host adapter into the PC, then boot up the Windows operating system. Windows will detect the RocketRAID 600L/600LS HBA and automatically search for the driver. - Page 19 Device Manager, and listed under “Storage Controllers”. Installing the driver during a fresh Windows OS installation Please prepare a USB flash drive with the RocketRAID 600L Windows driver. The driver can be download from the HighPoint Website: http://highpoint-tech.com/USA_new/series_rr600-download.htm Boot from the Windows Installation DVD.
- Page 20 Select x32 or x64 according with your windows OS such as: \RR64xL\Windows\x64 Follow the Installation Wizard’s prompts to continue the installation process. Windows should display the following entry after locating the driver. Click “Next” to install the RocketRAID 600L/600LS driver.
-
Page 21: Driver Installation -Linux And Freebsd
6.2 Driver installation -Linux and FreeBSD Please refer to the Driver Installation Guide or README file included with the driver packages for more information. Linux/FreeBSD driver packages can be download from HighPoint Website. http://highpoint-tech.com/USA_new/series_rr600-download.htm 7 HighPoint Web RAID Management Software The HighPoint RAID Management Software (WebGUI) provides RAID configuration and management features. -
Page 22: Installing / Uninstalling The Web Raid Management Software - Linux/Freebsd
If you encounter any problem while utilizing RocketRAID series host adapters, or have any questions about this or any other HighPoint Technologies, Inc. products, feel free to contact our Customer Support Department.
Need help?
Do you have a question about the RocketRAID 600L and is the answer not in the manual?
Questions and answers