Table of Contents
Advertisement
Quick Links
Advertisement
Table of Contents

Related Manuals for Dahua MP06


Summary of Contents for Dahua MP06
- Page 1 Mobile Intercom User’s Manual Version 1.0.0...
-
Page 2: Important Safeguard And Warning
Welcome Thank you for purchasing our device! This user’s manual will help you become familiar with our device in a very short time. Before installation and operation, please read the following safeguard and warning carefully! Important Safeguard and Warning 1.Electrical safety All installation and operation here should conform to your local electrical safety codes. -
Page 3: Product Introduction
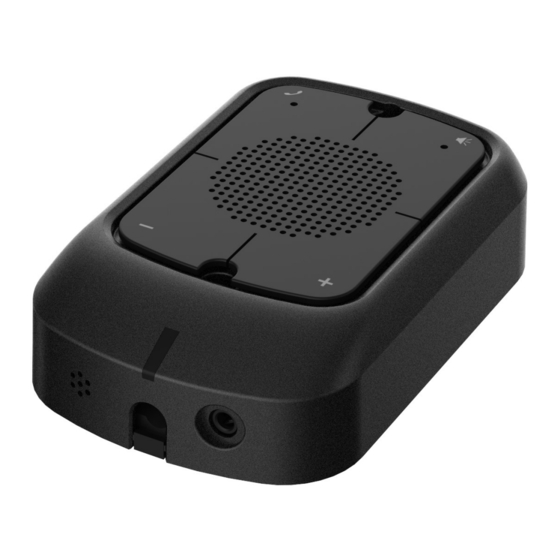
1 Product Introduction Note: All the installation and operations here should conform to your local electric safety rules. 1.1 Overview Mobile Intercom works with DVR/NVR. It is suitable to realize the full duplex bidirectional talk between the driver and the surveillance center. 1.2 Appearance The product is shown as below. - Page 4 Figure 1-2 1.4 Features Neat and compact body, easy to move. Click button to trigger DVR/NVR to start bidirectional talk with the platform. Support amplifier function to drive the loudspeaker on the vehicle. Standard aviation port, connection and installation are easy and reliable.
- Page 5 2 Installation and Connection 2.1 Installation 2.1.1 Bracket Installation Refer to Figure 2-1 to install the bracket. Dig holes on the vehicle according to the installation map (1 in Figure 2-1). Insert the expansion bolt on the hole. Use screws (4 in Figure 2-1) to secure the bracket (3 in Figure 2-1) on the vehicle. Turn the intercom (5 in Figure 2-1) to fix it on the bracket (3 in Figure 2-1).
- Page 6 Figure 2-2 2.2 Connection The mobile intercom and the DVR/NVR connection have two modes. Full duplex bidirectional talk connection cable. See Figure 2-3. Figure 2-3...
-
Page 7: Port Definition
Full duplex bidirectional talk (+vehicle loudspeaker output)cable connection is shown as below. See Figure 2-4. Figure 2-4 2.3 Port definition Socket Type Socket Image Pin Definition 1. NC 4-pin 2. GND aviation female 3. Audio Input AUDIO_IN port 4. NC 1. - Page 8 3 Functions 3.1 Buttons Refer to Figure 3-1 for buttons information. Figure 3-1 Button Introduction Press the button to call the platform, the indicator light is on. Alarm /call platform Press the button again, cancel the alarm/call the platform. Press the button, the indicator light is on. Now it can speak via the device MIC and output to the peripheral loudspeaker.
- Page 9 Refer to Figure 2-4, press the Microphone button, the microphone indicator light is on. Now the peripheral microphone audio is from the local MIC. If the microphone indicator light is off, the audio is from the A/V OUT port of the DVR/NVR. 3.4 Peripheral MIC Standard 3.5mm audio port.
-
Page 10: Specifications
4 Specifications Parameters Name Details Working Mode Full duplex Operation Mode Button Audio 1-channel audio input, 1-channel loudspeaker Function output Pickup Range 90cm Indicator Light Voltage DC 12V Power ≤1.5W Peripheral Loudspeaker Max Power Working -30℃~+70℃ Temperature General Working 0%~90% Humidity Pressure 86kPa~106kPa...
Need help?
Do you have a question about the MP06 and is the answer not in the manual?
Questions and answers