Mamiya M645 Super User Manual
Mamiya m645 super: user guide
Hide thumbs
Also See for M645 Super:
- Service instructions manual (63 pages) ,
- Instructions manual (33 pages) ,
- Instructions manual (7 pages)
Table of Contents
Advertisement
Advertisement
Table of Contents

Related Manuals for Mamiya M645 Super


Summary of Contents for Mamiya M645 Super
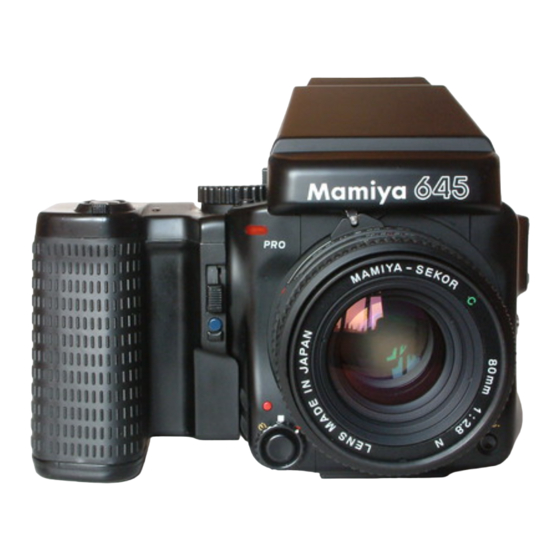
- Page 2 Thank you very much for your purchase of the M645 Super. The Mamiya M645 Super is the latest 6 x 4.5cm medium format SLR. This camera has been developed through Mamiya’s expertise in the most advanced technologies and offers the quality of a large negative as well as the maneuverability and operating convenience normally found only in smaller cameras.
- Page 3 Special Features o f Mamiya M645 Super ... 2 Names and Function of Parts ... 5 Atlaching and Removing Lenses ... 8 Attaching and Removing Roll Film Holders ... 9 Attaching and Removing Finders ... 10 Attaching and Removing the Wind-up Crank ... 11 Inserting Battery and Battery Check ...
- Page 4 For beautiful color enlargements, the 6 x 4.5cm is the ideal format. Versatile, Light-Weight Body: The M645 Super is a compact, light-weight, all-round camera designed to handle as easily and speedily as a 35mm SLR. Its size and weight are well suited for action photo- graphers.
- Page 5 These accessories include hand grips for conve- nient, easy handling. auto extension rings for easy close- ups and copying, auto bellows, and infrared cordless remote control to satisfy all photographic requirements. Please refer to the M645 Super system chart for a com- plete listing.
- Page 6 Hot-shoe Hot shoe type electronic flashes can be mounted. Multiple exposure operation A simple operation of the Multiple Exposure. Lever allows you to take as many multiple exposures as you wish, thereby making it possible lo explore new photo- graphic situations. Mirror lock-up system The mirror lock-up feature enables manual raising of the mirror before the exposure is made to minimize...
- Page 7 Focusing Screen N Aperture Ring Couping Pin This pin is fitted into the Expos Meter Coupler of the lens, to transmit the aperture data to the AE Prism Finder. Alignment Dot/Battery Check Lamp Shutter Release Selector A white square is used d normal photography.
- Page 8 Finder Coupling Panel (Front) Finder Coupling Panel (Rear) Electric Contact for Film Holder This contact receives film sen- sitivity data from the film holder. Film Holder Mount Film Holder Coupling Pin Guide Film Transport Gear Film Holder Mounting Bracket speed and switches the opera- tion mode from manual to AE photography.
- Page 9 This ring adjusts t effect of the aperature setting g on the lens, set this lever to “MAN- UAL” and you can observe the effect through the viewfinder. *Normally use your camera in “AUTO” position including AE photography. coin. Distance Scale The camera to subject distance can be set or confirmed with this scale.
- Page 10 Removing the Front Body Cap: Turn the Front Body Cap in the direc- tion of the arrow, while pushing the Lens Release Button @ toward the arrow. *The Upper and Rear Body Protective Covers can be readily removed. Attaching the Lens: Align Lens Alignment Dot @ with the Camera Alignment Dot 0.
- Page 11 Attaching the Roll Film Holder: While holding the Rubberized Finger Rest @ on both sides of the holder, position the Bottom Coupler of the holder @ properly to the Holder Mounting Bracket @ of the body. Press the upper part of the holder together with the body until clicks.
- Page 12 Attaching the Finder Insert the front finder mounting latch @ into the body side slot @ as shown by the arrows, and press the finder down until the rear hooks latch firmly. Removing the Finder: Hold the Finder Lock Release Button ( 0 ) in while pushing down on the Button ( ,l...
- Page 13 Removing the Crank: Push the Wind-up Crank Lock Lever @ in the direction of the arrow, pull out the crank to remove. Attaching the Crank: Pull the Lock Lever @j in the direction of the arrow while pressing the crank against the camera body.
- Page 14 The M645 Super uses one 6V silver- oxide battery (4SR44) or 6V alkaline- manganese battery (4LR44). Pull the Battery Chamber Cover Latch (at the bottom of the camera body) in the di- rection of the arrow, and the Chamber Cover can be removed.
- Page 15 Caution: 1. Carefully wipe the contacts of the battery before inserting it into the chamber. Failure to do this could result in poor electrical contact and conse- quent erratic functioning of the camera. 2. When the camera is not used for a long period of time, remove the battery and store it in a cool, dry place.
- Page 16 Loading the Film While pushing the Back Cover Lock Release Button @ downward, press the Back Cover Opening Button @I>, and the Back Cover will open. While squeezing in on both sides of the Release Latch 8, pull the Roll Film Insert out of the camera body.
- Page 17 In the same manner, insert a roll of film in the upper compartment. At that time, check that the film leader paper is set as shown in the photo above. (The leader paper inside is facing outward on the pressure plate. Note that the film direction is wrong if the leader paper is facing inward.) Pull out some of the leader paper.
- Page 18 Insertion of the Roll Film Insert Insert the loaded Roll Film Insert straight into the holder as shown in the photo above. Be sure to check that the Roll Film Insert has been completely set before closing the Back Cover. Memo Cllp The Memo Clip on the Back Cover is used to hold the box top of the film in...
- Page 19 There are two methods for advanc- ing film to the first frame. In either case, when loading the film, always align the film with its start mark. Film Advancing after the Roll Film Holder is mounted onto the Body: Make sure that the Multiple Exposure Lever @ is aligned with a white square dot.
- Page 20 your desired shutter speed with Align index 8. the white alignment marks, *In other than the 0 and 0 dial will rotate freely, and each shut- ter speed display will stop at the click point. Color Coding The yellow 4 and 2 represent full seconds.
- Page 21 The outer ground glass ring (which encircles the microprism collar) can be also used for focusing. *As an accessory, Mamiya offers Diopter Correction Lenses which can be attached to the viewfinders. Near and farsighted persons will find these accessories useful for obtaining accurate focus.
- Page 22 Set the desired f/stop on the Aperture Ring @ by aligning the f/number with the red reference dot @. (The Aperture Ring has a click stop for each f/stop. In-between clicks can also be used.) AM (Auto/Manual) Lever 1. In normal photography, set AM Lever so that character “A”...
- Page 23 1. The Shutter Release Button @ is a 2-step type. The release pressure will charge halfway through the cycle. The first step light up the metering related display. The second step is the electromagnetic shutter release position. (The first position operates only when the AE Prism Finder N is used.) If the film is not completely advanced, the Dark Slide is not...
- Page 24 Eye-level Operation No matter how carefully one focuses the camera, if there is camera move- ment during the instant that the shutter is released, sharp pictures are unlikely. To eliminate camera movement, care must be taken regarding the method of holding the camera and releasing the shutter.
- Page 25 1. Turn the Wind-up Crank until it stops (one turn), and the camera is ready for the next exposure. 2. After the fixed number of exposures has been taken (15 for 120 film, 30 for 220 film), the Shutter Release Button automatically locks, and the Wind-up Crank becomes free.
- Page 26 Depth-of-field refers to the total area (foreground and background) which will appear in sharp focus. The area of sharpness (depth-of-field) depends upon the distance the lens is focused at, the f/stop (or aperture) being used, and the focal length of the lens. The area that will appear sharp can be determined as follows: 1.
- Page 28 A shoe-mount flash can be attached to the camera’s Hot-shoe or the Hot-shoe of the Left Hand Grip. *The Mamiya M645 Super has an (1) When using an electronic flash, plug the synchronization cord into the sync terminal and set the Shut- ter Speed Dial to 1/60 sec.
- Page 29 When the Multiple Exposure Lever is aligned with “MULTI”, the double- exposure prevention mechanism is disengaged, so that the shutter can be cocked (and even with the Wind-up Crank turned) without moving the film, making multiple exposures possible on tile same frame. (When making multiple exposures, the exposure counter will not advance., *Remember to return the lever to the...
- Page 30 To take time exposures, set the Shutter Speed Dial to "B" and use a cable release with a lock provision. Inserting an optional Cable Release Adapter into the Auxiliary Release Contact of camera body, allows a cable release to be used.
- Page 31 Finally, attach the camera to the 3/8" tripod. When attached to the accessory Revolving Tripod Adapter, the Mamiya M645 Super can be instantly rotated to change from vertical to horizontal format, or vice versa. In order to have the capability of...
- Page 32 1. The Shutter Release Button will not Move. Check that the Shutter Release Selector is not in the locked position (Red dot). Check that the Wind-up Crank has been wound until it stops. Check that the Battery Check Lamp will light. (If not, replace the battery.) Check that the Dark Slide of the Roll Film Holder has been removed.
- Page 33 This is especially important before a photo- graphic assignment. (Check the battery, flash synchroniza- tion, mirror and shutter movement, film wind, diaphragm automation and so on.) If the camera is malfunctioning, take it to the nearest authorized Mamiya Service Center for repairs.
- Page 34 Daylight loading interchangeable film backs with film speed dial available for each film type. Standard lenses Mamiya-Sekor C 80mm f/2.8N (Multicoated) Mamiya-Sekor C 80mm f/1 .9 (Multicoated) Lens mount M645 bayonet mount (applicable to all M645 lenses) Shutter Moving coil, quartz-controlled focal-plane shutter Shutter speed (Electronic) B.4-1/1000 sec.
- Page 35 Field of view Film Transport Single turn winding by Wind-up Crank. Variable crank start position (6 positions). Power Drive Progressive type, automatic reset. Exposure counter The counter for 120 and 220 film will be automatic. Multiple exposure Available with Multiple Exposure Lever. Depth-of-field Scale provided on lens Depth-of-field Auxiliary release...
Need help?
Do you have a question about the M645 Super and is the answer not in the manual?
Questions and answers