Table of Contents
Advertisement
Quick Links
Oasis
READ AND SAVE THESE INSTRUCTIONS
USER
®
SCC P/N
MANUAL
20-14028
MODEL B3924RH REFRIGERATED/HEATED SIDE-BY-SIDE COMBO OEO* WALL CASE
*Online Easy Ordering
888 E. Porter Road ∙ Muskegon, MI 49441 Phone: 231.798.8888 Fax: 231.798.4960 www.structuralconcepts.com
REV C DATE: 08/11/2022
USER MANUALS\21-14028_PUBLIX_OASIS_USER MANUAL_B3924RH_REF-HTD_SELF-CONT_SIDE-BY-SIDE_CASE
Advertisement
Table of Contents
Troubleshooting

Related Manuals for Structural Concepts Oasis B3924RH


Summary of Contents for Structural Concepts Oasis B3924RH
- Page 1 Oasis READ AND SAVE THESE INSTRUCTIONS USER ® SCC P/N MANUAL 20-14028 MODEL B3924RH REFRIGERATED/HEATED SIDE-BY-SIDE COMBO OEO* WALL CASE *Online Easy Ordering 888 E. Porter Road ∙ Muskegon, MI 49441 Phone: 231.798.8888 Fax: 231.798.4960 www.structuralconcepts.com REV C DATE: 08/11/2022 USER MANUALS\21-14028_PUBLIX_OASIS_USER MANUAL_B3924RH_REF-HTD_SELF-CONT_SIDE-BY-SIDE_CASE...
-
Page 2: Table Of Contents
TABLE OF CONTENTS / MODELS INCLUDED IN MANUAL TABLE OF CONTENTS / MODELS INCLUDED IN MANUAL ……………………………………………. OVERVIEW / TYPE / COMPLIANCE / WARNINGS / PRECAUTIONS / WIRING / PLUGS ….…..….. CASE REMOVAL FROM SKID ………………………………………..………………………………………. INSTALLATION: POSITIONING AND ALIGNING CASE / ADJUSTING LEVELERS ……..…………… OVERVIEW: REFRIGERATED AND HEATED SECTIONS / THERMOMETERS ……………..………... -
Page 3: Overview / Type / Compliance / Warnings / Precautions / Wiring / Plugs - Page 1 Of 2
OVERVIEW / TYPE / COMPLIANCE / WARNINGS / PRECAUTIONS / WIRING / PLUGS - PAGE 1 of 2 OVERVIEW For Type 1 Conditions (most cases): ambient conditions are to be at 55% maximum humidity and This Oasis® self-service combo case merchandises maximum temperatures of 75 °F (24 °C). - Page 4 TYPE, COMPLIANCE and WARNINGS. This disclosure statement has been reviewed and WIRING DIAGRAM approved by Structural Concepts and Structural Concepts attests, under penalty of perjury, that these Each case has its own wiring diagram folded and in its statements are true and accurate.
-
Page 5: Case Removal From Skid
CASE REMOVAL FROM SKID 1. Removing Case Shipping Brackets That Are Attached To Skid Remove screws holding case shipping brackets to skid. Remove case shipping brackets from skid. See illustrations below. Note: Shipping brackets will vary in size, shape, material and location depending upon case type and model. -
Page 6: Installation: Positioning And Aligning Case / Adjusting Levelers
INSTALLATION: POSITIONING AND ALIGNING CASE / ADJUSTING LEVELERS Note: Units shown may not depict an exact representation of your particular unit being installed. 1. Position & Align Case Alongside Other Cases 2. Adjust Levelers As discussed on previous page, using casters, ... -
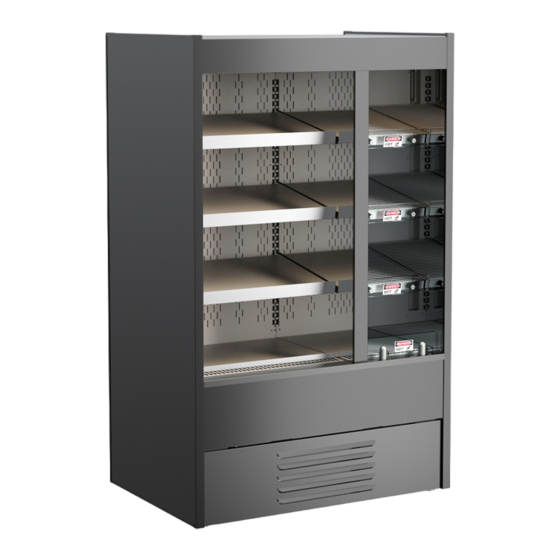
Page 7: Overview: Refrigerated And Heated Sections / Thermometers
OVERVIEW: REFRIGERATED AND HEATED SECTIONS / THERMOMETERS Overview Important! Thermometers Overview Thermometers reflect warmest air Model B3924RH is illustrated below. temperature in merchandiser (not actual Merchandiser is shown partially disassembled for food temperatures). illustrative purposes only. You must use probe thermometers to ... -
Page 8: Power Switches To Entire Case & Refrigerated Side Only / Led Light Switches
POWER SWITCHES TO ENTIRE CASE & REFRIGERATED SIDE ONLY / LED LIGHT SWITCHES Overview 3. Power Switch To Refrigerated Side Only Model B3924RH is illustrated below. The Power Switch To Refrigerated Side Only is This model may not reflect every feature or located in the electrical box on refrigerated side. -
Page 9: Condensate Package Access
CONDENSATE PACKAGE ACCESS Condensate Package Access Caution! Only Trained Service Providers Are To Access Condensate Package. Turn off power before accessing and sliding out from under merchandiser. Condensate package is accessible at case front. At initial slide-out, it may be necessary to remove compressor pan shipment screws (see illustration below for location). -
Page 10: Led Style Light Fixtures
Attach magnetic mounting clips onto LED light. LED lights rarely require change-out. Adjust magnetic mounting clips so they are equally Contact Structural Concepts’ Technical Service spaced on LED light. Department for replacement LED lights. Reattach LED light assembly to its shelf/header. ... -
Page 11: Thermostat Controller To Refrigerated Side Of Case
THERMOSTAT CONTROLLER TO REFRIGERATED SIDE OF CASE 1. Power Switch To Entire Case You must remove front grille from case to access this power switch. Power Switch To Entire Case must be turned The Carel® thermostat at front-left of case ONLY ON to energize refrigerated side of case. -
Page 12: Thermostat Controllers To Heated Side Of Case
THERMOSTAT CONTROLLERS TO HEATED SIDE OF CASE 3. Thermostat Controls To Shelving and Deck 1. Energizing Case Thermostat controls to heated shelving and deck Power Switch to Entire Case (in electrical are at right side of condenser package. box) must be turned on to energize case. -
Page 13: Case Startup: Refrigeration Settings / Heater Settings / Shutting Down Case
CASE STARTUP: REFRIGERATION SETTINGS / HEATER SETTINGS / SHUTTING DOWN CASE 4. Adjusting Thermostat Settings 1. Main Power Switch / Light Switch Thermostats have been pre-set at factory. See previous two pages for specifics on powering You should RARELY need to adjust thermostats on up case (both refrigerated and heated sides). -
Page 14: Evaporator Coil / Txv / Fan And Motor / Drain / Trough / Cover, Etc
EVAPORATOR COIL / TXV / FAN AND MOTOR / DRAIN / TROUGH / COVER, ETC. Evaporator Coil / TXV / Fan / Motor / Drain, Etc. When the case is in start up mode or has been idle for a long period of time, the unit will require ... -
Page 15: Cleaning Schedule - To Be Performed By Store Personnel
CLEANING SCHEDULE - TO BE PERFORMED BY STORE PERSONNEL AREA TO BE FREQ. INSTRUCTIONS CLEANED Sides / Front Daily Wipe down with warm, soapy water and clean cloth. Dry with clean cloth or paper Grille / Top towel. Board / Front Grille / Rear Plenums Metal Shelving... -
Page 16: Preventive Maintenance (To Be Performed By Trained Service Provider) - Page 1 Of 3
PREVENTIVE MAINTENANCE (TO BE PERFORMED BY TRAINED SERVICE PROVIDER) - PAGE 1 of 3 WARNING! TURN OFF CASE BEFORE PERFORMING PREVENTIVE MAINTENANCE! FREQ. INSTRUCTIONS Quarterly Under Case Cleaning: Whenever refrigeration package is slid out from underside of case, vacuum (or use broom) under the case to remove all dust, debris and dirt that may collect. - Page 17 PREVENTIVE MAINTENANCE (TO BE PERFORMED BY TRAINED SERVICE PROVIDER) - PAGE 2 of 3 1. Quarterly Honeycomb Air Diffuser Removal Important: Clean honeycomb with warm water and soap solution. Submerse if necessary. Use brush to A. Wedge a non-metallic device of suitable strength dislodge stubborn or sticky residue.
- Page 18 PREVENTIVE MAINTENANCE (TO BE PERFORMED BY TRAINED SERVICE PROVIDER) - PAGE 3 of 3 FREQ. INSTRUCTIONS Quarterly Honeycomb: Check honeycomb air diffuser to determine if it is dirty. See previous page of this manual for cleaning specifics. Quarterly Hot Gas Condensate Pan / Overflow Condensate Pan (Electrical Coil): ...
-
Page 19: Troubleshooting (To Be Performed By Store Personnel)
TROUBLESHOOTING (TO BE PERFORMED BY STORE PERSONNEL) CONDITION TROUBLESHOOTING Case Is Not Level See INSTALLATION section in this manual for additional information. Case Not Lining Up See INSTALLATION section in this manual for instructions on properly aligning case (alongside other cases) and adjusting levelers. Water Is On The Floor Call service provider. - Page 20 TROUBLESHOOTING (TO BE PERFORMED BY TRAINED SERVICE PROVIDERS) CONDITION TROUBLESHOOTING Water Is On The Floor Check that the drain trap is free of debris. Check that the drain hose is correctly positioned over floor drain. Check store conditions. See OVERVIEW / TYPE / COMPLIANCE / WARNINGS / PRECAUTIONS / WIRING / PLUGS pages in this manual for humidity and temperature ranges to prevent condensation.
-
Page 21: Troubleshooting - Condensing System
TROUBLESHOOTING - CONDENSING SYSTEM (BY TRAINED SERVICE PROVIDERS ONLY) CONDITION TROUBLESHOOTING Head Pressure Too High Check that the condensing coil is not dirty or covered. Check that condensing fans are working. Check that refrigerant is not overcharged. Perform sub-cooling check and verify that no contaminates are in system. Check that liquid line filter dryer is not plugged. -
Page 22: Troubleshooting - Evaporator System
TROUBLESHOOTING - EVAPORATOR SYSTEM (BY TRAINED SERVICE PROVIDERS ONLY) CONDITION TROUBLESHOOTING Low Suction Pressure Check if sight glass is flashing or showing low charge. Check that expansion valve (TXV) isn’t restricted. Check element charge. Check that liquid line or filter isn’t restricted. Check that refrigeration lines and/or hoses are not kinked on either high or low sides. -
Page 23: Serial Label Location & Information Listed / Tech Info & Service
For additional technical information and service, (on the header, near thermostat, at case rear, see the TECHNICAL SERVICE page in this manual behind panels/toe-kicks, on electrical boxes, etc.). for instructions on contacting Structural Concepts’ Serial labels contain electrical, temperature and Technical Service Department. -
Page 24: Carel® Ir33 Platform Programmable Controller For Refrigerated Units - Page 1 Of 3
CAREL® ir33 PLATFORM PROGRAMMABLE CONTROLLER FOR REFRIGERATED UNITS - PAGE 1 of 3 Integrated Electronic Microprocessor Controller Programming The Instrument ▲ To Modify Defrost, Differential and Other Parameters mute 1. Press & hold “Prg” & “SET” keys together for at least five (5) seconds; display mute will flash “0,”... - Page 25 CAREL® ir33 PLATFORM PROGRAMMABLE CONTROLLER FOR REFRIGERATED UNITS - PAGE 2 of 3 Integrated Electronic Microprocessor Controller User Interface - Display Summary Table of Alarm and Signals: Display, Buzzer and Relay This data derived from Carel® Controller Material: ir33 +030220441 - rel. 2.0 - 01.05.2006. User Manuals\Carel ir33 Platform Programmable Controller For Refrig Units - Rev C Date: 06/22/2022 reset alarms w/manual reset / reset HACCP alarms / reset temp.
- Page 26 CAREL® ir33 PLATFORM PROGRAMMABLE CONTROLLER FOR REFRIGERATED UNITS - PAGE 3 of 3 Integrated Electronic Microprocessor Controller Summary Table of Operating Parameters CODE PARAMETER UOM* TYPE MINIMUM MAXIMUM DEFAULT Select Celsius (°C) or Fahrenheit (°F) flag Calibration of probe 1 °C/°F Calibration of probe 2 °C/°F...
-
Page 27: Carel® Ir33 Platform Programmable Controller For Heated Units
To Reset Any Alarms With Manual Reset ▲ Press and hold the “Prg” and “aux” key for This data derived from Carel® Controller Material: at least 1 second. mute ir33 +030220441 - rel. 2.0 - 01.05.2006. Structural Concepts Heated Unit Document - Revision A Date: 04/07/2022... - Page 28 Summary Table of Alarm and Signals: Display, Buzzer and Relay This data derived from Carel® Controller Material: ir33 +030220441 - rel. 2.0 - 01.05.2006. Structural Concepts Heated Unit Document - Revision A Date: 04/07/2022 reset alarms w/manual reset / reset HACCP alarms / reset temp. monitoring...
- Page 29 °C/°F Technical Service Dept. at 1(800) 433.9490 Ext. 1 Control delta °C/°F This data derived from Carel® Controller Material: ir33 +030220441 - rel. 2.0 - 01.05.2006. Structural Concepts * Unit Of Measure Heated Unit Document - Revision A Date: 04/07/2022...
-
Page 30: Technical Service Contact Information & Warranty Information
LIMITED WARRANTY Overview: All sales by Structural Concepts Corporation (hereafter, “SCC”) are subject to the following limited warranty. “Goods” refers to the product or products being sold by SCC. Warranty Scope: Warranty is for equipment sold in the United States, Canada, Mexico and Puerto Rico. Equipment sold elsewhere may carry modified warranties.
Need help?
Do you have a question about the Oasis B3924RH and is the answer not in the manual?
Questions and answers