Table of Contents
Advertisement
Quick Links
Oasis
READ AND SAVE THESE INSTRUCTIONS
®
USER
SCC P/N
MANUAL
21-29855
OASIS® REFRIGERATED MODEL BD3632 AND BD4832 BOX DOOR CASE
> SELF-CONTAINED REFRIGERATION SYSTEM (STANDARD)
> REMOTE REFRIGERATION SYSTEM (OPTIONAL)
> FRONT DOOR NON-LOCKING (STANDARD)
> CASE ADJOINMENT POSSIBLE
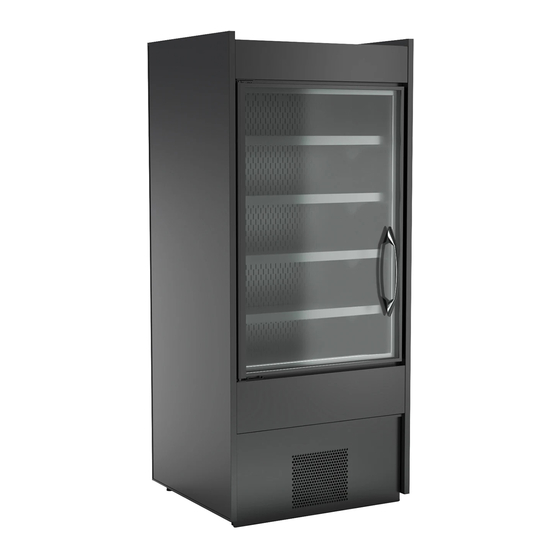
--- Model BD3632 (Shown Above) With One Door ---
--- Model BD4832 (Shown Above) With Two Doors ---
Structural
Concepts Corp. ∙ 888 E. Porter Rd ∙ Muskegon, MI 49441 Phone: 231.798.8888 Fax: 231.798.4960 ∙ www.structuralconcepts.com
REV B DATE: 05/04/2023
USER MANUALS\21-29855_OASIS_USER MANUAL_BD3632_BD4732_BD(L)32_REFRIG_SELF-SVC_BOX DOOR CASE
Advertisement
Table of Contents
Troubleshooting

Related Manuals for Structural Concepts Oasis BD3632


Summary of Contents for Structural Concepts Oasis BD3632
- Page 1 Oasis READ AND SAVE THESE INSTRUCTIONS ® USER SCC P/N MANUAL 21-29855 OASIS® REFRIGERATED MODEL BD3632 AND BD4832 BOX DOOR CASE > SELF-CONTAINED REFRIGERATION SYSTEM (STANDARD) > REMOTE REFRIGERATION SYSTEM (OPTIONAL) > FRONT DOOR NON-LOCKING (STANDARD) > CASE ADJOINMENT POSSIBLE --- Model BD3632 (Shown Above) With One Door --- --- Model BD4832 (Shown Above) With Two Doors --- Structural...
-
Page 2: Table Of Contents
TABLE OF CONTENTS / MODELS TO WHICH THIS MANUAL IS APPLICABLE OVERVIEW / TYPE / COMPLIANCE / WARNINGS / PRECAUTIONS / WIRING / PLUGS …………... INSTALLATION: CASE REMOVAL FROM SKID / POSITIONING / LEVELER ADJUSTMENT ...…... GENERAL MERCHANDISER ILLUSTRATION - MODEL BD3632 …...………………………………. FRONT/REAR PANEL REMOVAL / CONNECTIONS CHECK / TURNING ON POWER TO CASE ….. -
Page 3: Overview / Type / Compliance / Warnings / Precautions / Wiring / Plugs - Page 1 Of 2
COMPLIANCE OVERVIEW • Performance issues when in violation of applicable NEC, • These Structural Concepts merchandisers are designed federal, state and local electrical and plumbing codes to merchandise packaged products at 41 °F (5 °C) or are not covered by warranty. See below. - Page 4 OVERVIEW / TYPE / COMPLIANCE / WARNINGS / PRECAUTIONS / WIRING / PLUGS - PAGE 2 of 2 PRECAUTIONS WIRING DIAGRAM • • This sheet contains important precautions to prevent Each case has its own wiring diagram folded and in its damage to unit or merchandise.
-
Page 5: Installation: Case Removal From Skid / Positioning / Leveler Adjustment
INSTALLATION: CASE REMOVAL FROM SKID / POSITIONING / LEVELER ADJUSTMENT 1. Disconnect Case From Skid • Remove front and rear panels. • Also, remove shipping brackets that Front secure casters to skid Panel • Important! Case is shipped with levelers in the DOWN position (for stability). -
Page 6: General Merchandiser Illustration - Model Bd3632 - Page 1 Of 4
GENERAL MERCHANDISER ILLUSTRATION - MODEL BD3632 - PAGE 1 of 4 • Vending controls system (monitor, payment 1. Front View of Case processor, locks, etc.) is at right side of case. • View is shown with front panel removed (for •... - Page 7 GENERAL MERCHANDISER ILLUSTRATION - MODEL BD3632 - PAGE 2 of 4 2. Rear View of Case • Rear panel is shown removed to show access to condenser Model BD3632 Is Shown. It May Not Reflect Every Feature or package and electrical box. Option of Your Particular Case.
- Page 8 GENERAL MERCHANDISER ILLUSTRATION - MODEL BD3632 - PAGE 3 of 4 3. Self-Contained Hot Gas Loop Condensate Package (Shown Rotated 180°) • Caution: Only trained service providers are to provide maintenance and service to unit. • Warning! Disconnect power before providing maintenance and service to unit. •...
- Page 9 GENERAL MERCHANDISER ILLUSTRATION - MODEL BD3632 - PAGE 4 of 4 5. Evaporator Coil Fans / Air Discharge • When the case is in a start-up mode or has been idle for a long period of time, the unit will require When case is energized, refrigeration will be provided.
-
Page 10: Front/Rear Panel Removal / Connections Check / Turning On Power To Case
FRONT/REAR PANEL REMOVAL / CONNECTIONS CHECK / TURNING ON POWER TO CASE • See TROUBLESHOOTING section in operating 1. Removable Front/Rear Panel manual for various troubleshooting issues. • Front and rear panel can be removed/replaced by simply grasping top ‘lip’ and pulling 3. -
Page 11: Led Light Fixtures
Attach magnetic mounting clips onto LED light. Removal of Faulty LED Lights: • Adjust magnetic mounting clips so they are equally • Contact Structural Concepts’ Technical Service spaced on LED light. Department for replacement LED lights. • Reattach LED light assembly to its shelf/header. -
Page 12: Cleaning Schedule (To Be Performed By Store Personnel)
CLEANING SCHEDULE - PERFORMED BY STORE PERSONNEL FREQ. INSTRUCTIONS Daily Inner Metal Components: Shelves, Decks, Rear Perforated Plenum, Inner End Panels, Etc.): • Wipe with cloth dipped in mild-soapy water. Dry with soft cloth. Outer Metal Components: Door Frame, Door Handles, Lower Panels, End Panels, Etc.): •... -
Page 13: Preventive Maintenance - To Be Performed By Trained Service Providers
PREVENTIVE MAINTENANCE - TO BE PERFORMED BY TRAINED SERVICE PROVIDERS ONLY - 1 of 3 WARNING! TURN OFF CASE BEFORE PERFORMING PREVENTIVE MAINTENANCE! QUARTERLY PREVENTIVE MAINTENANCE INSTRUCTIONS Tub, Coil, Drain, Fan Blades, Motors, Brackets: Caution! Do Not Clean or Perform Service On Unit While It Is Energized! 1. - Page 14 PREVENTIVE MAINTENANCE - TO BE PERFORMED BY TRAINED SERVICE PROVIDERS ONLY - 2 of 3 WARNING! TURN OFF CASE BEFORE PERFORMING PREVENTIVE MAINTENANCE! QUARTERLY PREVENTIVE MAINTENANCE INSTRUCTIONS, CONT’D Under Case Cleaning: Caution! You must turn main power switch off before cleaning! •...
- Page 15 PREVENTIVE MAINTENANCE - TO BE PERFORMED BY TRAINED SERVICE PROVIDERS ONLY - 3 of 3 ANNUAL PREVENTIVE MAINTENANCE INSTRUCTIONS Optional Clean Sweep® Condensing Coil Cleaner: Important! Disconnect power from case before cleaning Clean Sweep® Condenser Coil Cleaner! • Remove front panel (no screw removal is requiredd). •...
-
Page 16: Troubleshooting (To Be Performed By Trained Service Provider Only) - Page 1 Of 3
TROUBLESHOOTING (TO BE PERFORMED BY TRAINED SERVICE PROVIDER ONLY) - PAGE 1 of 3 CONDITION TROUBLESHOOTING Case Not See INSTALLATION section in this manual for instructions on properly aligning case Lining Up (alongside other cases) and adjusting levelers. Water Is On Caution! Water on flooring can cause much damage! Until cause is determined (and The Floor repaired), follow these procedures:... - Page 17 TROUBLESHOOTING (TO BE PERFORMED BY TRAINED SERVICE PROVIDER ONLY) - PAGE 2 of 3 CONDITION TROUBLESHOOTING Fan Emits Excessive Check that the case is aligned, level and plumb. Noise Check evaporator fan for cleanliness. Unplug/power off fan motor. Check motor shaft for bearing wear. Check that fan motor is securely mounted in brackets.
- Page 18 TROUBLESHOOTING (TO BE PERFORMED BY TRAINED SERVICE PROVIDER ONLY) - PAGE 3 of 3 CONDITION TROUBLESHOOTING Weight Sensors On Contact Instant Retail Services. Shelf/Shelves Are Malfunctioning Color-Coded Lights Contact Instant Retail Services. On Shelf/Shelves Are Malfunctioning Screen/Monitor Is Contact Instant Retail Services. Malfunctioning Payment Processor Contact Instant Retail Services.
-
Page 19: Troubleshooting - R-290 Condensing System (By Trained Service Providers)
TROUBLESHOOTING - R-290 CONDENSING SYSTEM (BY TRAINED SERVICE PROVIDERS ONLY) CONDITION TROUBLESHOOTING Head Pressure Too Check that the condensing coil is not dirty or covered. High Check that condensing fans are working. Perform sub-cooling check and verify that no contaminates are in system. Check that liquid line filter dryer is not plugged. -
Page 20: Troubleshooting - R-290 Evaporator System (By Trained Service Providers)
TROUBLESHOOTING - R-290 EVAPORATOR SYSTEM (BY TRAINED SERVICE PROVIDERS ONLY) CONDITION TROUBLESHOOTING Low Suction Check if sight glass (if present) is flashing or showing low charge. Pressure Check that expansion valve (TXV) isn’t restricted. Check element charge. Check that liquid line or filter isn’t restricted. Check that refrigeration line / courtesy loop is not kinked. -
Page 21: Serial Label Location & Information Listed / Tech Info & Service
TECHNICAL SERVICE page in this manual for • Serial labels are affixed at a wide range of places instructions on contacting Structural Concepts’ (on the header, near thermostat, at case rear, Technical Service Department. behind panels/toe-kicks, on electrical boxes, etc.). -
Page 22: Programmable Controller Information
PROGRAMMABLE CONTROLLER (SELECT, CLICK ON OR SCAN QR CODE FOR INFORMATION) Determine Which Programmable Controller Is On Your Case (Controllers That Are Commonly Used By Structural Concepts Are Shown Below). Your Particular Programmable Controller May Differ From Units Shown. Carel® ir33 Platform Carel®... -
Page 23: Technical Service Contact Information / Warranty Information
STRUCTURAL CONCEPTS TECHNICAL SERVICE CONTACT INFORMATION & LIMITED WARRANTY YOU MUST HAVE THE FOLLOWING INFO AVAILABLE TECH SERVICE/WARRANTY CONTACT INFO: BEFORE CONTACTING STRUCTURAL CONCEPTS: 1 (800) 433-9490 / EXTENSION 1 SERIAL NO. / MODEL NO. / STORE NO. / STORE...
Need help?
Do you have a question about the Oasis BD3632 and is the answer not in the manual?
Questions and answers