Table of Contents
Advertisement
Quick Links
Advertisement
Table of Contents

Subscribe to Our Youtube Channel
Related Manuals for Weidmüller STARTERKIT-UC20-WL2000-IoT


Summary of Contents for Weidmüller STARTERKIT-UC20-WL2000-IoT
- Page 1 Starter-Kit | u-control Internet of Things with Node-RED (IoT) 2666060000 | STARTERKIT-UC20-WL2000-IoT Quick Start Guide for Starter-Kit IoT + Node-RED Instructions for setup and usage of the Starter-Kit with u-create Web and Node-RED QSG0033v01...
- Page 2 Quick Start Guide for Starter-Kit IoT with u-create Web and Node-RED Revision history Version Date Change log 01.2021 First release Contact Weidmüller Interface GmbH & Co. KG For further support please contact your local Klingenbergstraße 26 sales representative. 32758 Detmold, Germany +49 5231 14-0 Author: w100141 +49 5231 14-292083...
-
Page 3: Table Of Contents
Quick Start Guide for Starter-Kit IoT with u-create Web and Node-RED Warning and disclaimer ....................4 Abstract .......................... 5 Requirements ......................... 5 3.1. Hardware ........................5 3.2. Software ......................... 5 Installation of starter kit hardware ................... 6 Network settings ......................7 5.1. -
Page 4: Warning And Disclaimer
Quick Start Guide for Starter-Kit IoT with u-create Web and Node-RED 1. Warning and disclaimer Warning Controls may fail in unsafe operating conditions, causing uncontrolled operation of the controlled devices. Such hazardous events can result in death and / or serious injury and / or property damage. Therefore, there must be provide safety equipment/ electrical safety design or other redundant safety features that are independent from the automation system. -
Page 5: Abstract
Quick Start Guide for Starter-Kit IoT with u-create Web and Node-RED 2. Abstract This guide contains instructions on how to activate the starter kit and connect to the controller. Furthermore, it contains a guide how to setup the controller, setup an internet connection using the provided wireless access point and download a demo application to the controller. -
Page 6: Installation Of Starter Kit Hardware
Quick Start Guide for Starter-Kit IoT with u-create Web and Node-RED 4. Installation of starter kit hardware 1. Take the starter kit board and the power supply out of the box and connect the power supply with the board (1) and a power socket (2). Now the board can be activated by the switch on the left side (3). -
Page 7: Network Settings
Quick Start Guide for Starter-Kit IoT with u-create Web and Node-RED 5. Network settings The starter kit contains two networked devices, the u-control PLC and an WiFi Access Point (AP). The AP can also be used as an WiFi client to connect the u-control PLC to an existing WiFi network. - Page 8 Quick Start Guide for Starter-Kit IoT with u-create Web and Node-RED After login you are greeted by the following screen: Figure 3: Welcome screen of u-create web, menu network settings We will start by exploring the network settings of the u-control. You can configure the network interfaces to either have their IP address assigned dynamically via DHCP or to have a static IP address.
-
Page 9: Wifi Access Point As A Client
Quick Start Guide for Starter-Kit IoT with u-create Web and Node-RED 5.2. WiFi access point as a client Out of the box the AP is configured with the static IP 192.168.1.110 and can only be accessed using a wired connection. Connect an ethernet cable between the AP and your PC. Configure the network adapter to use a static IP in the same subnet, e.g. - Page 10 Quick Start Guide for Starter-Kit IoT with u-create Web and Node-RED Enter the IP address 192.168.1.110 in your browser. The login page of the AP will open: Figure 7: Login page of the wireless access point Log in using the default credentials as shown in Figure 7. You will be greeted by an overview of the AP’s configuration, as shown in Figure 8.
- Page 11 Quick Start Guide for Starter-Kit IoT with u-create Web and Node-RED Navigate to Wireless LAN Setup ► Operation Mode and select “Client”. Make sure the wireless interface is enabled. Make sure to submit your changes after each step. Figure 9: Operation mode selection "Client" Navigate to Wireless LAN Setup ►...
- Page 12 Quick Start Guide for Starter-Kit IoT with u-create Web and Node-RED Navigate to Save Configuration and click on the “Save” button. Figure 13: Save the configuration of the AP Next navigate to Restart and click the “Restart” button. The AP will reboot, as shown in Figure 15. Figure 14: Restart menu of the AP Figure 15: The AP is restarting Since we’ve configured the AP to receive it’s IP address via DHCP, it will be assigned a new...
- Page 13 Quick Start Guide for Starter-Kit IoT with u-create Web and Node-RED for further information. Click on the IP address of the discovered “IE-WL-BL-AP-CL-EU” to open the configuration overview as shown in Figure 17. Figure 17: Overview of the completed AP configuration To test the internet connection, use the ping tool under Maintenance ►...
-
Page 14: Getting Started With U-Create Web
Quick Start Guide for Starter-Kit IoT with u-create Web and Node-RED 6. Getting started with u-create web Now that your starter kit is up and running, we’re ready to download and deploy the first application. To make use of most of the provided components we will implement a simple temperature controller. -
Page 15: Devices And I/O
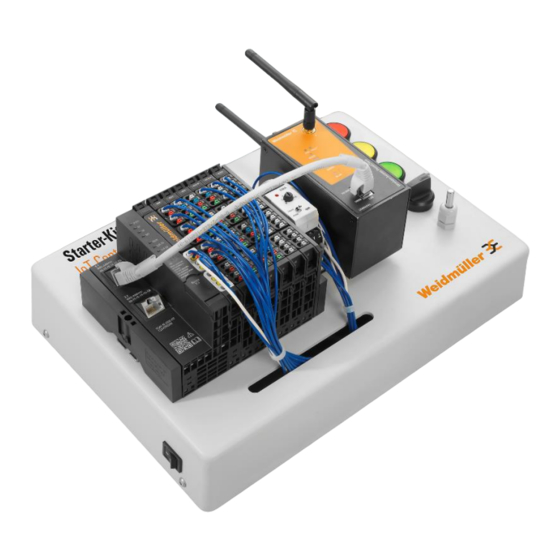
Quick Start Guide for Starter-Kit IoT with u-create Web and Node-RED Figure 20: u-create web in planning (e.g. edit) mode, devices tab, import/export menu 6.2. Devices and I/O The starter kit comes fully assembled and ready to use. Figure 21: Overview of the starter kit hardware QSG0033v01... -
Page 16: Global Variables
Quick Start Guide for Starter-Kit IoT with u-create Web and Node-RED The following devices are connected to the I/O modules and can be used to develop your first applications without making any changes to the starter kit’s hardware: Hardware I/O Module Connection Pushbutton red UR20-8DI-P-2W... -
Page 17: Visualisation
Quick Start Guide for Starter-Kit IoT with u-create Web and Node-RED Figure 22: Live view of global variables in u-create web Note that variables that are mapped to an input are preceded by an “I_”, variables that are mapped to an output by an “O_”. Next comes the type, “I” for integer, “X” for bool, “R” for real. This is a design decision, you can name variables as you prefer, using your own naming convention. -
Page 18: Getting Started With Node-Red
Quick Start Guide for Starter-Kit IoT with u-create Web and Node-RED Figure 23: Live view of the visualisation in u-create web 7. Getting started with Node-RED Now that you’ve explored the integrated features of u-create web, let’s see how Node-RED builds on these features and allows you to create automation applications using web technologies. -
Page 19: Importing And Running The Demo Application
Quick Start Guide for Starter-Kit IoT with u-create Web and Node-RED 7.1. Importing and running the demo application Now that you’ve opened the Node-RED application, you will be greeted by an empty flow canvas. To import the demo application into Node-RED, click on the hamburger menu in the top right- hand corner and select “Import”. - Page 20 Quick Start Guide for Starter-Kit IoT with u-create Web and Node-RED Hit “Deploy” to run the program. Any changes made to the program must be deployed as well to take effect. Look at the starter kit. You might notice some LEDs being lit. If not, turn the rotary switch to the South-East / 4:30 position.
-
Page 21: Turning The Temperature Controller Into An Iot-Device
Quick Start Guide for Starter-Kit IoT with u-create Web and Node-RED 7.2. Turning the temperature controller into an IoT-device Now that the temperature controller is running on the u-control PLC, let’s connect it to an MQTT broker to turn it into an IoT-device. We will use the free test broker of mosquitto.org for this guide. First, we need to install the string node via the Node-RED palette. -
Page 22: Further Information
Quick Start Guide for Starter-Kit IoT with u-create Web and Node-RED To see which values the controller is publishing via MQTT you need to subscribe to the topic “weidmueller/starter-kit-iot/+” using an MQTT subscriber of your choice. The free command line utility mosquitto_sub is shown below.
Need help?
Do you have a question about the STARTERKIT-UC20-WL2000-IoT and is the answer not in the manual?
Questions and answers