Table of Contents
Advertisement
Advertisement
Table of Contents

Related Manuals for KERR ENDODONTICS Apex Connect


Summary of Contents for KERR ENDODONTICS Apex Connect
- Page 1 INSTRUCTIONS FOR USE Apex Connect ELECTRONIC APEX LOCATOR...
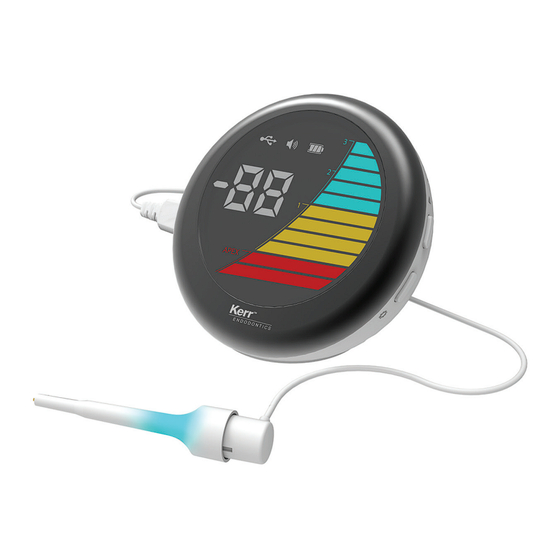
- Page 2 - ENGLISH Apex Connect ELECTRONIC APEX LOCATOR CONTENTS OVERVIEW All Components Apex Connect Unit Probe Cord File Holder Adapter Lip Hook (5) File Holder A File Holder B AC/DC Adapter Power Cord APEX CONNECT UNIT Name Function Power button Turns on the main body.
-
Page 3: Symbol Description
Pipeline and Hazardous Materials Safety Administration or INDICATIONS FOR USE the International Air Transport Association guidelines. PRECAUTIONS Apex Connect is an Electronic Apex Locator designed to measure the working length of root canals. • Do not use this device for any purpose other than its CONTRAINDICATIONS intended use. -
Page 4: Initial Setup
The battery icon appears on the display. Examine each connector and connect to the appropriate device. • Single USB connector (A): connects to the Apex Connect unit • USB connector (H) connects to the file holder Disassembling the Device 1. -
Page 5: Preparing The Device
3. If using File Holder A, remove File Holder A from the File PREPARING THE DEVICE Holder Adapter and disconnect the File Holder Adapter from the Probe Cord. Preparation and Use Environment The environmental information appropriate for using this device is as follows. - Page 6 Follow the steps below to set the user environment for the same time. Apex Connect unit • The measured value range and corresponding color will be 1. With the device powered on, press, and hold the button shown on the display with the file holder lamp.
-
Page 7: Advanced Settings
USB connection terminal of the motor handpiece and the means that the file has reached the anatomical foramen other USB connector (A) into that of the Apex Connect Unit. (apical constriction) and is approximately 0.5 mm away from the physiological foramen (apical foramen). -
Page 8: Maintenance
3. Slowly insert the Ni-Ti file into the root canal. The root canal at the same time for 2 seconds, then press and hold the length is measured, and the Apex Connect measurement is button on the Apex Connect Unit. The power and the display displayed in the [EAL] area of the main screen. - Page 9 After using the device, be sure to keep it clean for the next use. • Clean the surface of the file holder A thoroughly to avoid • Wipe the surface of the Apex Connect Unit using a cloth leaving any residue of contamination.
-
Page 10: Storage And Disposal
If the system shows any defect within the warranty period that is not working substances such objects from the mouth. are not excluded from this warranty, Kerr Endodontics shall, at its properly. as washing liquid have sole discretion, either replace or repair the device using suitable accumulated in new or reconditioned parts. -
Page 11: Part Numbers
• Increase the distance between the device and the device causing the interference. • Reinstall the device and restart. • Contact the dealer, Kerr Endodontics sales representative or Customer Care. BUYER INFORMATION Business Name _________________________________... - Page 12 Distributed by Kerr Corporation 1889 W. Mission Blvd. Pomona, CA 91766 USA 1-800-KERR-123 | kerrdental.com Manufactured by: Meta Systems Co., Ltd. #1214-18, Sicox tower 12F, 484 Dunchon-daero, Jungwon-gu Seongnam-si, Gyeonggi-do 13229, Korea Distribution Facility: Kerr Australia Pty. Ltd. 12 Mars Rd., Unit 6 Lane Cove West NSW, 2066 Australia +61 2 8870 3000...
Need help?
Do you have a question about the Apex Connect and is the answer not in the manual?
Questions and answers