
Subscribe to Our Youtube Channel
Related Manuals for Bumbleride Speed


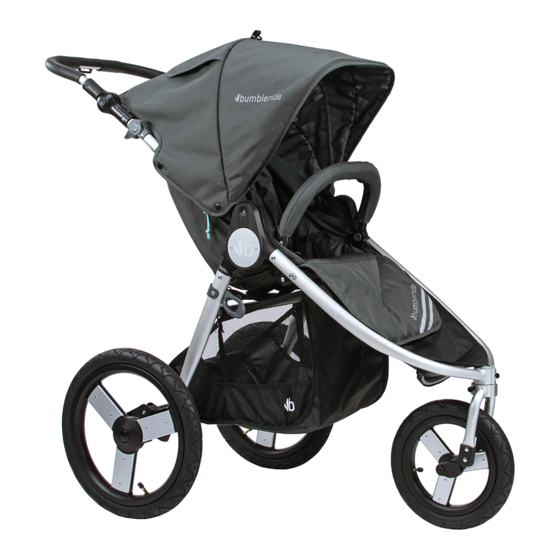
Summary of Contents for Bumbleride Speed
- Page 1 Speed owner’s manual manual de instrucciones manuel d’instructions IMPORTANT-READ CAREFULLY AND KEEP FOR FUTURE REFERENCE...
- Page 2 Get ready for the ride of your life. At Bumbleride, our goal is to make gear for Our aim with Speed is to give you a running parents to get out and do what they love, stroller with the ultimate balance of dura- while doing our best to preserve the planet.
- Page 3 Bienvenido a la familia Bumbleride. Prepárate para el paseo de tu vida. En Bumbleride, nuestro objetivo es propulsar Nuestro objetivo con Speed es brindarle un el cambio para que los padres salgan y hagan coche para correr con el máximo equilibrio de lo que les encanta, y al mismo tiempo hacer durabilidad y rendimiento liviano.
- Page 4 équipements pour la famille active. Speed est fi dèle à notre en- que les parents puissent sortir et faire ce qu’ils gagement d’un concept propre et adapté.
-
Page 5: Table Of Contents
Using with an infant/ Utilización con un bebé/ Utilisation avec un poupon Using Speed3 steering/ Uso del modo infantil/ Utilisation du mode bébé Folding Speed/ Cómo plegar Indie / Plier Indie MAINTENANCE/ MANTENIMIENTO/ ENTRETIEN Adding air to the tires/ Cómo agregar aire a las ruedas/ Ajouter de l’air aux pneus Cleaning instructions/ Instrucciones de limpieza/ instructions de nettoyage USEFUL INFORMATION/ INFORMACIÓN ÚTIL/ INFORMATIONS UTILES... -
Page 7: What's In The Box?/ Incluido En La Caja/ Ce Que Contient La Boîte
What’s in the box Incluido en la caja / Ce que contient la boîte? Bumper bar Barra de parachoques Barre de pare-chocs Speed frame Estructura Speed Wrist strap* Cadre Speed Correa para la muñe corroie de poignet Pump* Bomba Pompe... -
Page 8: Opening The Frame/ Cómo Abrir El Marco/ Ouverture Du Cadre
Opening the frame Cómo abrir el marco / Ouverture du cadre Place the stroller as shown with the handlebar on top. Coloque el coche como se muestra con el manillar en la parte superior. Placez la poussette comme indiqué avec le guidon sur le dessus. WARNING / ADVERTENCIA / ATTENTION Always ensure children are a safe distance away while opening and folding the stroller. - Page 9 Release the autolock by levering it away from the stroller and pull up on the handlebar at the same time. Suelte el bloqueo automático ale- jándolo del cochecito y tire hacia ar- riba del manillar al mismo tiempo. Relâchez le verrouillage automatique en l’...
-
Page 10: Attaching The Wheels/ Fijación De Las Ruedas/ Fixation Des Roues
Attaching the wheels Fijación de las ruedas Fixation des roues Slide the rear wheels into the rear axle tube. You will hear a ‘CLICK’ . To remove rear wheel pull on the release knob while pulling out the wheel. Deslizar las ruedas traseras en el tubo de eje trasero. - Page 11 Thread the nut onto the axle bolt and tighten using the tools provided. Coloque la rueda delantera entre las horquillas. Deslice el eje trasero hacia las ruedas y la horquilla. Enrosque la tuerca en el perno del eje y apriete con las herramientas propor- cionadas.
-
Page 12: Using The Sun Canopy/ Colocación De La Capota/ Utilisation Des Pare-Soleil
Using the sun canopy Uso del toldo solar / Utilisation de la verrière solaire Open the sun canopy and attach the side fl aps to the snaps on the handlebar & seat fabric. Abra el toldo solar y fi je las aletas laterales a los broches en el manillar y la tela del asiento. - Page 13 The rear canopy extension can be removed for added ventilation. Begin by unsnapping the extension from the seat fabric at the bottom. La extensión del dosel trasero se puede quitar para mayor ventilación. Comience desabro- chando la extensión de la tela del asiento en la parte inferior.
- Page 14 Attaching/adjusting bumper bar Fijación/ajuste de la barra del parachoques Fixation/réglage de la barre de pare-chocs Locate the holsters on the inside of the seats and insert the bumper bar latches through the slits in the fabric & into the holsters. Ubique las fundas en el interior de los asientos e inserte los pestillos de la barra del parachoques a través de las rendijas en...
-
Page 15: Attaching Wrist Strap/ Colocación De La Correa De Muñeca/ Fixation De La
Attaching wrist strap Colocación de la correa de muñeca / Fixation dragonne Retrieve the wrist strap from the cargo basket pocket. Feed the loop end of the strap through the slot in the plastic handlebar grip. Bring the loop under and feed it through the buckle until it is tight against the handlebar grip. - Page 16 WARNING / ADVERTENCIA / ATTENTION Always doublecheck that the brake is fully engaged by pushing the stroller forward. Siempre verifique que el freno esté completamente activado empujando el coche hacia adelante. Vérifiez toujours que le frein est complètement engagé en poussant la poussette vers l’avant.
-
Page 17: Using The Brake/ Cómo Usar El Freno/ Utilisation Du Frein
Using the brake Cómo usar el freno / Futilisation du frein Press down on the brake pedal to engage. Presione el pedal del freno para enganchar. Appuyez sur la pédale de frein pour vous engager. Press down on the rear of pedal to disengage the brake or lift up the pedal from the underside. -
Page 18: Using With An Infant/ Utilización Con Un Bebé/ Utilisation Avec Un Poupon
Using with an infant Utilización con un bebé / Utilisation avec un poupon Open the five point safety harness by pressing the button in the middle. Notice how the harness locks together. Abra el arnés de seguridad de cinco puntos presionando el botón en el medio. - Page 19 Undo the Velcro pocket at the top of the seat back to access matching slots on the seat back support. Turn the buckle sideways and push it through the slot. Deshaga el bolsillo Velcro en el respaldo del asiento para acceder a las ranuras cor- respondientes en el soporte del respaldo del asiento.
- Page 20 COURIR. FAIRE DU JOGGING. MARCHER: La fourche du Speed est munie du système de di- rection Speed3 qui vous permet de choisir un de ses trois modes en fonction du terrain.
- Page 21 JOG: 30 degree swivel for jogging or all terrain. Position fork in a rear facing po- sition and engage fork lock. Giro de 30 grados para correr o para todo terreno. Coloque la horquilla en posición mirando hacia atrás y trabe el seguro de la horquilla.
-
Page 22: Folding Speed/ Cómo Plegar Indie / Plier Indie
Folding Speed Cómo plegar Speed / Plier Speed Begin by raising the seat back and folding down the bumper bar and footrest. Comience levantando el respaldo del asiento y plegando la barra del para- choques y el reposapiés. Commencez par soulever le dossier du siège et rabattre la barre de pare-chocs... - Page 23 Rabattez le guidon pour un pli plus compact. Rabattez le gui- don pour un pli plus compact. Use the carrying handles and frame to safely carry your Speed. Utilice las asas de transporte y el marco para llevar con seguridad su Speed.
-
Page 24: Adding Air To The Tires/ Cómo Agregar Aire A Las Ruedas/ Ajouter De L'air Aux Pneus
Adding air to the tires Cómo agregar aire a las ruedas / Ajouter de l’air aux pneus Speed tires have inner tubes and will occasionally need air added. You will fi nd the pump in the cargo basket pocket. Las ruedas de Speed tienen tubos internos y ocasionalmente necesitarán que le ag-... - Page 25 Unfold pump handle and infl ate the tire to 30psi/ 2bar. The tire should feel fi rm but with some give. Despliegue el mango de la bomba e infl e el neumático 30 psi (2 bar). El neumático debe sentirse fi rme pero con algo de ceder. Dépliez la poignée de la pompe et gonfl ez le pneu à...
-
Page 26: Cleaning Instructions/ Instrucciones De Limpieza/ Instructions De Nettoyage
All warranty claims must be made directly to the authorized Bumbleride dealer from whom the product was purchased. Your Bumbleride stroller frame comes with a 3 year warranty and a lifetime of friendly customer service. The frame of your Bumbleride is guaranteed to be free from manufacturer defects for a period of 3 years from the date of purchase. - Page 27 Bumbleride al que se compró el producto. Su marco de coche Bumbleride viene con una garantía de 3 años y una vida de servicio al cliente amigable. El marco de su Bumbleride está garantizado para estar libre de de- fectos del fabricante durante un período de 3 años a partir de la fecha de compra.
- Page 29 Your child’ s safety may be aff ected if you do not follow these instructions. Always ensure that children are a safe distance away when opening and closing the stroller. The Bumbleride Speed complies with ASTM F-833-21, SOR/2016-167 and EN 1888-1/2:2018 safety standards.
- Page 30 Asegúrese siem- pre de que los niños estén a una distancia segura al abrir y cerrar la coche. El Bum- bleride Speed cumple con las normas de seguridad ASTM F-833-21, SOR/2016-167 y EN 1888-1/2:2018. Obtenga más información visitándonos en www.bumbleride.
- Page 31 être aff ecté si vous ne suivez pas ces instructions. Toujours s’assurer que les enfants sont à une distance sécuritaire lors de l’ o uverture et de la fermeture de la poussette. Le Bumbleride Speed est conforme aux normes de sécurité ASTM F-833-21, SOR/2016-167 et EN 1888-1/2:2018.
- Page 32 Bumbleride Inc. 2345 Kettner Blvd, San Diego, CA 92101 www.bumbleride.com info@bumbleride.com 1-800-530-3930...
Need help?
Do you have a question about the Speed and is the answer not in the manual?
Questions and answers