Advertisement
Introduction
Before operating the unit, please read this manual thoroughly and retain it for future reference.

To reduce a risk of fire or electric shock, do not expose this product to rain or moisture.
To avoid electrical shock, do not open the cabinet. Refer servicing to qualified personnel only.
The apparatus shall not be exposed to dripping or splashing and no objects filled with liquid, such as vases, shall be placed on the apparatus.

This installation should be made by a qualified service person and should conform to all local codes.
For the customers in Europe
The manufacturer of this product is Sony Corporation, 1-7-1 Konan, Minatoku, Tokyo, 108-0075 Japan.
The Authorized Representative for EMC and product safety is Sony Deutschland GmbH, Hedelfinger Strasse 61, 70327 Stuttgart, Germany. For any service or guarantee matters please refer to the addresses given in separate service or guarantee documents.
For the customers in Europe, Australia and New Zealand
This is a Class A product. In a domestic environment, this product may cause radio interference in which case the user may be required to take adequate measures.
In the case that interference should occur, consult your nearest authorized Sony Service facility.
This apparatus shall not be used in the residential area.
 ATTENTION
The electromagnetic fields at the specific frequencies may influence the picture of this unit.

The nameplate is located on the top.
Features
The SSC-CB461R color video camera is equipped with the 1/3 type Super HAD CCD II™*.
The SSC-CB561R color video camera is equipped with the 1/3 type EXview HAD CCD II™**.
It has the following features:
- Vari-focal auto iris lens fitted as standard. Lens focal length is from 2.8 mm to 10.5 mm.
- High resolution and high sensitivity
- Automatic white balance tracking and adjustment (ATW/ATW-PRO)
- Noise Reduction
- Day/Night function allowing color/monochrome mode switching
- AC 24 V/DC 12 V power supply system
- Line Lock function (AC 24 V)
* Super HAD CCD II™ is a trademark of Sony Corporation. (SSC-CB461R)
** EXview HAD CCD II™ is a trademark of Sony Corporation. (SSC-CB561R)
Notes on Use
Power supply
The camera operates on either AC 24 V (50 Hz) or DC 12 V power. The camera automatically detects the power.
- When connecting the transformer, be sure to connect each lead to the appropriate terminal. Wrong connection may cause malfunction and/or damage to the video camera.
- Ground the unit or an irregular voltage may be generated in the AC power cord and may cause malfunction and/or damage to the video camera.
Handling of the unit
Be careful not to spill water or other liquids on the unit, or allow combustible or metallic objects to fall inside the body. If used with a foreign object inside, the camera is liable to fail, or be a cause of fire or electric shock.
Operating or storage location
Do not shoot an extremely bright object (an illumination, the sun, etc.). Also, avoid operating or storing the camera in the following locations, as these can be a cause of a malfunction.
- Extremely hot or cold places (Operating temperature: –10°C to +50°C [14°F to 122°F])
- Exposed to direct sunlight for a long time, or close to heating equipment (e.g., near heaters)
- Close to sources of strong magnetism
- Close to sources of powerful electromagnetic radiation, such as radios or TV transmitters
- Locations subject to vibration or shock
- Humid or dusty locations
- Locations exposed to rain
- Locations under the influence of fluorescent light or reflection of a window
- Under an unsteady light (the image will flicker)
- Where it is subject to moisture.
- Where it is subject to fume and swear.
- This camera is not for Outdoor use, and don't use the camera with housing in any installation environment.
Ventilation
To prevent heat buildup, do not block air circulation around the camera.
Transportation
When transporting the camera, repack it as originally packed at the factory or in materials of equal quality.
Cleaning
- Use a blower to remove dust from the lens.
- Use a soft, dry cloth to clean the external surfaces of the camera. Stubborn stains can be removed using a soft cloth dampened with a small quantity of detergent solution, then wipe dry.
- Do not use volatile solvents such as alcohol, benzene or thinners as they may damage the surface finishes.
In the event of any problems with the operation of the camera, contact your Sony dealer.
Note on laser beams
Laser beams may damage the CCDs. If you shoot a scene that includes a laser beam, be careful not to let a laser beam become directed into the lens of the camera.
Note
If you use the Line Lock function in an operating environment where power quality is poor, the monitor image may be distorted.
Phenomena Specific to CCD Image Sensors
The following phenomena that may appear in images are specific to CCD (Charge Coupled Device) image sensors. They do not indicate malfunctions.
White flecks
Although the CCD image sensors are produced with high-precision technologies, fine white flecks may be generated on the screen in rare cases, caused by cosmic rays, etc.
This is related to the principle of CCD image sensors and is not a malfunction.
The white flecks especially tend to be seen in the following cases:
- when operating at a high environmental temperature
- when you have raised the gain (sensitivity)
- when using the slow shutter
Vertical smear
When an extremely bright object, such as a strong spotlight or flashlight, is being shot, vertical tails may be produced on the screen, or the image may be distorted.

Aliasing
When fine patterns, stripes, or lines are shot, they may appear jagged or flicker.
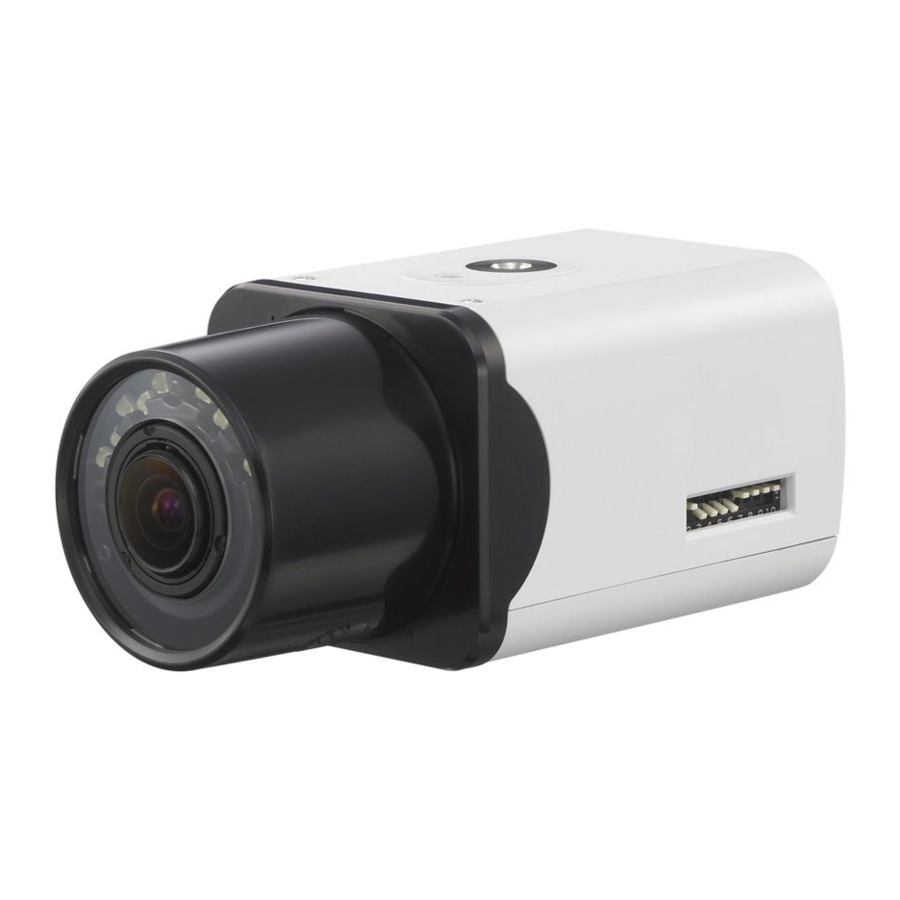
Location and Function of Part
Top/Front/Right Side

- Lens
- Front cover
- Tripod screws

The screw holes for attaching the tripod are located on both the top and bottom of the camera. Use a 1/4" 20 UNC screw to attach a tripod to the camera. The tripod must be set up on a flat surface and tightened firmly by hand.

Use the mounting screw whose length is 4.5 mm – 7 mm only. Use of other screws may cause improper mounting and damage parts inside the camera.
- Mode setting DIP switch
The following DIP switches are turned on if they have been set to the top positions.Pin No. Switch Location Up (ON) Down (OFF) 1 SYNC LL INT 2 AGC ON OFF 3 iBLC ON OFF 4 ATR Lite ON OFF 5 SHARPNESS SHARP NORMAL 6 WB PRO ATW 7 D/N AUTO OFF 8 D/N TIME SHORT LONG 9 AdIR ON OFF 10 IRIS OPEN AUTO
- SYNC (Sync Lock) switch (Initial setting: INT)
Use this switch to set the camera synchronization mode to INT (Internal) or LL (Line Lock).
When the camera power is DC 12 V, the camera is in the internal operation mode regardless of the switch setting.
Note
If the Line Lock function is used while camera power is unstable, the camera image may flutter. - AGC (Automatic Gain Control) switch (Initial setting: ON)
Use this switch to increase the gain of the video amplifier when set to ON. - iBLC (Intelligent Backlight Compensation) switch (Initial setting: OFF)
Use this switch to adjust the exposure to compensate for situations where the subject is lit from behind. - ATR Lite (Adaptive Tone Reproduction) switch (Initial setting: OFF)
When the switch is set to ON, the camera will adjust the tone automatically according to ambient brightness and darkness. - SHARPNESS switch (Initial setting: NORMAL)
When the switch is set to ON, the camera will produce sharper images. - WB (White Balance) switch (Initial setting: ATW)
Choose the WB mode of the camera:
PRO (when the switch is set to ON): the camera will adjust the WB automatically, based on the color temperature of fluorescent, incandescent or natural light.
ATW (when the switch is set to OFF): the camera will adjust the WB automatically, especially under certain lights, such as sodium, etc. - D/N (Day/Night) switch (Initial setting: AUTO)
Choose the D/N mode of the camera:
D/N mode (when the switch is set to ON): switches to the color mode when in a brightly lit environment; switches to the monochrome mode when in a low light environment.
Color mode (when the switch is set to OFF) - D/N TIME (Day/Night time) switch (Initial setting: LONG)
Sets the time for switching Day/Night mode.
SHORT takes more than 2 seconds, and LONG takes more than 30 seconds. - AdIR (Advanced IR control) switch (Initial setting: ON)
When the switch is set to ON, the camera will compensate for overexposure in Night mode.
Note
In the case that camera's parameter is set as D/N Time=LONG, AdIR=ON, the picture could be too dark for about 30 seconds when camera mode is from Night mode to Day mode. - IRIS (Lens iris control) switch (Initial setting: AUTO)
When the switch is set to ON, the aperture is completely open, which allows for easier focusing.
Note
Set this switch to OFF when using the camera in the normal way; otherwise, the camera image may flutter
Rear

- VIDEO OUT (composite video signal output) connector (BNC type)
- Fall-prevention rope mounting hole
When installing the camera on a ceiling or wall, be sure to secure a fallprevention rope (not supplied) to this hole for safety. - DC 12 V/AC 24 V (50 Hz) (power input) terminal (DC 12 V ±10% /AC 24 V ±10%)
- PHASE adjustment screw
Use to adjust the vertical phase of cameras synchronized by Line Lock.
Inside

- IR LED
- Focus lever
Loosen the lever, and move it to adjust the focal length. Tighten the lever to secure its position. - Zoom lever
Loosen the lever, and move it to adjust the angle of view. Tighten the lever to secure its position.
© 2012 Sony Corporation
Printed in China

Documents / ResourcesDownload manual
Here you can download full pdf version of manual, it may contain additional safety instructions, warranty information, FCC rules, etc.
Download Sony SSC-CB561R, CB461R - Color Video Camera Operating Instructions
Advertisement


Need help?
Do you have a question about the SSC-CB561R and is the answer not in the manual?
Questions and answers