Table of Contents
Advertisement
Quick Links
Thank you for your purchase of MultiCare analyzer!
ALL-ROUND MAU Test Device
This User Instruction Guide contains all the information needed to use the analyzer
and keep it ready to operate. Please read this User Instruction Guide carefully
before using the analyzer. Familiarize yourself with the required preparations and
the measurement procedure before performing the first measurement. Also read
the package insert of the test kits to be used for the planned test.
3
Advertisement
Table of Contents
Troubleshooting

Related Manuals for SD Biosensor MultiCare 03MA10


Summary of Contents for SD Biosensor MultiCare 03MA10
- Page 1 Thank you for your purchase of MultiCare analyzer! ALL-ROUND MAU Test Device This User Instruction Guide contains all the information needed to use the analyzer and keep it ready to operate. Please read this User Instruction Guide carefully before using the analyzer. Familiarize yourself with the required preparations and the measurement procedure before performing the first measurement.
- Page 2 The packaging materials, labels and instruction for use for MultiCare Analyzer may contain the following symbols or abbreviations which are listed below with their meaning: Symbols Crossed out wheeled bin: To discard it separately from other household waste Caution, consult accompanying documents Consult instructions for use In vitro diagnostic medical device This system is intended to use outside the body (in vitro diagnostic...
-
Page 3: Table Of Contents
CONTENTS CHAPTER 1. UNDERSTANDING YOUR NEW ANALYZER....6 Intended Use....................6 Test Principle....................6 Before You Start Testing...................7 MultiCare Analyzer...................7 Power Supply....................11 Components....................11 CHAPTER 2. TESTING THE MultiCare ANALYZER....12 Operating the Analyzer...................12 Preparing a Measurement................20 Performing a Test..................21 CHAPTER 3. USING THE ANALYZER MEMORY.........23 Memory Map....................23 Displaying Stored Measured Values..............24 Delete Data Stored in Memory.................24... -
Page 4: Chapter 1. Understanding Your New Analyzer
CHAPTER 1. Understanding Your New Analyzer 1. Intended Use The MultiCare System is a reflectometry immunoassay instrument for the quantitative measurement in human blood, urine and other specimens. This system is for in vitro diagnostic use and professional use in hospital and clinic. -
Page 5: Before You Start Testing
3. Before You Start Testing CAUTION Carefully read and follow the instructions in all labeling material related with the MultiCare System. It is very important to follow the instructions in order to prevent an inaccurate result or improper treatment. Samples The sample type of the MultiCare System is different according to the specific parameter you want to measure. - Page 6 Overview of MultiCare Analyzer...
- Page 7 I. Code-chip slot Location for inserting a code chip Connect to external barcode reader J. Barcode reader port (If you have a SD BIOSENSOR Barcode Reader) Connect a PC with a USB cable for the communication K. USB cable Port...
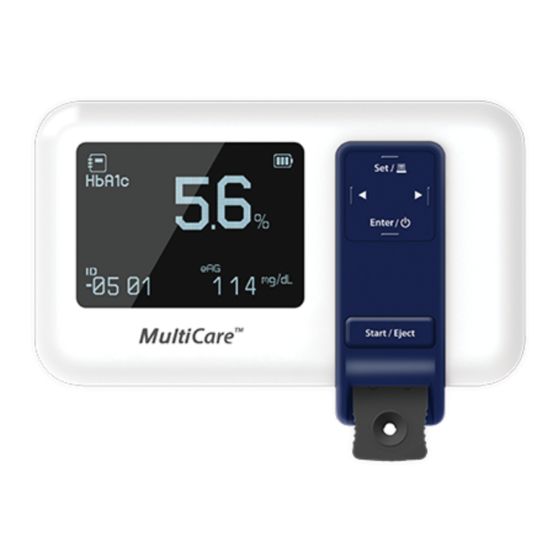
- Page 8 Display of MultiCare Analyzer The symbols in the display have the following meanings: Indicate the parameter HbA1c : HbA1c CRP : CRP Unit of the glycated U-ALB : U-Albumin hemoglobin Lipid : Lipid Profile Indicate the code Indicate the setting mode Processing Indicates the beep sound...
-
Page 9: Power Supply
5. Power Supply A 5V/2A AC power adapter or 4 AA alkaline batteries can be used. The analyzer saves battery power by automatically turning off after 1 minute without inserting a test panel or from non-use. When the batteries are dead or the connection between the analyzer and adapter is failed, the analyzer can still retain the test results stored in the memory and the setting values except date and time. -
Page 10: Chapter 2. Testing The Multicare Analyzer
CHAPTER 2. Testing the MultiCare Analyzer 1. Operating the Analyzer Before using the analyzer for the first time, perform the following steps: STEP 1. Insert four batteries or connect the AC adapter jack. STEP 1-1. Insert four batteries Ensure the analyzer is switched off and turn it over. Open the battery compartment lid by slightly pressing the tab towards the center of the analyzer. - Page 11 STEP 2. Set the Analyzer. The following table provides an overview of the available settings. Stage Setting Option Beep On, Off Year YYYY Date Format m-d, d-m Date (Month & Day) mm-dd, dd-mm Time Format 12h, 24h Time Hour &Minute Auto Printing On, Off Printing Page...
- Page 12 Stage 1. Setting - Beep In the first stage, you set the Beep function. If you enter the setting mode, the first step of the setting mode, Beep will appear. Set the beep on or off by pressing either the left () or right () button and then select the preferred feature by pressing the Enter button.
- Page 13 Stage 4. Setting – Date In the fourth stage, you set the Date in Date or Month. After setting the Date Format, set the correct month or day by pressing either the left () or right () button and select by pressing the Enter button. Stage 5.
- Page 14 24h Format Sub-step 1) Set the hour (1 to 24) Sub-step 2) Set the minute (1 to 59). Stage 7. Setting – Auto Printing In the seventh stage, you set the Auto Printing function. Following the Time setting, the display for the Auto Printing function will appear. Set the Auto Printing function, ‘On’...
- Page 15 NOTE If you select the ‘P-1’, you can get only one sheet including the test result. If you select the ‘P-2’, you can get two sheets including the test result. Stage 9. Setting – HbA1c Unit In the ninth stage, you set the unit of the test results for the HbA1c. Set the preferred unit by pressing either the left () or right () button and select by pressing the Enter button.
- Page 16 NOTE If you have the MultiCare Analyzer (03MA10, standard model) the analyzer will display a test panel standby state automatically. The below setting stages are for the MultiCare Analyzer (03MA20, bluetooth supported model) for the Bluetooth function. Stage 12. Setting – Bluetooth with PC In the twelfth stage, you can set the Bluetooth communication with your PC or smartphone.
- Page 17 Stage 14. Setting – Repairing the Printer In the fourteenth stage, you can set the analyzer to be automatically paired with the previous paired printer, whenever the printer is near the analyzer. After the Bluetooth with printer setting, the repairing setting will appear on the screen.Select ON or OFF by pressing the left () or right () button, and then save it by pressing the Enter button.
-
Page 18: Preparing A Measurement
CAUTION • Do not forget to insert the code chip that is supplied with each test kit box. • Each code chip belongs to one particular test kit box. Store the test kit together with the code chip in the box. 2. -
Page 19: Performing A Test
3. Performing a Test Prepare a test kit for the required measurement. Check the expiry date and Code number of the test kit. Always use test kits before their expiry date has passed. All clinical specimens must be at room temperature before beginning the assay. - Page 20 Collect all the mixture from the buffer tube completely and then apply the mixture into the test panel. Empty Press the start button. The result will be displayed on the screen in 3 or 5 minutes. When the test is done, pull out the used test panel. The analyzer shuts off automatically after you remove the test panel.
-
Page 21: Chapter 3. Using The Analyzer Memory
CHAPTER 3. Using the Analyzer Memory 1. Memory Map The MultiCare Analyzer can store 999 test results with date, time, and flags to let you review them in order. If the memory is full and a new result is added, the analyzer deletes the oldest result. Latest Data Data Oldest Data... -
Page 22: Displaying Stored Measured Values
2. Displaying Stored Measured Values Switch on the analyzer and then press the left () or right () button at the stand-by state if you want to enter the memory mode. When pressing the left button, the latest data shows. When pressing the right button, the oldest data shows. -
Page 23: Chapter 4. Printing And Data Transfer
CHAPTER 4. Printing and Data Transfer 1. Printing Material required, but not provided • STANDARD Thermal Printer • STANDARD USB Cable If you want to purchase the accessories listed below, please call your local customer support and service center. How to print Auto Print If you have turned the auto printing function on in the setting mode, the analyzer will not display the Printing symbol. -
Page 24: Data Transfer
2. Data Transfer The data stored in the memory of the analyzer can be transferred to a PC via either an mini USB cable or Bluetooth. For more information on downloading results to a suitable system, please call your local customer support and service center. The analyzer displays the following during data transfer. - Page 25 Open the MultiCare Management Software (MMS) installed on the PC. Click ‘Bluetooth Pairing’ on a menu. The PC starts to search the analyzer near. When the pairing is finish, ‘Finish paring of MultiCare (xx:xx:xx:xx:xx:xx).’ message will appear on the screen. At the same time, the analyzer will display ‘OK’...
-
Page 26: Chapter 5. Control Test
CHAPTER 5. Control Test It is important to perform Control Tests with more than one level of control materials to assure your system is working properly. Why You Should Do The Control Test: • The control material is used to check that the analyzer and the test kits are working together as a system and you are performing the test correctly. - Page 27 Troubleshooting for Control Test Check Action Did you perform the test while in If not, do the test again. Insert a test panel . the control mode? Press the left ( ) button for three seconds Did you see “control icon” on the to display the control icon.
-
Page 28: Chapter 6. Check Strip Test
CHAPTER 6. Check Strip Test The check strip is used to check that the optic sensor in the analyzer is working properly. The MultiCare Analyzer is based on the photometric method. There are 2 kinds of check strip for the MultiCare System: white and gray. - Page 29 Enter Button Press Enter and Start buttons at the same time for 3 seconds Sleep Mode Panel Wait Inset "CAL" check strip Inset "CHE" check strip Eject the strip White calibration Scan "CHE" strip If measured value iswithin the range, OK If measured value is not within the range, EEE...
-
Page 30: Chapter 7. Maintenance And Troubleshooting
CHAPTER 7. Maintenance and Troubleshooting 1. Cleaning your Analyzer Caring for MultiCare Analyzer is easy. Just keep it free from dust. If you need to clean it, follow these guidelines carefully to help you get the best performance possible; To prevent malfunction of the analyzer, keep the test kit port clean from blood, moisture, dirt, or dust. -
Page 31: Maintenance, Testing And Transportation
2. Maintenance, Testing and Transportation The analyzer needs little or no maintenance with normal use. It automatically tests its own systems every time you turn it on and it lets you know if something is wrong. If you drop the analyzer or think it is not giving accurate results, make sure that your test kits and control sets haven’t expired and then, run the control test or check strip test. -
Page 32: Chapter 8. Screen Messages And Troubleshooting
CHAPTER 8. Screen Messages and Troubleshooting 1. Warning Messages Indication Warning Description [Warning: Low Battery] At this time, battery is getting low but you can still perform about 10 tests. [Solution] Replace the battery soon. [Warning: Replace Battery] Battery power is low. If you press the Enter button after discharging the battery, the battery icon will flash and then after ten seconds the analyzer will turn off automatically. - Page 33 Indication Warning Description [Expired Test Kit] The test kit date has expired. [Solution] Discard this test kit and test again using a new test kit that is not past the expiration date. [Temperature Error] If the environmental temperature is above or below the operating range, a thermometer icon will appear on the screen.
- Page 34 Indication Warning Description [Extremely Total Hemoglobin] The applied sample is either under 7g/dL or above 23g/dL value of the total hemoglobin. [Solution] If this error occurs with a sample known to have total hemoglobin in the normal range, turn the analyzer off and back on and repeat test.
-
Page 35: Chapter 9. Warnings, Precautions And Limitations
CHAPTER 9. Warnings, Precautions and Limitations The MultiCare System is only used for In-vitro diagnostics. Should not be used to replace daily home testing. Should not be used for analyzing samples from patients with conditions causing shortened red blood cell survival, such as hemolytic diseases, pregnancy and significant acute or chronic blood loss. -
Page 36: Chapter 10. Product Technical Information
CHAPTER 10. Product Technical Information 1. Specifications Four batteries(1.5 V, AA) or AC adapter(5V/2A) ON/OFF Source Around 200 tests Battery Life LCD(Customized) Display Controls 5 Buttons(SET/PRT, Enter, Arrow: , Start/Eject) Memory 999 test results • One minute after last user action without inserting a test panel into the analyzer. - Page 37 SD Biosensor, Inc. Head office C-4th&5th, 16, Deogyeong-daero 1556beon-gil, Yeongtong-gu, Suwon-si, Gyeonggi-do, 16690, REPUBLIC OF KOREA Manufacturing Site 74, Osongsaengmyeong 4-ro, Osong-eup, Heungdeok-gu, Cheongju-si, Chungcheongbuk-do, 28161, REPUBLIC OF KOREA www.sdbiosensor.com 03MA10, 03MA20...
- Page 38 MEMO...
Need help?
Do you have a question about the MultiCare 03MA10 and is the answer not in the manual?
Questions and answers