Table of Contents
Advertisement
Advertisement
Table of Contents
Troubleshooting

Related Manuals for SD Biosensor SD LipidoCare


Summary of Contents for SD Biosensor SD LipidoCare
-
Page 2: Table Of Contents
The SD LipidoCare Professional Analyzer ..................7 Power supply ............................10 Test strips ..............................10 CHAPTER 2. USING THE SD LIPIDOCARE PROFESSIONAL ANALYZER ... 11 Changing the batteries ......................... 11 Setting the analyzer ..........................12 Pairing, only for 02LA20G ........................21 Analyzer Memory ............................ - Page 3 Important Safety Instructions Before using the SD LipidoCare Professional Analyzer, please read the following information. Important Safety Instructions The lancing device are for single patient use. Do not share them with anyone including other family members! Do not use on multiple patients! All parts of the kit are considered biohazardous and can potentially transmit infectious diseases, even after you have performed cleaning and disinfection.
-
Page 4: Chapter 1. Understanding The New Analyzer
Professional to measure total cholesterol (TC), triglycerides (TG), HDL cholesterol (HDL), and glucose in capillary whole blood with the SD LipidoCare Professional Lipid Profile Test Strips and SD LipidoCare Professional Blood Glucose Test Strips; it is also intended to calculate low density lipoprotein (LDL), the LDL/HDL ratio, and non-HDL. -
Page 5: Test Principle
Blood sample used for testing is whole blood from a fingerstick. The sample is applied to an SD LipidoCare Professional Test Strip. The test strip is then placed into the SD LipidoCare Professional Analyzer, where a unique system on the test strip separates the plasma from the blood cells. -
Page 6: Before You Start A Test
Samples For m easuring lipid (cholesterol) The SD LipidoCare Professional Analyzer for lipid testing is designed for testing a fresh capillary whole blood sample from the fingertip. For m easuring glucose The SD LipidoCare Professional Analyzer for glucose is designed for testing a fresh capillary whole blood sample from the fingertip, palm, upper arm, or forearm. -
Page 7: The Sd Lipidocare Professional Analyzer
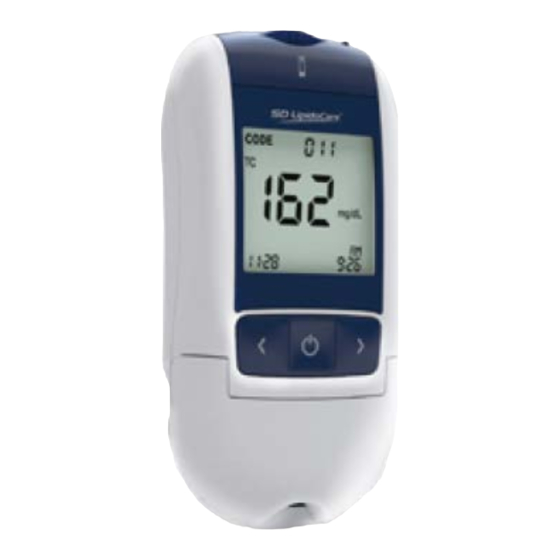
4 AAA 1.5 V batteries NOTE: The SD LipidoCare Professional Lipid Profile Test Strips, SD LipidoCare Professional Blood Glucose Test Strips, SD Lipid Control Solution, and SD Glucose Control Solution are required, but not included, and must be purchased separately. - Page 8 Battery Provides access to the battery compartment compartment lid (4 AAA 1.5 V alkaline batteries) Codechip slot Insert a codechip for lipid testing Holds the inserted test strip to prevent the movement of the test strip Optic cover when you are testing Data port Download test results to a personal computer Printer port...
- Page 9 Display of the SD LipidoCare P rofessional Analyzer The symbols in the display have the following meanings: Indicates a codechip sign Warning when the battery is low Indicates the index number of the Indicates printing memory Codechip number or memory...
-
Page 10: Power Supply
Do not throw batteries into a fire. There is a risk of explosion! 6. Test strips SD LipidoCare Professional Lipid Profile Test SD LipidoCare Professional Blood Strip GlucoseTest Strip... -
Page 11: Chapter 2. Using The Sd Lipidocare Professional Analyzer
CHAPTER 2. USING THE SD LIPIDOCARE PROFESSIONAL ANAL YZER 1. Changing the batteries Before using the Analyzer for the first time, perform the following steps: 1) Ensure the analyzer is switched off, and turn it over. 2) Open the battery compartment lid by slightly pressing the tab toward the center of the analyzer. -
Page 12: Setting The Analyzer
2. Setting the analyzer The following table provides an overview of the available settings. Stage Setting Options Default Setting Beep On, Off Year YYYY 2015 Date Format m-d, d-m Date mm-dd, dd-mm 1- 1 Time Format 12h, 24h Time hh:mm 12:00 AM Units of the Test Result mg/dL, mmol/L... - Page 13 3) Press the ON/OFF button to store the selected setting and go to the next setting. If you want to quit the setting stage, press the SET/PRT button. 4) If the settings are completed, the analyzer will be automatically turned off. CAUTION You can only move forward through the settings.
- Page 14 Stage 3) Setting – Date Format In the 3rd stage, you can set the date format. 1) The analyzer can display the month and day in either Month-Day (m-d) format or Day- Month (d-m) format. Select the preferred format by pressing either the left or right button, and then save it by pressing the ON/OFF button.
- Page 15 Stage 6) Setting – Time In the 6th stage, you can set the time, the current hour, and the minutes. Select the hour and minute by pressing either the left or right button and then save them by pressing the ON/OFF button.
- Page 16 Stage 8) Setting – Auto Printing In the 8th stage, you can set the auto printing function. 1) Following the test unit setting, the display for the auto printing function will appear. 2) Turn the auto printing function on or off by pressing either the left or right button, and then save your selection by pressing the ON/OFF button.
- Page 17 Stage 10) Setting – Hypo warning for glucose In the 10th stage, you can set the hypo warning function for the glucose testing only. 1) After the printing setting, the display for setting the hypo warning will appear. 2) You can turn the hypo warning off or select the hypo level as 60, 70, or 80 mg/dL by pressing the left or right button.
- Page 18 Stage 11) Setting – Alarm In the 11th stage, you can set up to four alarms to remind yourself to do a glucose test. 1) After the hypo warning setting, the display for setting the alarm will appear. 2) Turn the first alarm on or off by pressing the left or right button, and then save it by pressing the ON/OFF button.
- Page 19 Stage 12) Setting – Bluetooth with PC, only for 02LA20G In the 12th stage, you can set the Bluetooth communication with your PC or smartphone. If the analyzer is paired with the PC or smartphone, the test results are transferred automatically, via Bluetooth.
- Page 20 The code chip is included in the test strip package. The code chip provides the analyzer with important information on the production-specific properties of the SD LipidoCare Professional Lipid Profile Test Strip in order to measure your results accurately. Before you use the SD LipidoCare Professional Analyzer with a new test strip for the first time, you should check that the code numbers on the analyzer and the test kit are the same.
-
Page 21: Pairing, Only For 02La20G
3) Click the Pairing button on the screen to look for the device for pairing. It will start to search the SD LipidoCare Professional Analyzer nearby. - 21 -... - Page 22 4) After the search is complete, the available analyzer will be listed on the screen. Select the available analyzer by clicking the address of the analyzer. 5) When complete, the Pairing Is Done message will appear on the screen. At the same time, the analyzer will display the OK message on the screen. If you receive both messages on the PC and the analyzer, pairing was done successfully.
-
Page 23: Analyzer Memory
4. Analyzer Memory The SD LipidoCare Professional Analyzer can store the test results of up to 500 data with testing dates and times, and it can assign a number to let you review the test results in order, from the most recent to the oldest. If the memory is full and a new result is added, the analyzer deletes the oldest result. -
Page 24: Reviewing Stored Test Results
5. Reviewing stored test results All modes Turn the analyzer on, then press the left or right button at the strip standby state to enter memory mode. The All mode is the first memory mode with the icon displayed when you enter the memory mode. - Page 25 Memory mode, the All mode will appear. Press the SET/PRT button quickly to enter the Lipid mode. When you perform a lipid profile test using the SD LipidoCare Professional Lipid Profile Test strip, you will get six parameter results in total, at once. The index number is assigned to all the parameter results from a test.
-
Page 26: Displaying The Average Of Glucose Test Results
Glucose Mode If you want to review only the glucose results, you can review them in the glucose mode. After entering the Memory mode of the memory, press the SET/PRT button 2 times, quickly, to change the glucose mode. On the screen, both and the icon will appear in the glucose mode. -
Page 27: Deleting Test Data
4) If there are not any stored glucose test results, the following display will appear on the screen: NOTE: You cannot search the stored results or averages if a glucose test strip is inserted in the analyzer. 7. Deleting test data 1) Switch the analyzer on and then press the left or right button in order to enter the Memory mode at the test strip (lipid or glucose) standby state. -
Page 28: Printing
8. Printing Material required, but not provided • SD Thermal printer (Model Number: 90TPRT10) • SD USB cable If you want to purchase the accessories listed above, please contact our customer service center at 1-855-486-2888. How to print Auto Print If you have turned the auto printing function on in the Setting mode, the analyzer will not display the Printing symbol. -
Page 29: Chapter 3. Collecting Blood Samples
CHAPTER 3. COLLECTING BLOOD SAMPLES CAUTION • When collecting the capillary blood from the fingerstick, palm, forearm, or upper arm, there is the possibility of a bloodborne pathogen transmission. • Users should wash hands thoroughly with soap and water after handling the meter, lancing device, or test strips. -
Page 30: Getting A Blood Sample From Alternative Sites
2. Getting a blood sample from alternative sites Important Information About AST Sites other than fingertips may have fewer nerve endings, so obtaining a blood sample from these sites may be less painful. The technique for alternative site testing is different from fingertip testing. - Page 31 Sampling for the AST Procedure 1) Select a soft, fleshy area on the palm, forearm, or upper arm free of visible veins, moles, and hair and away from bone. 2) Press and vigorously rub the selected area for 10 seconds until it starts to feel warm to the touch.
-
Page 32: Chapter 4. Performing A Test For Lipid Or Glucose
• SD LipidoCare Professional Blood Glucose Test Strip • Sample collection tool, such as a reusable lancing device, lancets, and a capillary tube (optional) If you want to purchase sample collection tools, please contact the SD Biosensor customer service center at 1-855-486-2888. <Precaution>... -
Page 33: Test Procedure For Cholesterol (Lipid) Only
2. Test Procedure for cholesterol (lipid) only 1) Prepare a lipid test strip for the measurement. 2) Hold the lipid test strip with thumb and index finger so that the lipid test strip is facing upward. 3) Insert the lipid test strip into the lipid test strip slot of the analyzer. When the lipid test strip reaches the correct position, you will hear a beep. - Page 34 7) The message “CLo” will appear for 5 seconds. After closing the door, it performs the measurement for 3 minutes. 8) Your result appears on the screen after 3 minutes. When the test is done, pull out the used test strip and discard it. The analyzer shuts off automatically, 3 seconds after the used test strip has been removed.
- Page 35 CAUTION • Do not open the door during the test. • If you do not close the door after applying the blood sample to the test strip, the Close Door message will appear on the screen, accompanied by warning beeps. •...
-
Page 36: Procedure For Glucose
3. Procedure for glucose 1) Take a glucose test strip from a container. Make sure to tightly close the container cap after taking a glucose test strip. 2) Insert a glucose test strip into the Glucose Test Strip Slot of the analyzer. The analyzer will automatically enter the glucose testing mode. -
Page 37: Understanding Your Results
4. Understanding Your Results M easuring Range For results outside the m easuring range, the M easuring Range, SD LipidoCare analyzer displays m g/ dL(m m ol/ L) Low(Lo) High(HI) 100–450 (2.59–11.64) < 100 (2.59) > 450 (11.64) 45–650 (0.51–7.34) <... - Page 38 Ex pected Value for lipid The National Heart, Lung and Blood Institute issued the Third Report of the National C holesterol Education Program (NCEP) Expert Panel on Detection, Evaluation, and Treatm ent of High Blood Cholesterol in Adults (Adult Treatment Panel III) in May 2011. The A TP III report presented the NCEP’s updated clinical guidelines for cholesterol testing an d management and described the following classifications for cholesterol and triglycerid e testing:...
- Page 39 TC/ HDL Ratio The ATP III report does not comment on the use of the ratio of total to HDL cholesterol. Various authors have suggested that the TC/HDL ratio is the strongest lipid risk factor and 4, 5 can be a useful summary of CHD risk. A ratio of 4.5 or less is desirable.
-
Page 40: Chapter 5. Control Solution Test
• Do not apply the control solution to the skin or eyes, as it may cause irritation. What you need: • SD LipidoCare Professional Analyzer • SD LipidoCare Professional Lipid Profile Test Strips • SD LipidoCare Professional Blood Glucose Test Strips • The codechip •... -
Page 41: Procedure For The Lipid Control Solution
2. Procedure for the lipid control solution 1) Prepare the lipid test strip and the code chip. 2) Make sure the code chip matches the code number of the test strip package. 3) Insert a test strip into the analyzer. 4) When the OPE message is displayed on the screen, open the door. -
Page 42: Procedure For The Glucose Control Solution
3. Procedure for the glucose control solution Take a new glucose test strip from the test strip container. Be sure to tightly replace the container cap after taking a glucose test strip. Insert a glucose test strip (yellow window with a printed arrow symbol facing up) into the glucose test strip slot. -
Page 43: Troubleshooting The Control Solution
4. Troubleshooting the control solution Check Action Make sure that the test strips and the control solutions are not past the expiration date. Once opened, they are good only for a Have the test strips and/or control solutions limited time period: expired? - Glucose test strip : 6 months - SD Glucose Control Solution : 3 months... -
Page 44: Chapter 6. Check Strip Test
CHAPTER 6. CHECK STRIP TEST 1. Check Strip Test The check strip test is used to check that the analyzer is working well. 2. When to use the Lipid and Glucose check strip • Whenever you suspect the meter does not function properly •... -
Page 45: How To Use The Sd Glucose Check Strip
4. How to use the SD Glucose check strip check strip 1) Insert the SD Glucose Check Strip with the print facing up into the glucose test strip slot. Then the analyzer starts the glucose check strip testing automatically. NOTE: There is no special mode to enter for this glucose check strip testing. If the SD Glucose Check Strip is inserted into the analyzer, the analyzer starts the check strip test automatically. -
Page 46: Chapter 7. Maintenance And Troubleshooting
When you clean and disinfect the analyzer, please use the Discide Ultra Disinfecting towelettes only. It could shorten the use-life or affect the performance of the SD LipidoCare Professional Analyzer if you use other wipes. - 46 -... - Page 47 When to clean and disinfect the analyzer We recommend that you clean and disinfect the analyzer once a week. The cleaning and disinfection instructions were validated for 10,950 cleaning and disinfection cycles (10,950 cleaning wipes and 10,950 disinfecting wipes) on the analyzer which supports cleaning and disinfection after each patient, up to 10 patients per day, for the 3 year use life of the analyzer.
- Page 48 STEP 4 - Allow the analyzer to air dry. Dispose of the wipe. Disinfecting STEP STEP 1 Take another wipe and then wipe the analyzer thoroughly. The analyzer should be cleaned prior to the disinfection step. • Wipe the outside of the analyzer up and down 4 times. •...
-
Page 49: Maintenance, Testing, And Transportation
2. Maintenance, Testing, and Transportation Analyzer Keep the test strip slots free of dust. If the analyzer is stored with batteries inserted, it is best to keep it in a low humidity environment to prevent defects. Keep the analyzer dry, and avoid exposing it to extremes in temperature and humidity. Do not take apart the analyzer. -
Page 50: Chapter 8. Screen Message And Troubleshooting
CHAPTER 8. SCREEN MESSAGE AND TROUBLESHOOTING 1. Warning message Indication Description Hypo Warning Message When your glucose result is equal to or less than the Hypo setting value, the HYPO icon will appear. Warning Your test result is higher than the measuring range of the parameter. -
Page 51: Error Message
2. Error message Indication Description Strip Error The lipid or glucose test strip is damaged or inserted improperly. Solution Discard the test strip and perform the test again, using a new test strip. Lipid Test Strip Glucose Test Strip Blood Sample Error Insufficient amount of blood has been applied. - Page 52 Indication Description Codechip Error code chip other manfuacutrers or other products made by SD Biosensor is inserted. Solution Check to ensure that the code chip is from the package of the test strip inserted. Insert the correct one. Flap Open Error The door of the analyzer is open during the measurement.
-
Page 53: Chapter 9. Warnings, Precautions, And Limitations
• 2. Test Strip for Glucose The SD LipidoCare Professional System is not designed to be a substitute for pathology laboratory equipment, and it should not be used for the diagnosis of diabetes. Extremes in hematocrit may affect test results. Hematocrit levels less than 20% may cause falsely high readings. -
Page 54: Chapter 10. Technical Information
CHAPTER 10. TECHNICAL INFORMATION 1. Analyzer Specifications Battery Operation 4 AAA 1.5 V, Alkaline batteries Battery Life Around 1,000 tests Display Controls 4 Buttons (SET/PRT, ON/OFF, arrow: >/<) Memory 500 results • 1 minute after last user action without a test strip inserted into the analyzer Automatic shut-off •... -
Page 55: Appendix 1: References
Appendix 1: References 1. American Diabetes Association, Clinical Practice Recommendation Guidelines 2003, Diabetes care, Vol. 26. Supplement 1. p.22 2. Stedman, TL. Stedman’s Medical Dictionary, 27th Edition, 1999, p. 2082. 3. Ellen T. Chen, James H. Nichols, Show-Hong Duh, Glen Hortin, MD: Diabetes Technology & Therapeutics, Performance Evaluation of Blood Glucose Monitoring Devices, Oct 2003, Vol. -
Page 56: Appendix 2: Warning
Appendix 2: Warning This equipment generates, uses, and can radiate radio frequency energy and, if not installed and used in accordance with the instructions, may cause harmful interference to radio communications. However, there is no guarantee that interference will not occur in a particular installation. - Page 57 Catalogue no. : 02LA10G/02LA20G FCCID: RPJ02LA10G/RPJ02LA20G Manufacturer SD BIOSENSOR, INC C-4th&5th, 16, Deogyeong-daero, 1556 beon-gil, Yeongtong-gu, Suwon-si, Gyeonggi-do, 443-813, Republic of Korea Importer(Authorized Representative) SD BIOSENSOR USA, INC. 2 Corporate Park Ste 202, Irvine, CA 92606 Issue date: 2015.05...
Need help?
Do you have a question about the SD LipidoCare and is the answer not in the manual?
Questions and answers