
Related Manuals for Innova 7111 Smart


Summary of Contents for Innova 7111 Smart
- Page 1 7111 SMART DIAGNOSTIC SYSTEM The most comprehensive scan tool for diagnosing 1996 and newer OBD2 vehicles!
- Page 2 WELCOME TO THE INNOVA FAMILY! Hello... On behalf of everyone at INNOVA, we want to welcome you and thank you for purchasing the INNOVA 7111 Smart ® Diagnostic System (SDS) tablet! Our award winning tablet includes tons of pro-level features 2021 Motor Top 20 designed to help maximize your OBD2 diagnostic routine.
-
Page 3: Table Of Contents
TABLE OF CONTENTS LEGAL INFORMATION � � � � � � � � � � � � � � � � � � � � � � � � � � � �1 FCC Compliance Statement � � � � � � � � � � � � � � � � � � � � � � � � � � � � � � � � � 1 Trademarks �... - Page 4 TABLE OF CONTENTS Stored DTC � � � � � � � � � � � � � � � � � � � � � � � � � � � � � � � � � � � � � � � � � � � � 16 Pending DTC �...
- Page 5 TABLE OF CONTENTS Viewing Live Data for a Selected Module ......30 Performing Active Tests for a Selected Module ......31 Performing Special Functions for a Selected Module .
- Page 6 TABLE OF CONTENTS Technical Support (Send an Email) � � � � � � � � � � � � � � � � � � � � � � � � � � � � �50 Date and Time Settings � � � � � � � � � � � � � � � � � � � � � � � � � � � � � � � � � � � 51 Retailer Selection �...
-
Page 7: Legal Information
Licensee and End Users acknowledge such ownership, confidential information, and intellectual property rights and will not take any action to jeopardize, limit or interfere in any manner with Innova’s or its licensors’ or other suppliers’ ownership of or rights with respect to the Products and Services. The Products and Services may be protected by Patent, Trademark, Copyright and/or other intellectual property laws and by international treaties. -
Page 8: Patents
LEGAL INFORMATION Patents PATENTS Innova Electronics Corp. protects its intellectual property with numerous U.S. patents, which were used to research, design and manufacture this product. Please visit https://www.innova.com/pages/patents for additional information. SOFTWARE VERSION Please note that the images and functions on this manual may differ based on the current Firmware Version (FW) and Software Version you have. -
Page 9: Safety Precautions
SAFETY PRECAUTIONS Safety First! SAFETY PRECAUTIONS SAFETY FIRST! It is important that every user utilizing this product read all instructions and warnings included within this manual to ensure your safety, the safety of others, and to prevent damage to this product & vehicles being diagnosed and repaired. -
Page 10: Safety Alert Icons
SAFETY PRECAUTIONS Safety Alert Icons SAFETY ALERT ICONS As you read this manual, color-coded icons are used throughout to identify safety alerts and warnings. These are provided to help prevent serious injury to you, injury to bystanders, and damage to property or equipment. They are characterized as follows: Yellow Icon –... -
Page 11: Introduction
INTRODUCTION Tablet Controls INTRODUCTION TABLET CONTROLS See Figure 1 for the locations of items 1 through 9, below. POWER Button - Turns the tablet “On” and “Off.” When tablet is off, press and hold for approximately 3 seconds to turn on. -
Page 12: Initial Tablet Setup (Wi-Fi & Personal Settings)
SETTINGS / Version Information. [See page Adjust Personal Settings – Further customize your tool experience with several available settings. [See page Enjoy your INNOVA Smart Diagnostic System! ® Have questions? We’re here to help: Live Chat: www.innova.com... -
Page 13: The Home Screen
Battery/Alternator Test, and EV/HEV/PHEV Battery Health. Access dealership level re-learn procedures to complete repairs or maintenance and much more. [See page Support Tab – Access the tablet’s Tool Library for DTC and tool icon definitions; connect with Innova’s ASE Certified Technical Team for support. [See page Wi-Fi Icon - Tap to access and edit the tablet’s Wi-Fi settings... -
Page 14: Technical Specifications
INTRODUCTION Technical Specifications TECHNICAL SPECIFICATIONS The following table provides the tablet’s current technical specifications*: 7” Touch Panel / 1024x600 pixels Display Type 6-foot Detachable 16-pin OBDII Compliant Connector J1962 DLC Cable Detachable Vehicle Maximum communication range of 30 feet. Communication Interface (VCI) with Bluetooth Connectivity ®... -
Page 15: Getting Started
GETTING STARTED Connecting the Tablet GETTING STARTED CONNECTING THE TABLET Turn the vehicle’s ignition OFF. Locate the vehicle’s 16-pin Data Link Connector (DLC). [See page NOTE: Some DLCs have a plastic cover that must be removed before connecting the Scan Tool. Connect the tablet to the vehicle’s DLC. -
Page 16: Scanning A Vehicle
GETTING STARTED Scanning a Vehicle Providing Vehicle Selection Information A dialog appears requesting Vehicle Selection Tap on each of the available entries (Year, Make, Model, Trim, Body Code, Engine) A grayed-out selection means that an entry is not available or not necessary for this vehicle. Make a selection under each option. -
Page 17: Obd2 Diagnostics
OBD2 DIAGNOSTICS Performing a Scan – OBD2 Diagnostics OBD2 DIAGNOSTICS The OBD2 Diagnostics function allows you to perform OBD2 scans, view & record Live Data, create RepairSolutions2 Reports, and Erase OBD2 DTCs. PERFORMING A SCAN – OBD2 Diagnostics Follow the AutoLink Connection steps. [See page Tap OBD2 Diagnostics. -
Page 18: Emissions Readiness - Interpreting Results
OBD2 DIAGNOSTICS Viewing Scan Results – OBD2 Diagnostics Each report begins with a vehicle information bar that includes a Report ID, the vehicle’s description (year/make/ model), the last six digits of the Vehicle Identification Number (VIN) and the odometer reading (ODO) at the time the scan was performed. -
Page 19: Viewing Freeze Frame Data
Tap the Freeze Frame button to view the captured results. FIX FOR DTCs – The RepairSolutions2 (RS2) Report Innova’s RepairSolutions2 reports offer a fix, which is cross referenced for accuracy against a database of millions of verified fixes. It is real-world data that has been collected for over 25 years by Innova’s network of ASE Master Technicians across the U.S. -
Page 20: Buying Parts
Viewing Scan Results – OBD2 Diagnostics NOTE: You MUST accept Innova’s Terms of Use and Privacy Policy to continue. If you DO NOT accept Innova’s Terms of Use and/or Privacy Policy, tap Cancel to exit without creating a report. A progress message shows while the report is updated. When the message closes, the screen refreshes to display all available “enhanced”... -
Page 21: Viewing Drive Cycle Procedures
OBD2 DIAGNOSTICS Viewing Scan Results – OBD2 Diagnostics complete self-diagnosis and testing of the assigned system. A drive cycle may need to be performed to complete the testing. Green/Gray Flashing Icon = Description: This icon indicates that the monitor has not completed testing This Driving Cycle (KOER). Tips: The monitor has not met all conditions required to complete self-diagnosis and testing of the assigned system. -
Page 22: Stored Dtc
OBD2 DIAGNOSTICS Additional Testing Utilities selected monitor. Follow the provided steps to perform and complete the monitor’s “Enabling Criteria”. STORED DTC Shows all “stored” powertrain DTCs for the vehicle. Each entry in the list includes the DTC number and description. PENDING DTC Shows all “pending”... -
Page 23: Obd Mode Tests
OBD2 DIAGNOSTICS Additional Testing Utilities Tap the Erase DTCs button at the top of the OBD2 Diagnostic results page. The tablet displays an attention message confirming deletion. If you want to proceed, tap Erase DTCs to continue. If you do not want to proceed, choose Cancel to exit the erase procedure. By selecting to Erase DTCs, a “One moment please…”... -
Page 24: Inspection/Maintenance Monitor Test (Mode $01)
OBD2 DIAGNOSTICS Additional Testing Utilities Inspection/Maintenance Monitor Test (Mode $01) The Inspection/Maintenance Monitor Test ($01) lets you view the Drive Cycle Procedures for all monitors supported by the vehicle. A Drive Cycle for a monitor requires that the vehicle is driven in such a way that all the required “Enabling Criteria”... -
Page 25: Evaporative Test (Mode $08)
OBD2 DIAGNOSTICS Additional Testing Utilities $06) retrieves and displays test results for emission-related powertrain components and systems that are not continuously monitored. The tests available are determined by the vehicle manufacturer. NOTE: The tablet does not perform the OBD mode test. Instead, it retrieves results from the most recently performed tests from the onboard computer’s memory. -
Page 26: Viewing Live Data
OBD2 DIAGNOSTICS Additional Testing Utilities values (volts, rpm, temperature, speed, etc.) and system status information (open loop, closed loop, fuel system status, etc.) generated by the various vehicle sensors, switches, and actuators. The real time (Live Data) vehicle operating information (values/status) that the computer supplies to the tablet for each sensor, actuator, switch, etc. - Page 27 OBD2 DIAGNOSTICS Additional Testing Utilities Tapping a checkbox repeatedly will toggle it on and off. Tap the Unselect button to unselect all PIDs. Tap the “search” icon to quickly search for the PID(s) you wish to view or graph. Use the keyboard to type in the name of the PID(s) and select as desired. Tap the “hide search”...
-
Page 28: Recording (Capturing) Live Data
OBD2 DIAGNOSTICS Additional Testing Utilities compare them against the specifications found in the vehicle’s repair manual. 11. Tap the icon to return to the OBD2 Diagnostics results page, or the Home icon to exit. Recording (Capturing) Live Data The tablet allows you to record and save Live Data information for each PID supported by the vehicle. Place the tablet in Live Data mode as indicated in Live Data Mode [See page Tap Record to begin recording Live Data. -
Page 29: Vehicle Id
OBD2 DIAGNOSTICS Additional Testing Utilities Additional Vehicle Information – offers basic information such as VIN and Year, Make and Model of vehicle. More details are accessible with the Vehicle Information button. Customer Information – Includes the Date/Time at which the scan was run and the customer’s information, which can be edited using the icon. -
Page 30: Editing Customer Information
OBD2 DIAGNOSTICS Additional Testing Utilities encountered (XXXCOND), and the number of times that the vehicle has been operated under the specific conditions for the monitor (XXXCOMP). Statistics are also provided for the number of times the vehicle has been operated in OBD monitoring conditions (OBDCOND), and the number of times the vehicle’s engine has been started (IGNCNTR). -
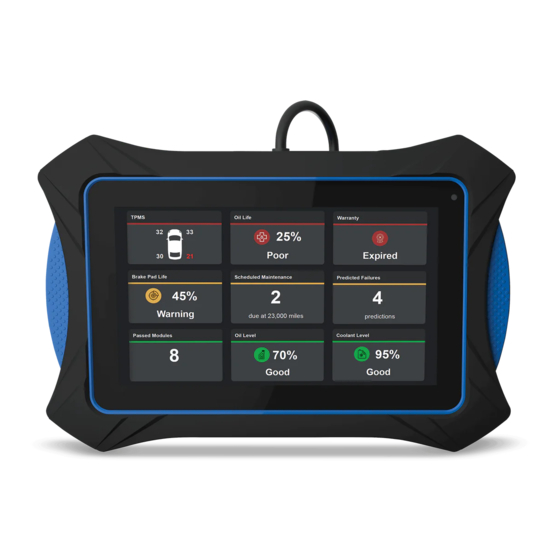
Page 31: Predicted Failures
Each is based on historical data taken from millions of real-world vehicle repair records collected for over 25 years by Innova’s network of ASE Master Technicians across the U.S. Each entry in the list provides the following information: Predicted Failure(s) within 12 months: A brief description of the predicted failure/repair/ maintenance procedure required. -
Page 32: Oem Diagnostics
OEM DIAGNOSTICS Performing a Scan – OEM Diagnostics OEM DIAGNOSTICS The OEM Diagnostics function allows you to perform enhanced, OEM level diagnostics not available over generic OBD2. Access ABS, Airbag, Transmission, Tire Pressure, Battery, and many body control modules to view and erase their DTCs. -
Page 33: Scan All Systems
OEM DIAGNOSTICS Scan All Systems SCAN ALL SYSTEMS From the OEM Diagnostics results screen, tap Scan All Systems. A progress bar appears, “Retrieving Vehicle Information...”, while the tablet scans all the vehicle’s equipped modules. Please note that it will take a few moments while it scans all of the vehicle’s systems. Tap “Cancel”... -
Page 34: Viewing & Scanning An Individual Control Module
OEM DIAGNOSTICS Scan All Systems # Fault – Indicates the number of reported DTCs. No Fault – Indicates that no DTCs were found. Available – Indicates that the module is part of the system but does not report DTCs. The results screen also allows to either: Erase All DTCs - Erases ALL of the vehicle’s retrieved Diagnostic Trouble Codes (DTC). -
Page 35: Reading Dtcs For A Selected Module
OEM DIAGNOSTICS Scan All Systems Live Data – See page 30 Active Test – See page 31 Special Function – See page 32 Reading DTCs for a Selected Module Select the module for which you wish to read DTCs. [See page Tap Read DTCs in the “Available Functions”... -
Page 36: Viewing Live Data For A Selected Module
OEM DIAGNOSTICS Scan All Systems If you do not want to proceed, tap Cancel to cancel the erase procedure. If you chose to erase DTCs, an “Erasing DTCs…” message displays while the erase function is in progress. If the erase was successful, a confirmation message shows. Tap Scan Again to re-scan the currently selected module;... -
Page 37: Performing Active Tests For A Selected Module
OEM DIAGNOSTICS Scan All Systems Tap the icon to quickly search and select desired PID(s). Tap the icon at the top left of the screen to return to the All Systems Scan screen Performing Active Tests for a Selected Module Active Tests let you perform active tests for various vehicle actuators and systems. -
Page 38: Performing Special Functions For A Selected Module
OEM DIAGNOSTICS Scan All Systems Performing Special Functions for a Selected Module Special Functions let you perform diagnostic and calibration procedures for various vehicle actuators and systems. The specific tests available depend on the vehicle make and model. Select the module for which you wish to perform Special Functions. [See page Tap Special Function in the “Available Functions”... -
Page 39: Erase All Oem Dtcs
OEM DIAGNOSTICS Scan All Systems Tap Finish or Exit to return to the previous menu. Tap the icon at the top left of the screen to return to previous page. ERASE ALL OEM DTCs Erase all the stored OEM DTCs from the vehicle’s computer memory as follows: Perform the Scan All Systems steps. -
Page 40: Rescan All Systems
OEM DIAGNOSTICS Vehicle Inspection Health Report RESCAN ALL SYSTEMS Use this function to get the most current diagnostic status for the vehicle under test – particularly as you continue to troubleshoot each individual control module. From the “Scan All Systems” result page, tap Rescan All Systems button at the top right of the page. Tool generates a new report and updates the “Scan All Systems”... -
Page 41: System Diagnostics (Dtc Status Overview)
OEM DIAGNOSTICS Vehicle Inspection Health Report System Diagnostics (DTC Status Overview) Gives a quick snapshot of all Diagnostic Trouble Codes (DTCs) found on the vehicle with “Fault – DTCs reported” or “No Fault – no DTCs present”. Tap the Systems Diagnos- tics tab to open the Scan All Systems window to view scan details... -
Page 42: Dashboard Warning Light Status
OFF. Diagnostic Report (RepairSolutions2 ™ Innova’s RepairSolutions2 reports offer a complete solution that includes a verified fix, vehicle warranty status, scheduled maintenance, predicted failures, recalls, and technical service bulletins (TSBs). Follow the steps below to access this report. Verify the tablet is connected to a Wi-Fi network [See page 52]. -
Page 43: Workshop Tools
WORKSHOP TOOLS Oil Maintenance Reset WORKSHOP TOOLS The WORKSHOP TOOLS tab allows you to perform several OEM service reset procedures. Depending on the vehicle being tested, it can offer up to eight options: Oil Maintenance Reset, Battery Reset, Electric Parking Brake (EPB) Reset, Steering Angle Sensor (SAS) Calibration, Transmission Fluid Temperature, ABS Bleeding, Battery/Alternator Test, and EV/HEV/PHEV Battery Health. -
Page 44: Battery Reset
WORKSHOP TOOLS Battery Reset BATTERY RESET You can use the tablet to view the procedures for resetting the battery monitor system following battery replacement or perform battery reset OBD service (for Audi, BMW, Ford, Volkswagen, and Volvo models only). To view battery reset procedures: Tap Battery Reset on the Workshop Tools screen. -
Page 45: Electronic Parking Brake (Epb) Reset
WORKSHOP TOOLS Electronic Parking Brake (EPB) Reset on the vehicle being serviced. An “instructional” message displays. Follow the instructions provided to prepare the vehicle for battery reset OBD service. When all necessary procedures have been performed, tap Next to continue. A “One moment please…”... -
Page 46: Steering Angle Sensor (Sas) Calibration
WORKSHOP TOOLS Steering Angle Sensor (SAS) Calibration Perform test procedures as directed. Tap Next, as appropriate, to continue to the next step. For some vehicles, “status” screens display as each phase of the calibration procedure is successfully completed. Tap Next, as appropriate, to scroll to the next screen. -
Page 47: Transmission Fluid Temperature
WORKSHOP TOOLS Transmission Fluid Temperature Perform test procedures as directed. Tap Next or Continue, as appropriate, to scroll to the next screen. Or, tap End or Exit to terminate the procedure. For some vehicles, “status” screens display as each phase of the calibration procedure is successfully completed. -
Page 48: Abs Bleeding
WORKSHOP TOOLS ABS Bleeding Select the PID(s) you wish to view and tap View, Graph, or Record. [See page Tap Unselect to unselect all PID parameters. Tap on the icon at the top of the page to return to the Workshop Tools screen. ABS BLEEDING The ABS Bleeding function is available for Chrysler, GM, Hyundai/KIA, Mazda, Toyota, Ford, Honda, Nissan, Mitsubishi, Subaru, Volvo, Mercedes, Volkswagen, BMW, and Jaguar vehicles only. -
Page 49: Battery / Alternator Test
WORKSHOP TOOLS Battery / Alternator Test For some vehicles, “status” screens display as each phase of the calibration procedure is successfully completed. Tap Next to scroll to the next step. A “results” message displays when the procedure has completed. Tap End to close the results message. Tap on the icon at the top of the page to return to the Workshop Tools screen. -
Page 50: Alternator / Charging System Test
WORKSHOP TOOLS Battery / Alternator Test NOTE: If the engine is running, an advisory message shows. Turn the engine off, then turn the ignition on. DO NOT start the engine. Tap Continue to proceed. An “instructional” message displays. Turn the vehicle’s headlights on, then tap Continue to proceed. A “countdown”... -
Page 51: Ev / Hev / Phev Battery Health
WORKSHOP TOOLS EV / HEV / PHEV Battery Health EV / HEV / PHEV BATTERY HEALTH The tablet offers the ability to check the battery health for a variety of electric powered vehicles, including: Electric Vehicle (EV), Hybrid-Electric Vehicle (HEV), and Plug-In Hybrid Electric Vehicle (PHEV). Tap EV/HEV/PHEV Battery Health on the Workshop Tools screen. - Page 52 WORKSHOP TOOLS EV / HEV / PHEV Battery Health The Line Graph button displays battery voltage PIDs in line graph format. The PID List button returns to the PID selection screen. The Record button records selected PIDs. [See ] Tap on the icon at the top of the page to return to the Workshop Tools screen.
-
Page 53: Previous Vehicles
PREVIOUS VEHICLES Scan History Reports PREVIOUS VEHICLES The INNOVA Smart Diagnostic System permanently stores the results ® of the most recent vehicle scans you have performed. The PREVIOUS VEHICLES tab allows you to retrieve these historical scan records and view them as needed. -
Page 54: Viewing Scan History Reports
PREVIOUS VEHICLES Scan History Reports VIEWING SCAN HISTORY REPORTS Tap an entry on the Scan History tab. The report view differs based on the Scan Type listed on the entry: OBD Diagnostics – the OBD2 Diagnostic test result screen displays. [See page OEM Diagnostics –... -
Page 55: Playback Recorded Live Data
PREVIOUS VEHICLES Playback Recorded Live Data Report icon turns from “gray” to “green” when a report is sent. Recipient receives an email with a PDF copy of their report, which can be saved and printed. PLAYBACK RECORDED LIVE DATA Entries on the Live Data tab are listed in reverse chronological order (most recent scan first). -
Page 56: Settings
TECHNICAL SUPPORT (Send an Email) The Innova Electronics technical team is here to help if you encounter any issues or if you have any questions. You can reach them directly with the tablet from Monday through Saturday, 6:00AM to 6:00PM, Pacific Time. -
Page 57: Date And Time Settings
The Email field shows the most recently entered email address for the tablet. If no address was previous entered, the Email field shows an empty text box. NOTE: You MUST provide a personal email address to receive a reply from Innova Technical Support via email. -
Page 58: Retailer Selection
Tap Set Date and Time to save your changes. A confirmation message displays. Tap Close to close the message. RETAILER SELECTION To get the best possible parts recommendations, provide the name of the retailer where you purchased your INNOVA Smart Diagnostic System tablet. Specifying the Retailer Scroll the Settings page to the Retailer field. - Page 59 SETTINGS Wi-Fi Settings Connecting to a Wi-Fi Network Scroll the Settings page to the Wi-Fi Settings field. If you are currently connected to a Wi-Fi network, the network name is shown; if not, it shows “Not Connected”. Tap Change Network. The Sign In To Your Wi-Fi Network dialog displays.
-
Page 60: Regional Settings
SETTINGS Regional Settings REGIONAL SETTINGS Allows you to set the unit of measurement for the tablet’s display to US (Imperial) or Metric. Configuring Regional Settings Scroll the Settings page to the Regional Settings field. Tap the currently selected unit of measurement to display the menu. Select the radio button for the desired unit of measurement, then tap OK. -
Page 61: Volume Settings
SETTINGS Volume Settings Tap the currently active idle time value to display the Select Idle Time menu. Select the radio button for the desired idle time value, then tap OK. Tap CANCEL to close the Select Idle Time menu and retain the previously selected idle time value. -
Page 62: Dlc Locator
SETTINGS DLC Locator Touch and slide right to make the display brighter. Touch and slide left to make the display darker. The current Brightness setting shows above the slider as you adjust the slider position ━ DLC LOCATOR Use this search function to quickly find the location of the Data Link Connector (DLC) for a specified vehicle. Using the DLC Locator Scroll the Settings page to the DLC Locator field. -
Page 63: Theme Settings
SETTINGS Theme Settings The DLC Location screen shows a description of the DLC location and whether the DLC is “covered” or “uncovered,” and includes a picture of the DLC location. Tap the Close button to close the DLC Locator screen and return to the Settings page. THEME SETTINGS Allows you to change the appearance of the tablet screens. -
Page 64: Report An Issue
REPORT AN ISSUE Did you encounter an OBD II connection issue or a DTC specific problem? Use this feature to record a log of the issue and send a direct message to Innova’s Technical Team to get support. To report an issue: Scroll to the Report an Issue field. -
Page 65: View User's Manual
SETTINGS View User’s Manual Tap the Stop Logging button A dialog screen displays with the vehicle’s information and tool information Enter your Email, Phone, and Issue Description (these are required fields). If an email is displayed, tap (Change) to enter a new email address Tap Submit to send your report, or Cancel to exit and return to the Home screen. -
Page 66: Support
SUPPORT The SUPPORT tab includes various support resources, including: Tool Library – access tool definitions and terminology Technical Support – directly connect with Innova’s Technical Support team via the tablet’s email function TOOL LIBRARY Accesses definitions of tool icons and Diagnostic Trouble Codes (DTCs). -
Page 67: Smog Check And I/M Program Led Definition
SUPPORT Tool Library SMOG CHECK AND I/M PROGRAM LED DEFINITION Tap the Smog Check and I/M Program LED Definition button The Smog Check and I/M Program LED Definition dialog displays Tap Cancel to return to the Tool Library selection screen ICON MONITOR STATUS Defines the icon monitor status’... -
Page 68: Technical Support
Tap Cancel to return to the Tool Library selection screen TECHNICAL SUPPORT The Innova Electronics technical team is based in Irvine, California and is always ready to help! To connect with Technical Support: From the Home page, tap SUPPORT. (You can also access it from the... -
Page 69: Warranty+ Customer Service
CUSTOMER SERVICE Our ASE Certified technical staff is here to help if you have any questions or require service. For information on UPDATES and OPTIONAL ACCESSORIES, please contact your local store, distributor or Innova’s Service Center. USA & Canada: (800) 544-4124... -
Page 70: Glossary
GLOSSARY OBD2 Terminology GLOSSARY OBD2 TERMINOLOGY The following terms and their definitions are related to OBD2 systems. Powertrain Control Module (PCM) - The PCM is the OBD2 accepted term for the vehicle’s “on-board computer.” In addition to controlling the engine management and emissions systems, the PCM also participates in controlling the powertrain (transmission) operation. -
Page 71: Obd2 Monitors
GLOSSARY OBD2 Monitors OBD2 Drive Cycle requirements vary from one model of vehicle to another. Vehicle manufacturers set these procedures. Consult your vehicle’s service manual for OBD2 Drive Cycle procedures. NOTE: Do not confuse a “Trip” Drive Cycle with an OBD2 Drive Cycle. A “Trip” Drive Cycle provides the “Enabling Criteria”... -
Page 72: Additional Terminology + Acronyms
GLOSSARY Additional Terminology + Acronyms = Oxygen Sensor Heater Monitor = Catalyst Monitor = Heated Catalyst Monitor = EGR (Exhaust Gas Recirculation) System Monitor = EVAP System Monitor = Secondary Air System Monitor NOTE: The following Monitors became standard beginning in 2010. The majority of vehicles produced before this time will not support these Monitors. - Page 73 Innova Electronics Corp. 17352 Von Karman Ave. Irvine, CA 92614 Copyright © 2022 IEC. All Rights Reserved. v.1.86.00...
Need help?
Do you have a question about the 7111 Smart and is the answer not in the manual?
Questions and answers