Table of Contents
Advertisement
Quick Links
Advertisement
Table of Contents

Related Manuals for NDS DTB01


Summary of Contents for NDS DTB01
- Page 1 DISPLAY BUS User Manual ENGLISH VALID FOR THE MODEL DTB01...
- Page 2 INSTRUCTIONS FOR THE PROPER DISPOSAL This electronic product is subject to the European Directive 2012/19 / EU. Comply with local waste disposal regulations, do not dispose of old products with normal household waste. The proper disposal of products that can no longer be used prevents potential negative consequences for the environment and for the population.
-
Page 3: Table Of Contents
INDEX 1. SAFETY INSTRUCTIONS 2. PACKAGE CONTENTS 3. DESCRIPTION 4. MAIN FEATURES 5. DISPLAY STRUCTURE 6. INSTALLAZIONE 7. SETUP INIZIALE 8. SCREEN STRUCTURE 9. CUSTOM CHARGING CURVE 10. OTHER SETTINGS 11. BATTERIES 12. BATTERY CHARGERS DC-DC 13. SOLAR REGULATORS AND SOLAR PANELS 12. -
Page 4: Safety Instructions
• The information contained in this manual may be changed without notice. NDS Energy s.r.l. reserves the right to make changes and improvements to the product at any time without notice and without obligation to apply these changes to the devices... -
Page 5: Package Contents
Tempra Lithium Battery, Power Service PSB DC-DC, Suncontrol2 SCE. In addition to the DTB01 display you can also use the App for iOS and Android smartphones, if there is an NDS device with Bluetooth in the N-BUS network. -
Page 6: Main Features
4. MAIN FEATURES N-BUS device energy parameter monitoring: State of • Charge (SoC) of Tempra battery, Solar Energy, DC-DC charge when vehicle is in motion. Accurate, real-time consumption monitoring. • Control of all N-BUS devices to activate or deactivate • a device, choose charge curve, select settings in general. -
Page 7: Installazione
6. INSTALLAZIONE Remove the DBT01 mounting frame a. Slide the display b. Lift up the lower c. Slide the display cover plate part of the display cover plate upwards in cover plate downwards, in relation to the relation to the rear mounting mounting frame, frame... -
Page 8: Setup Iniziale
6. Connect the DTB01 display to an NDS device with N- BUS. 7. SETUP INIZIALE The DTB01 Bus Display allows you to set up and control all networked N-BUS devices. When the display is started for the first time, it searches for all connected... - Page 9 3. After the start-up screen, set the required data by moving through the various screens with the selection buttons. As shown in the figures below. Setup can also be completed later. NOTE When starting the DTB01, only the setting menus for the connected devices are shown in succession.
- Page 10 STEP 1 - POWERING UP After pressing the power button, the loading screen is displayed and the N-BUS network is initialized. STEP 2 - LANGUAGE You can skip this step and Set the desired language. go directly to the home Press the red button at the page by clicking on the bottom right to go to the...
- Page 11 STEP 4 - TIME Set the time with the + and - buttons. When finished, continue to the next screen by pressing the red button at the bottom right. Or go back with the bottom left button. STEP 5 - BATTERY SETTINGS Set the capacity and technology of the leisure battery to be used.
- Page 12 To get more information on the charge values, click on the arrow for the desired charge curve, the display screen for the technical charge data will open. NOTE When the Tempra Battery is connected to the N-BUS network, the values for technology and Ah will automatically be set and cannot be changed.
-
Page 13: Screen Structure
8. SCREEN STRUCTURE The Home screen consists of an upper status bar (Status Bar), a central part dedicated to device widgets, and a lower navigation bar (Tab Bar). Status Bar Device Widgets Tab Bar The tab bar shows the icons of the active devices connected to the N-BUS network, the setting icon (Settings) and the return button to the Home Screen are also shown. - Page 14 The Status Bar displays icons relating to Bluetooth connectivity and 220V mains presence. The time, alarm notifications and the display standby button are also shown. STATUS BAR Main 220V Presence Notifications icon Display Bluetooth backlight off Time icon The widget section varies in order and form according to the connected devices.
-
Page 15: Custom Charging Curve
9. CUSTOM CHARGING CURVE With the DTB01 you can set a customized charging curve for your batteries to match the manufacturer's requirements. Follow the steps below to change the charging curve. STEP 1 From the home screen, click on the gear symbol to enter the settings menu. - Page 16 STEP 3 Set the desired values Select the desired options using the + and - buttons by marking the box, and on the side, then proceed set the required value with to the next screen using the + and - buttons on the t h e re d b u tto n a t t h e side, then proceed to the bottom right.
-
Page 17: Other Settings
10.OTHER SETTINGS SETTING SCREEN SELECTION From the home screen, click on the gear symbol to enter the settings menu. SETTINGS SCREEN 1/3 On page 1/3 of the settings m e n u y o u c a n s e l e c t settings by ticking the box, e.g. - Page 18 The Display submenu allows you to: • Set the backlight activity time • Set the time before display standby. • A c t i va te /d ea c t i va te a u d i o feedback when touching the display.
-
Page 19: Batteries
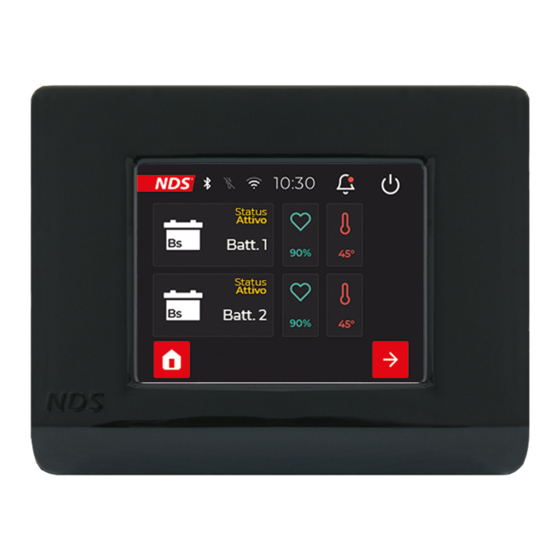
The screen shows all N-BUS devices connected in the same network. The device highlighted in blue is the Master, i.e. the Master is the device that manages all others. 11. BATTERIES BATTERY SCREEN Clicking on the battery icon on the Tab Bar displays all data of t h e T E M P R A b a t t e r i e s connected with the N-BUS. -
Page 20: Battery Chargers Dc-Dc
12.BATTERY CHARGERS DC-DC DC-DC SCREEN If a battery charger or DC-DC with N-BUS is present in the N-BUS network, it will be p o s s i b l e t o d i s p l a y t h e charging data of the leisure battery (voltage and current) and the voltage of the starter... -
Page 21: Solar Regulators And Solar Panels
13.SOLAR REGULATORS AND SOLAR PANELS SOLAR SCREEN If SunControl2 (SCE320, SCE360) is present in the N-BUS network, clicking on the solar panel icon on the Tab Bar displays all data concerning the solar panels and the controller. During charging, the charge status of the leisure batteries is also shown. -
Page 22: Technical Features
DISPLAY - DTB01 Display Type TFT 2,83" 262k full color Touch Screen 73mA @ MAX brightness Average consumption 33mA @ Display OFF 8mA during the night time Type of connection NDS Bus with 8m cable Operating temperature -10°C / +70°C... - Page 23 UE DECLARATION OF CONFORMITY Company: NDS ENERGY S.R.L. Address: Via Giovanni Pascoli, 96/98 65010 - Cappelle sul Tavo (PE) Italy Declare under our sole responsibility that the product: Commercial name: DISPLAY N_BUS DTB01 Models: To which this declaration applies complies with the...
-
Page 24: Warranty
12.WARRANTY... - Page 28 TUTTA L’ENERGIA CHE TI SERVE ALL THE ENERGY YOU NEED 0085_MANU_DTB01_GB03 NDS ENERGY S.R.L. Via Pascoli, 169 65010 Cappelle sul Tavo (Pe) Italy Tel.:+39 085 4470396 Web: www.ndsenergy.it Email: customer@ndsenergy.it LIKE US: facebook.com/ndsenergysrl...
Need help?
Do you have a question about the DTB01 and is the answer not in the manual?
Questions and answers