Table of Contents
Advertisement
Available languages
Available languages
Quick Links
TOOLS REQUIRED
Claw hammer
Safety goggles
Measuring tape
Wall hardware
Configuration Options
Stand-Alone Configuration:
If a Vanity Unit and Floor Hutch
are installed separately, there
is no need to use the 1/4 in.
spacers (CC) provided with the
Floor Hutch. The tops will be
centered on unit(s) with equal
overhang.
Wall-Hutch-Vanity Configuration: The two 1/4 in. spacers (CC)
are used to allow the Floor Hutch to be secured flush with the Vanity
Unit. Both tops will be installed flush on one side and the 1/2 in. top
overhang will be shifted to the opposite side.
WALL
1/4 IN.
SPACER
(CC)
Wall-Vanity-Hutch-Vanity Configuration: A 5/8 in. spacer is needed
to allow the Floor Hutch to be secured flush with the first Vanity Unit. The
5/8 in. spacer is available through customer service (free of charge).
The two 1/4 in. spacers (CC) provided are used to install the second
Vanity Unit flush with the Floor Hutch. The top overhang will be shifted
to the outer side of the Vanity Unit. The Floor Hutch top will be centered.
WALL
5/8 IN. SPACER
Phillips screwdriver
Caulk/sealant
EQUAL OVERHANG
TOP OVERHANG
OVERHANG
1/4 IN. SPACER (CC)
Use and Care Guide
Power drill
Masking Tape
Level
Vanity-Hutch Configuration: If a Vanity Unit and Floor Hutch are tied
together but not butted against a wall, the two 1/4 in. spacers (CC)
are used to tie the Floor Hutch and Vanity Unit together. The 1/2 in. top
overhang is shifted to one side of the Vanity Unit. The Floor Hutch top
is centered on the unit with equal overhang.
1/4 IN. SPACER
(CC)
Wall-Vanity-Hutch Configuration: A 5/8 in. spacer is needed to
allow the Floor Hutch to be installed flush with the Vanity Unit and
provide space for the top overhang between the Vanity Unit and
Floor Hutch. The 5/8 in. spacer is available through customer
service (free of charge).
WALL
5/8 IN. SPACER IS USED TO FILL
GAP BEHIND THE FACE FRAME
AND TIE THE UNITS TOGETHER.
Hutch-Vanity-Hutch-
Configuration: When the Vanity
Unit is installed with two Floor
Hutches, four 5/8 in. spacers
are needed. The 5/8 in. spacers
are available through customer
service (free of charge). After
Installation, use silicon to seal
the space between the Vanity
Unit top and Floor Hutch side
panel (A). The Floor Hutch tops
will be centered.
Item #1000 000 000
1000 000 000
Model #PPSOFWHT12H
PPSOFSVL12H
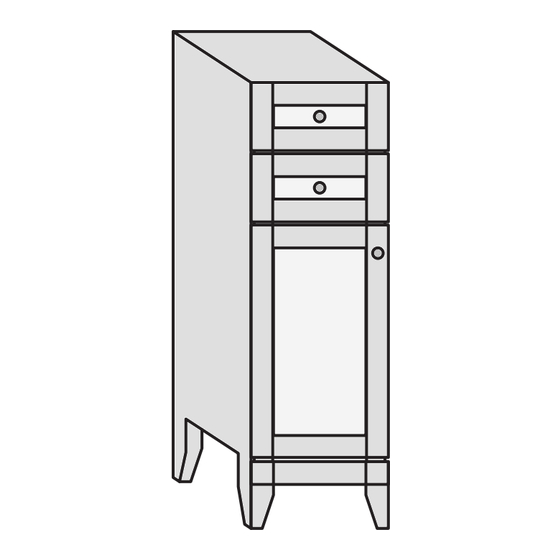
Floor Hutch
HARDWARE INCLUDED
AA - Knobs
BB - Knob
x 3
Screws x 3
CC - 1/4 in. Spacers x2
OVERHANG
1/4 IN. SPACER (CC)
OR
OVERHANG
1/2 IN. OVERHANG
A
5/8 IN.
SPACERS
HOMEDEPOT.COM
Please contact 1-888-774-8062 for further assistance.
Advertisement
Table of Contents

Related Manuals for Glacier bay PPSOFWHT12H


Summary of Contents for Glacier bay PPSOFWHT12H
- Page 1 Item #1000 000 000 1000 000 000 Model #PPSOFWHT12H PPSOFSVL12H Use and Care Guide Floor Hutch TOOLS REQUIRED HARDWARE INCLUDED Claw hammer Safety goggles Phillips screwdriver Power drill AA - Knobs BB - Knob Screws x 3 Measuring tape Wall hardware...
- Page 2 Installation PLANNING AHEAD SECURING UNITS TOGETHER (A) □ The Vanity Unit top has an overhang; spacers are used to fill NOTE: Before installation, make sure all parts are present. the space between units allowing them to be secured together. Compare parts with the Hardware Included list. If any part is missing or damaged, do not attempt to install the product.
- Page 3 Installation (continued) HINGES CHANGING DOOR OPENING INSTALLING HARDWARE □ In typical installations, the door □ Drill door hardware holes using opens from the right. To open from clamped wood block (1) to the left, unattach hinges from the protect the finish. □...
- Page 4 Núm. de artículo 1000 003 005 Núm. de modelo DSDEC12-JVM Guía de uso y cuidado Armario de piso HERRAMIENTAS REQUERIDAS HERRAJE INCLUIDO Martillo de garra Gafas de seguridad Destornillador Phillips Taladro BB - Tornillos de FF - Perillas x 3 perilla x 3 Cinta métrica Herraje de pared...
- Page 5 Instalación PLANIFICACIÓN ANTICIPADA CÓMO ASEGURAR ENTRE SÍ LAS UNIDADES (A) □ La cubierta de la unidad de tocador tiene un saliente; los separadores NOTA: Antes de comenzar a instalar, asegúrese de que todas son usados para llenar el espacio entre las unidades permitiéndoles las partes estén presentes.
- Page 6 Instalación (continuación) BISAGRAS CÓMO CAMBIAR LA INSTALACIÓN DEL HERRAJE APERTURA DE LA PUERTA □ Perfore agujeros de herraje de puerta □ En instalaciones típicas, la puerta abre usando bloques de madera sujetados desde la derecha. Para abrir desde la (1) para proteger izquierda, quite las bisagras del panel el acabado.
Need help?
Do you have a question about the PPSOFWHT12H and is the answer not in the manual?
Questions and answers